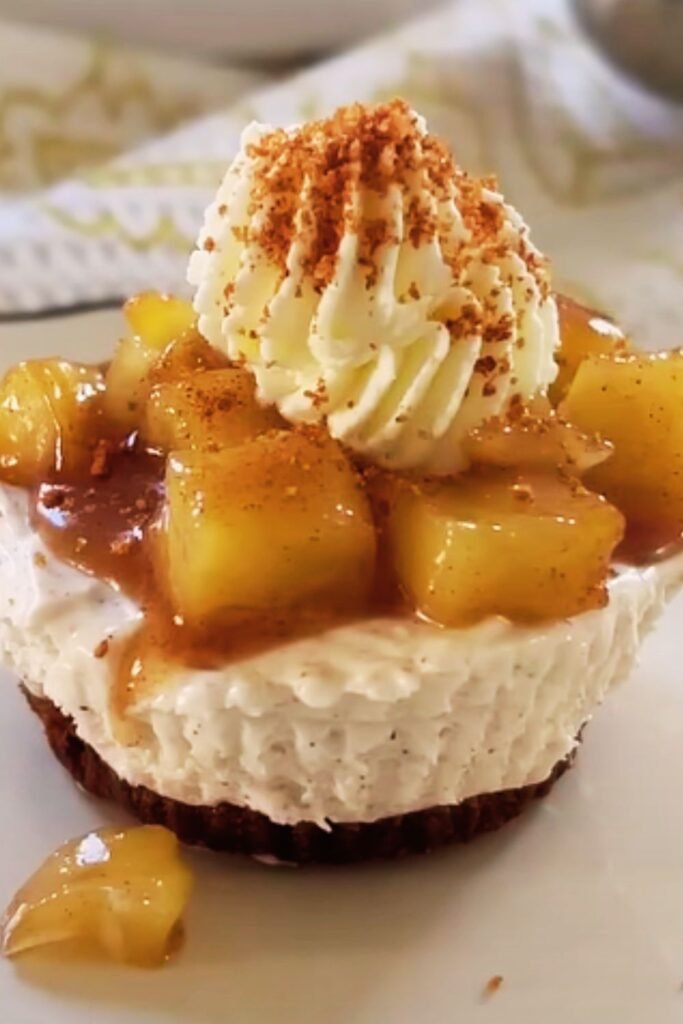
When I first discovered the magic of combining apple pie with cheesecake in cookie form, I knew I had stumbled upon something truly special. These Apple Pie Cheesecake Cookies represent the perfect marriage of three beloved desserts, creating a treat that’s both familiar and excitingly new. The buttery cookie base provides the perfect foundation for a creamy cheesecake layer, while the spiced apple topping brings all those cozy autumn flavors we crave.
What makes these cookies particularly special is how they capture the essence of a classic apple pie and rich cheesecake in a handheld format. I’ve spent countless hours perfecting this recipe, and I’m excited to share every detail with you. Whether you’re planning a fall gathering, looking for a unique dessert to impress guests, or simply want to treat yourself to something extraordinary, these cookies deliver on every level.
Understanding the Components
Cookie Base Fundamentals
The foundation of these remarkable cookies starts with what I call the “golden trio” of cookie ingredients. The base combines the richness of butter, the structure of flour, and the perfect amount of sugar to create a cookie that’s sturdy enough to hold the toppings yet tender enough to bite through easily.
Butter Temperature: Room temperature butter is crucial for proper creaming. I always take my butter out at least two hours before baking, or you can soften it quickly by cutting it into small pieces.
Flour Selection: All-purpose flour works best for these cookies, providing the right balance of structure and tenderness. I never recommend substituting with cake flour, as it won’t provide adequate support for the toppings.
Sugar Balance: The combination of granulated and light brown sugar creates both sweetness and moisture, while the brown sugar adds a subtle molasses note that complements the apple flavors beautifully.
Cheesecake Layer Secrets
The cheesecake component is where these cookies truly shine. I use full-fat cream cheese exclusively because it provides the rich, tangy flavor and smooth texture that defines authentic cheesecake. The addition of sour cream might seem unusual, but it’s my secret ingredient for achieving that perfect tangy balance.
Cream Cheese Preparation: Always use room temperature cream cheese to avoid lumps. I recommend leaving it out for at least three hours, or you can soften it in the microwave using 15-second intervals.
Egg Integration: The egg yolk in the cheesecake layer provides richness and helps bind the mixture. I always use the freshest eggs possible for the best flavor and texture.
Apple Topping Mastery
The apple topping is where the magic of fall flavors comes alive. I prefer using a combination of Granny Smith and Honeycrisp apples because they provide the perfect balance of tartness and sweetness, plus they hold their shape well during baking.
Apple Preparation: Dice the apples into small, uniform pieces about ¼ inch in size. This ensures even cooking and prevents the pieces from overwhelming the cookie base.
Spice Blend: My signature spice blend includes cinnamon, nutmeg, and just a touch of allspice. The key is balancing these warm spices without letting any single flavor dominate.
Essential Ingredients Breakdown
| Ingredient Category | Specific Ingredients | Purpose | Pro Tips |
|---|---|---|---|
| Cookie Base | Unsalted butter (1 cup) | Provides richness and structure | Use European-style butter for superior flavor |
| All-purpose flour (2 cups) | Creates cookie structure | Measure by weight for consistency | |
| Granulated sugar (½ cup) | Sweetness and texture | Fine sugar dissolves better | |
| Light brown sugar (¼ cup) | Moisture and molasses flavor | Pack firmly when measuring | |
| Vanilla extract (1 tsp) | Enhances overall flavor | Use pure vanilla, never imitation | |
| Salt (½ tsp) | Balances sweetness | Sea salt provides cleaner taste | |
| Cheesecake Layer | Cream cheese (8 oz) | Provides creamy, tangy base | Philadelphia brand works best |
| Sour cream (2 tbsp) | Adds tang and smoothness | Full-fat only for richness | |
| Powdered sugar (¼ cup) | Sweetness without grittiness | Sift to remove lumps | |
| Egg yolk (1 large) | Binding and richness | Use room temperature | |
| Vanilla extract (½ tsp) | Complements cream cheese | High-quality extract essential | |
| Apple Topping | Granny Smith apples (2 medium) | Provides tartness and structure | Choose firm, unblemished apples |
| Honeycrisp apples (1 medium) | Adds sweetness and texture | Substitute with Gala if unavailable | |
| Ground cinnamon (1 tsp) | Warm, sweet spice | Use Ceylon cinnamon for best flavor | |
| Ground nutmeg (¼ tsp) | Aromatic warmth | Freshly grated preferred | |
| Ground allspice (⅛ tsp) | Complex flavor depth | Use sparingly to avoid overpowering | |
| Granulated sugar (2 tbsp) | Sweetens and helps caramelize | Helps create syrupy coating | |
| Cornstarch (1 tbsp) | Thickens apple juices | Prevents soggy cookies |
Step-by-Step Preparation Guide
Phase 1: Cookie Base Preparation
I always start with the cookie base because it needs to be completely cooled before adding the cheesecake layer. Begin by preheating your oven to 350°F (175°C). Line your baking sheets with parchment paper, leaving some overhang for easy removal.
In a large mixing bowl, cream together the room temperature butter with both sugars until the mixture is light and fluffy, about 3-4 minutes with an electric mixer. This creaming process is crucial for creating the right texture. Add the vanilla extract and salt, mixing until just combined.
Gradually add the flour, mixing on low speed until a soft dough forms. Don’t overmix at this stage, as it can lead to tough cookies. The dough should be soft but not sticky. If it’s too sticky, add a tablespoon of flour at a time until it reaches the right consistency.
Using a cookie scoop or spoons, portion the dough into 2-inch balls and place them on the prepared baking sheets, spacing them about 2 inches apart. Gently flatten each ball with your fingers or the bottom of a glass to create a slight indent in the center where the cheesecake layer will sit.
Phase 2: Cheesecake Layer Creation
While the cookie bases are cooling, prepare the cheesecake layer. In a medium bowl, beat the room temperature cream cheese until smooth and creamy, about 2 minutes. Add the sour cream, powdered sugar, egg yolk, and vanilla extract, beating until the mixture is completely smooth with no lumps.
The consistency should be thick enough to hold its shape but spreadable. If it’s too thick, add a teaspoon of milk. If it’s too thin, refrigerate for 15 minutes to firm up slightly.
Phase 3: Apple Topping Assembly
Peel and core the apples, then dice them into small, uniform pieces. In a medium saucepan, combine the diced apples with sugar, cinnamon, nutmeg, allspice, and cornstarch. Cook over medium heat, stirring frequently, until the apples are tender but still hold their shape, about 8-10 minutes.
The mixture should be slightly thickened and syrupy. Remove from heat and let cool for 10 minutes. The apples will continue to absorb the syrup as they cool, creating the perfect consistency for topping.
Phase 4: Assembly and Final Baking
Once your cookie bases have cooled completely, carefully spread about 1 tablespoon of the cheesecake mixture onto each cookie, leaving a small border around the edges. Top each cookie with a generous spoonful of the apple mixture, distributing it evenly.
Return the cookies to the oven for an additional 12-15 minutes, until the cheesecake layer is set but still slightly jiggly in the center. The edges should be lightly golden. Remove from the oven and allow to cool on the baking sheet for 5 minutes before transferring to a wire rack.
Perfecting Your Technique
Temperature Control Mastery
Temperature control is absolutely critical for these cookies. I’ve learned that baking at exactly 350°F ensures the cookie base cooks through without burning while allowing the cheesecake layer to set properly. If your oven runs hot, reduce the temperature by 25°F and extend the baking time slightly.
Timing Precision
The initial baking time for the cookie base is crucial. Underbaked bases will be too soft to support the toppings, while overbaked bases become hard and lose their tender texture. Look for edges that are just set but centers that still appear slightly soft.
Cooling Considerations
Never attempt to add the cheesecake layer to warm cookies. The heat will cause the cream cheese mixture to melt and slide off. I always allow my cookie bases to cool for at least 30 minutes before proceeding with assembly.
Nutritional Analysis and Serving Information
| Nutritional Aspect | Per Cookie | Daily Value % | Notes |
|---|---|---|---|
| Calories | 285 | 14% | Based on 2000 calorie diet |
| Total Fat | 15g | 23% | Primarily from butter and cream cheese |
| Saturated Fat | 9g | 45% | Higher due to dairy content |
| Cholesterol | 65mg | 22% | From butter, cream cheese, and egg |
| Sodium | 180mg | 8% | Moderate level from butter and salt |
| Total Carbohydrates | 35g | 12% | From flour, sugars, and apples |
| Dietary Fiber | 2g | 8% | Contributed by apples and flour |
| Sugars | 22g | – | Natural and added sugars combined |
| Protein | 4g | 8% | From cream cheese, egg, and flour |
| Vitamin C | 3mg | 3% | From fresh apples |
| Calcium | 45mg | 4% | From dairy ingredients |
Storage and Preservation Methods
Short-term Storage
These cookies are best enjoyed fresh but can be stored at room temperature for up to 2 days in an airtight container. Place parchment paper between layers to prevent the cheesecake layer from sticking to other cookies.
Refrigeration Guidelines
For longer storage, refrigerate the cookies in an airtight container for up to 5 days. The cheesecake layer actually improves in texture after a day in the refrigerator, becoming firmer and more set.
Freezing Instructions
These cookies freeze beautifully for up to 3 months. Wrap individual cookies in plastic wrap, then place in a freezer-safe container. Thaw at room temperature for 30 minutes before serving.
Troubleshooting Common Issues
Cookie Base Problems
Spreading Too Much: This usually indicates butter that was too warm or overmixed dough. Ensure butter is at proper room temperature (cool to the touch but easily pressed).
Too Hard: Overbaking is the most common cause. Reduce baking time by 2-3 minutes and check doneness by gently pressing the center.
Cracking: This happens when the dough is too dry or the oven temperature is too high. Add a tablespoon of milk to the dough if it seems dry.
Cheesecake Layer Issues
Curdling: This occurs when ingredients are at different temperatures. Ensure all dairy ingredients are at room temperature before mixing.
Too Runny: The mixture may be too warm or the cream cheese wasn’t properly softened. Refrigerate for 15 minutes to firm up.
Cracking During Baking: This happens when the cheesecake layer is overbaked. Reduce the final baking time by 2-3 minutes.
Apple Topping Challenges
Too Watery: The apples released too much juice. Add an extra teaspoon of cornstarch and cook a bit longer to thicken.
Mushy Apples: This happens when apples are overcooked or the wrong variety is used. Stick to firm varieties like Granny Smith.
Bland Flavor: Increase the spice quantities gradually, tasting as you go. Fresh spices make a significant difference.
Creative Variations and Adaptations
Seasonal Modifications
Summer Version: Replace apples with fresh peaches or berries, adjusting spices to complement the fruit choice.
Winter Holiday: Add crystallized ginger to the apple mixture and a pinch of cardamom to the cheesecake layer.
Spring Twist: Use diced strawberries mixed with a touch of lemon zest in the cheesecake layer.
Dietary Adaptations
Reduced Sugar: Cut the sugar in each component by one-third. The cookies will be less sweet but still delicious.
Gluten-Free: Substitute the all-purpose flour with a 1:1 gluten-free baking flour blend.
Dairy-Free: Use vegan cream cheese and plant-based butter. The texture will be slightly different but still enjoyable.
Serving Suggestions and Presentation
Elegant Presentation Ideas
I love serving these cookies on a rustic wooden board with a dusting of powdered sugar and a few apple slices as garnish. The contrast between the refined flavors and casual presentation creates an inviting atmosphere.
Beverage Pairings
These cookies pair beautifully with hot coffee, especially a medium roast that won’t overpower the delicate flavors. Hot cider or chai tea also complement the apple and spice notes perfectly. For cold beverages, try them with cold brew coffee or even a glass of cold milk.
Portion Considerations
One cookie is typically sufficient per person as a dessert, though I often find guests reaching for a second one. If serving at a party, plan for 1.5 cookies per guest to ensure everyone gets their fill.
Advanced Techniques for Experienced Bakers
Flavor Enhancement Methods
Brown Butter: Brown the butter for the cookie base to add a nutty depth of flavor that complements the apple notes beautifully.
Spice Infusion: Toast whole spices and grind them fresh for an incredibly aromatic apple topping.
Vanilla Bean: Use vanilla bean paste instead of extract in the cheesecake layer for those beautiful vanilla specks and more intense flavor.
Texture Improvements
Cream Cheese Tempering: Bring cream cheese to room temperature gradually by cutting it into cubes and letting it sit for 2-3 hours for the smoothest texture.
Apple Preparation: Toss diced apples with a little lemon juice to prevent browning and add brightness to the flavor profile.
Professional Finishing Touches
Caramel Drizzle: A light drizzle of homemade caramel over the finished cookies adds restaurant-quality appeal.
Chopped Nuts: Toasted pecans or walnuts sprinkled on top add textural contrast and complementary flavors.
The Science Behind Perfect Cookies
Chemical Reactions in Baking
Understanding the science behind these cookies helps ensure consistent results. The creaming process incorporates air into the butter, creating a tender texture. The proteins in the flour develop just enough gluten to provide structure without toughness.
Moisture Management
The apple topping contains natural moisture that could make cookies soggy. The cornstarch acts as a thickening agent, while the initial cooking process removes excess water while concentrating flavors.
Temperature Effects
The staged baking process allows each component to cook at its optimal temperature. The cookie base needs higher initial heat to set properly, while the cheesecake layer requires gentler heat to prevent curdling.
Frequently Asked Questions
Q: Can I make these cookies ahead of time for a party? A: Absolutely! I recommend making them the day before serving. The flavors actually improve overnight, and the cheesecake layer sets to the perfect consistency. Store them covered in the refrigerator and bring to room temperature 30 minutes before serving.
Q: Why do my cookies spread too much during baking? A: Cookie spreading is usually caused by butter that’s too warm or dough that’s been overmixed. Make sure your butter is at proper room temperature (cool to the touch but easily pressed) and mix the dough just until combined.
Q: Can I substitute the sour cream in the cheesecake layer? A: While sour cream adds the perfect tang, you can substitute it with an equal amount of Greek yogurt. However, I don’t recommend omitting it entirely as it contributes to both flavor and texture.
Q: How do I know when the cheesecake layer is properly set? A: The cheesecake layer should be set around the edges but still slightly jiggly in the center when you gently shake the pan. It will continue to set as it cools. Overbaking will cause it to crack and become grainy.
Q: Can I use different apple varieties? A: While I recommend the Granny Smith and Honeycrisp combination, you can experiment with other firm varieties. Avoid very soft apples like Red Delicious, which will break down too much during cooking.
Q: What’s the best way to dice apples evenly? A: I use a technique where I cut the apple into quarters, remove the core, then cut each quarter into thin slices before dicing. This ensures uniform pieces that cook evenly.
Q: Can I freeze the cookie dough for later use? A: Yes! You can freeze the shaped cookie dough balls on a baking sheet, then transfer to freezer bags. Bake directly from frozen, adding 2-3 minutes to the baking time.
Q: How do I prevent the cheesecake layer from sliding off the cookies? A: Make sure your cookie bases are completely cool before adding the cheesecake layer. Also, create a small indent in each cookie base to help hold the topping in place.
Q: What should I do if my apple topping is too sweet? A: Add a squeeze of fresh lemon juice to balance the sweetness. The acidity will brighten the flavors and cut through the richness of the cheesecake layer.
Q: Can I make mini versions of these cookies? A: Absolutely! Use a smaller cookie scoop and reduce all topping amounts proportionally. Mini versions will need about 2-3 minutes less baking time for each stage.
These Apple Pie Cheesecake Cookies represent the perfect fusion of comfort and sophistication. Every bite delivers the familiar warmth of apple pie, the richness of cheesecake, and the satisfaction of a perfectly baked cookie. Whether you’re an experienced baker or someone looking to try something new, this recipe provides the detailed guidance needed to create something truly special. The combination of textures and flavors makes these cookies a memorable treat that will have everyone asking for the recipe.