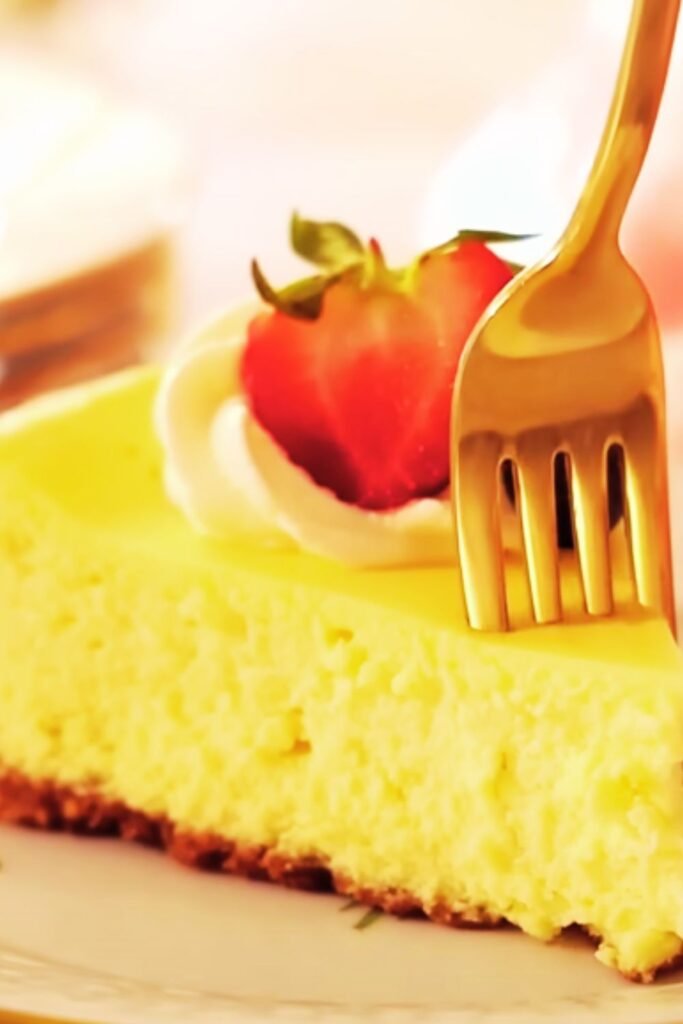
There’s something magical about the moment when you slice into a perfectly set cheesecake and discover beautiful ruby-red swirls dancing through creamy, ivory-colored filling. I’ve been perfecting my cherry ripple cheesecake recipe for years, and I can confidently say it’s become the crown jewel of my dessert repertoire. This isn’t just another cheesecake – it’s a showstopper that combines the tangy richness of classic New York-style cheesecake with the sweet-tart complexity of fresh cherries.
My journey with this recipe began during a particularly memorable summer when my cherry tree was bursting with fruit. I found myself with pounds of beautiful, plump cherries and a desperate need to preserve their peak-season flavor. After several attempts and minor disasters (including one memorable incident involving a cracked cheesecake that still tasted incredible), I finally achieved the perfect balance of creamy texture and fruity swirls that makes this dessert so irresistible.
Understanding the Art of Cherry Ripple Cheesecake
Cheesecake Base : The foundation of any great cheesecake lies in achieving the perfect texture – smooth, dense, and rich without being heavy or overly sweet.
Cherry Ripple : This refers to the beautiful marbled effect created by gently swirling cherry sauce through the cheesecake batter before baking.
Water Bath Method : A technique where the cheesecake pan sits in a larger pan filled with hot water during baking, ensuring even cooking and preventing cracks.
Springform Pan : A specialized baking pan with removable sides that makes unmolding delicate desserts like cheesecake much easier.
The secret to my cherry ripple cheesecake lies in understanding how different components work together. I’ve learned that the key to preventing that dreaded crack on top is all about temperature control and moisture. The cherry ripple isn’t just decorative – it adds pockets of concentrated fruit flavor that complement the rich, tangy base beautifully.
Essential Ingredients and Their Roles
| Ingredient | Quantity | Purpose | Quality Tips |
|---|---|---|---|
| Cream Cheese | 32 oz (4 packages) | Primary base, provides richness and tang | Must be at room temperature for smooth mixing |
| Fresh Cherries | 2 cups, pitted | Creates the ripple effect and flavor bursts | Choose firm, dark red cherries for best flavor |
| Granulated Sugar | 1 cup | Sweetens and helps with texture | Regular white sugar works best |
| Large Eggs | 4 whole eggs | Binding agent and structure | Room temperature eggs incorporate better |
| Vanilla Extract | 2 teaspoons | Enhances overall flavor profile | Pure vanilla extract, not imitation |
| Sour Cream | 1 cup | Adds tang and prevents cracking | Full-fat sour cream for best results |
| Graham Crackers | 1½ cups, crushed | Creates the crust foundation | Fresh crackers, not stale ones |
| Butter | 6 tablespoons, melted | Binds the crust ingredients | Unsalted butter for better flavor control |
| Cornstarch | 3 tablespoons | Thickens cherry sauce | Prevents runny ripples |
| Lemon Juice | 2 tablespoons | Brightens cherry flavor | Fresh lemon juice, not bottled |
I’ve experimented with various cherry varieties over the years, and I’ve found that sweet cherries like Bing or Rainier work beautifully, while tart cherries like Montmorency add an extra dimension of flavor complexity. The key is ensuring your cherries are ripe but still firm – overly soft cherries can make your ripple sauce too watery.
Mastering the Cherry Sauce
The cherry ripple sauce is where magic happens, and I’ve refined my technique through countless batches. Here’s my foolproof method:
- Prepare the cherries: Remove pits carefully, keeping cherry pieces relatively large for texture
- Cook with sugar: Combine cherries with ¼ cup sugar and cook over medium heat until juices release
- Add thickening agent: Whisk cornstarch with cold water before adding to prevent lumps
- Simmer until thick: Cook until the sauce coats the back of a spoon but remains pourable
- Cool completely: This prevents the sauce from cooking the cheesecake batter when swirled
The consistency should be similar to a thick jam – not too thin that it disappears into the batter, but not so thick that it doesn’t swirl easily. I always make my cherry sauce a day ahead, which allows the flavors to meld and ensures it’s completely cool when I need it.
Step-by-Step Preparation Method
Creating the Perfect Crust
My graham cracker crust technique has evolved significantly over the years. I’ve learned that the secret lies in achieving just the right balance of moisture and compaction:
- Crush crackers uniformly: I use a food processor for the most consistent texture, pulsing until I have fine, even crumbs
- Mix with melted butter: The butter should be warm enough to distribute evenly but not so hot that it melts the sugar
- Press firmly but gently: I use the bottom of a measuring cup to create an even layer that won’t crumble when sliced
- Pre-bake briefly: A 10-minute stint in the oven helps set the crust and prevents sogginess
Perfecting the Cheesecake Filling
The filling is where patience truly pays off. I’ve learned that rushing this step almost always leads to lumpy, dense results:
- Room temperature ingredients: This cannot be overstated – cold cream cheese will never blend smoothly, no matter how long you mix
- Sequential mixing: Add ingredients in the right order, mixing each addition just until combined
- Scrape bowl frequently: Ensure no unmixed pockets remain hiding at the bottom
- Strain if necessary: For the silkiest texture, I sometimes strain the batter through a fine-mesh sieve
The Ripple Technique
Creating beautiful, even ripples requires a gentle touch and the right tools:
- Pour most of the batter: Fill the pan with about 90% of the plain cheesecake mixture
- Add cherry sauce strategically: Drop spoonfuls of cooled cherry sauce across the surface
- Create initial swirls: Use a knife tip to make large figure-eight motions
- Refine the pattern: Add remaining batter and create smaller swirls for complexity
- Avoid overmixing: Stop when you achieve a marbled effect – too much mixing creates muddy colors
Baking Techniques for Success
| Temperature Phase | Time | Temperature | Purpose |
|---|---|---|---|
| Initial Bake | 15 minutes | 350°F (175°C) | Sets the outer edges |
| Reduced Heat | 45-55 minutes | 325°F (160°C) | Gentle cooking through center |
| Oven Off | 1 hour | Door cracked | Gradual cooling prevents cracks |
| Room Temperature | 2 hours | Ambient | Complete cooling |
| Refrigeration | 8+ hours | 35°F (2°C) | Final setting and flavor development |
The water bath method has been absolutely crucial in my cheesecake success. I wrap the bottom of my springform pan in heavy-duty aluminum foil and place it in a roasting pan. The hot water should come about halfway up the sides of the cheesecake pan. This creates a gentle, humid environment that prevents the top from drying out and cracking.
I’ve learned to recognize the signs of a perfectly baked cheesecake: the center should have just a slight jiggle when you gently shake the pan, and the top should be set but not browned. The internal temperature should reach about 150°F (65°C) in the center.
Troubleshooting Common Issues
Preventing Cracks
Temperature Shock Prevention : Gradual temperature changes are essential – I never move my cheesecake directly from a hot oven to a cold refrigerator.
Proper Mixing Technique : Overmixing incorporates too much air, which expands during baking and can cause cracks as it deflates.
Water Bath Consistency : Maintaining steady moisture levels throughout baking helps prevent the surface from drying out.
Achieving Smooth Texture
Through years of experience, I’ve identified the most common culprits behind grainy or lumpy cheesecake:
- Cold ingredients: Always bring cream cheese, eggs, and sour cream to room temperature before mixing
- Overmixing: Once eggs are added, mix just until combined to prevent incorporating excess air
- Old cream cheese: Check expiration dates – old cream cheese doesn’t blend as smoothly
- Improper straining: If lumps persist, strain the batter before adding cherry swirls

Nutritional Information and Serving Details
| Nutrient | Per Slice (1/12 of cake) | Daily Value % |
|---|---|---|
| Calories | 425 | 21% |
| Total Fat | 28g | 36% |
| Saturated Fat | 17g | 85% |
| Cholesterol | 145mg | 48% |
| Sodium | 285mg | 12% |
| Total Carbs | 35g | 13% |
| Dietary Fiber | 1g | 4% |
| Sugars | 32g | – |
| Protein | 8g | 16% |
| Calcium | 125mg | 10% |
| Vitamin C | 8mg | 9% |
I always remind people that cheesecake is definitely an indulgent treat, but the portion sizes are quite rich, so a little goes a long way. The cherries do add some beneficial antioxidants and vitamin C, which makes me feel slightly better about the indulgence!
Storage and Serving Recommendations
Proper storage is crucial for maintaining both flavor and texture. I’ve learned these lessons through some unfortunate experiences with dried-out or overly moist cheesecakes:
Short-term Storage
- Refrigerate immediately: After cooling completely, cover tightly with plastic wrap
- Optimal temperature: Keep at 35-38°F (2-3°C) for up to 5 days
- Prevent odor absorption: Cheesecake readily absorbs refrigerator odors, so proper wrapping is essential
Long-term Storage
- Freeze whole or in slices: Wrap individual pieces in plastic wrap, then aluminum foil
- Maximum freezer time: Up to 3 months for best quality
- Thawing process: Move to refrigerator 6-8 hours before serving
Serving Suggestions
I love experimenting with different accompaniments that complement the cherry ripple flavor:
- Fresh berry medley: Strawberries, blueberries, and raspberries create a beautiful color contrast
- Vanilla bean whipped cream: Light and airy, it balances the rich cheesecake
- Toasted almond slices: Add texture and nutty flavor that pairs wonderfully with cherries
- Mint garnish: Fresh spearmint leaves provide a bright, aromatic finish
- Chocolate shavings: Dark chocolate creates an elegant presentation
- Caramel drizzle: For those who enjoy sweet-on-sweet combinations
Seasonal Variations and Adaptations
Summer Adaptations
During peak cherry season, I sometimes add fresh cherry halves directly to the batter for extra fruit pieces throughout. I’ve also experimented with adding a touch of almond extract, which enhances the cherry flavor beautifully.
Winter Modifications
When fresh cherries aren’t available, I’ve successfully used frozen cherries (thawed and drained) or even high-quality cherry preserves thinned with a little lemon juice. The key is adjusting the sugar content accordingly.
Dietary Accommodations
Gluten-Free Version : Replace graham crackers with gluten-free cookies or crushed nuts for the crust
Reduced Sugar Option : Use sugar substitutes, but reduce liquid slightly as some artificial sweeteners don’t behave identically to sugar
Lighter Version : Substitute part of the cream cheese with Greek yogurt, though this does change the texture slightly
Professional Tips from My Kitchen
After making hundreds of cheesecakes, I’ve developed some techniques that consistently produce professional-quality results:
Equipment Recommendations
- 9-inch springform pan: The standard size that works best for this recipe
- Electric mixer: Stand mixer preferred, but hand mixer works with patience
- Rubber spatula: Essential for proper mixing and scraping
- Fine-mesh strainer: For silky-smooth batter if needed
- Offset spatula: Perfect for smoothing the top before baking
Timing Strategy
I always plan my cheesecake making around the fact that it needs significant chilling time. My preferred schedule is:
- Day 1: Make cherry sauce and let it cool overnight
- Day 2: Prepare and bake cheesecake in the morning, cool all day
- Day 3: Serve at peak flavor and texture
This timeline allows all flavors to develop fully and ensures the texture is perfect when serving.
Frequently Asked Questions
Q: Why did my cheesecake crack on top? The most common causes are temperature shock, overmixing, or overbaking. I always use a water bath and let my cheesecake cool gradually in the oven with the door cracked open. This prevents the sudden temperature change that often causes cracking.
Q: Can I make this cheesecake without a water bath? While possible, I don’t recommend it. The water bath provides gentle, even heat that prevents cracking and ensures creamy texture. If you absolutely must skip it, reduce the oven temperature by 25°F and watch carefully for doneness.
Q: How do I know when my cheesecake is done baking? The center should have just a slight jiggle when you gently shake the pan. The edges should be set and slightly puffed. An instant-read thermometer should register 150°F (65°C) in the center.
Q: Can I use frozen cherries instead of fresh? Yes, but thaw them completely and drain excess liquid before making the sauce. Frozen cherries often release more juice, so you may need to cook the sauce longer to achieve the right consistency.
Q: My cherry ripple sank to the bottom. What went wrong? This usually happens when the cherry sauce is too thin or too warm when added to the batter. Make sure your sauce has cooled completely and has a jam-like consistency before swirling.
Q: How far in advance can I make this cheesecake? Cheesecake actually improves with time! I often make mine 2-3 days before serving. It can be stored in the refrigerator for up to 5 days, and the flavors continue to meld beautifully.
Q: Can I substitute the sour cream with something else? Greek yogurt works as a substitute, though it will create a slightly different texture. Heavy cream mixed with a tablespoon of lemon juice can also work in a pinch, but sour cream really does provide the best flavor and texture combination.
Q: Why is my cheesecake dense and heavy? This usually results from overmixing after adding the eggs, or from using cold ingredients. Always bring everything to room temperature and mix just until combined once the eggs are incorporated.
Making the perfect cherry ripple cheesecake has been one of my most rewarding baking adventures. The combination of creamy, tangy cheesecake with beautiful swirls of sweet-tart cherry creates a dessert that never fails to impress. While it requires patience and attention to detail, the results are absolutely worth the effort. Every time I serve this cheesecake, I’m reminded why I fell in love with baking in the first place – there’s something magical about creating something beautiful and delicious that brings people together around the table.
Remember, baking is as much about the journey as the destination. Don’t be discouraged if your first attempt isn’t perfect – each cheesecake teaches you something new. With practice and patience, you’ll develop your own techniques and preferences that make this recipe uniquely yours.