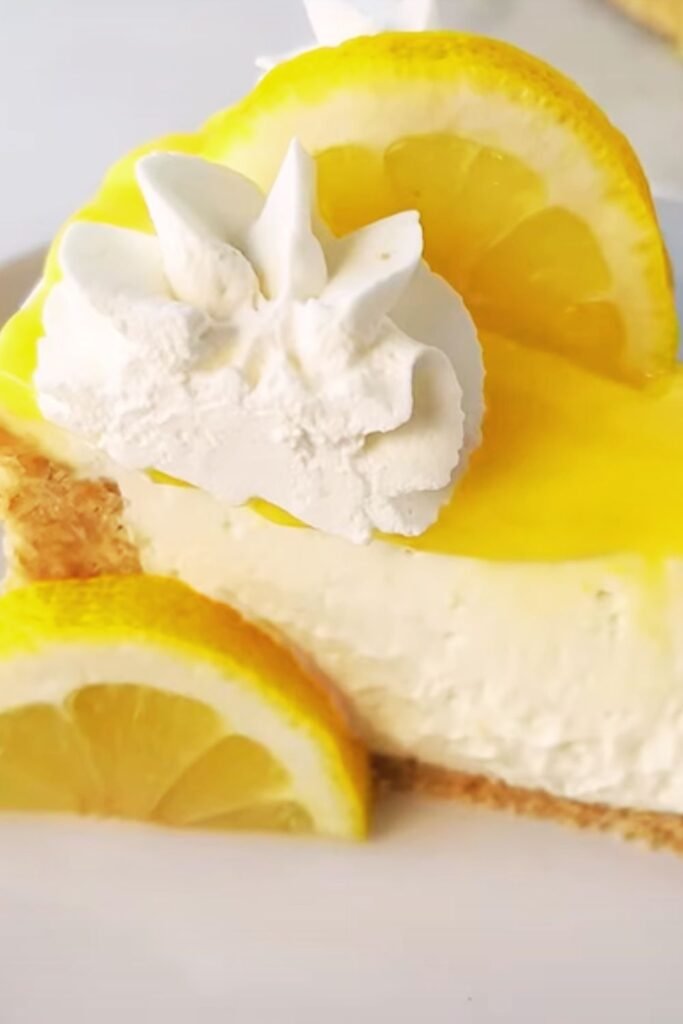
There’s something absolutely magical about the combination of tangy lemon and velvety cheesecake. When these two culinary powerhouses join forces in a light-as-air mousse, the result is nothing short of spectacular. I’ve been perfecting this Lemon Cheesecake Mousse recipe for years, and I’m thrilled to finally share my secrets with you!
This dessert strikes the perfect balance between richness and refreshment. The bright citrus cuts through the creamy cheesecake base, creating a dessert that satisfies your sweet tooth without weighing you down. It’s elegant enough for special occasions yet simple enough to whip up when you need a little sunshine in your day.
Why You’ll Love This Recipe
Before we dive into the details, let me tell you why this lemon cheesecake mousse deserves a spot in your recipe collection:
- No baking required – Perfect for hot summer days or when you don’t want to turn on the oven
- Make-ahead friendly – Prepare it up to 24 hours in advance for stress-free entertaining
- Versatile serving options – Elegant in individual glasses or spectacular as a trifle centerpiece
- Crowd-pleaser – The familiar flavors with an elevated presentation impress everyone from kids to culinary snobs
- Customizable – Easy to adapt with different citrus fruits or toppings
The Science Behind Perfect Mousse
Creating the perfect mousse is part art, part science. The key is achieving that delicate, airy texture while maintaining enough structure for the mousse to hold its shape. Here’s what’s happening behind the scenes:
Stabilized whipped cream: Whipped cream incorporates air bubbles, but these can collapse over time. Adding a stabilizer (in our case, gelatin) reinforces the structure.
Acid and protein interaction: The acid in lemon juice helps denature the proteins in the cream cheese, creating a smoother texture when combined.
Temperature control: Proper chilling allows the gelatin to set fully, giving your mousse that perfect spoonable yet firm consistency.
Essential Ingredients
Let’s break down what you’ll need for this heavenly creation:
| Ingredient | Quantity | Notes |
|---|---|---|
| Cream cheese | 16 oz (450g) | Full-fat, room temperature for smoothest results |
| Heavy whipping cream | 2 cups (480ml) | Cold from the refrigerator for best whipping |
| Granulated sugar | 1 cup (200g) | Divided between cream cheese and whipped cream |
| Lemons | 4-5 medium | You’ll need both juice and zest |
| Gelatin | 1 tablespoon (15ml) unflavored powdered | Bloomed in cold water |
| Vanilla extract | 2 teaspoons (10ml) | Pure, not imitation |
| Salt | 1/4 teaspoon (1g) | Enhances all flavors |
| Graham crackers | 8 full sheets | For optional crust layer |
| Unsalted butter | 4 tablespoons (56g) | Melted, for optional crust |
Special Equipment
While this recipe doesn’t require any fancy gadgets, these tools will make preparation much easier:
- Stand mixer or hand mixer – Whipping by hand is possible but exhausting
- Microplane or fine grater – For getting the most fragrant zest without bitter pith
- Citrus juicer – To extract every drop of precious lemon juice
- Serving glasses – Clear vessels show off the beautiful layers
- Piping bag with star tip – For professional-looking presentation (optional)
Step-by-Step Instructions
Preparing the Base
- Bloom the gelatin: In a small bowl, sprinkle the powdered gelatin over 3 tablespoons of cold water. Let it sit for 5 minutes until it becomes spongy.
- Heat the gelatin: Once bloomed, microwave the gelatin mixture for 10-15 seconds until just melted, or place the bowl in a larger bowl of hot water. Stir until completely dissolved and set aside to cool slightly.
- Prepare lemon components: Zest your lemons until you have 2 tablespoons of zest. Then juice them to collect 1/2 cup (120ml) of fresh juice. Strain the juice to remove seeds and pulp.
- Beat the cream cheese: In a large bowl, beat the room-temperature cream cheese with 3/4 cup of sugar until completely smooth and fluffy, about 2-3 minutes. Scrape down the sides of the bowl frequently.
- Add lemon flavoring: Mix the lemon zest, lemon juice, vanilla extract, and salt into the cream cheese mixture. Beat until well combined and smooth.
- Incorporate gelatin: With the mixer running on low speed, slowly pour in the cooled (but still liquid) gelatin mixture. Beat until fully incorporated.
Creating the Mousse
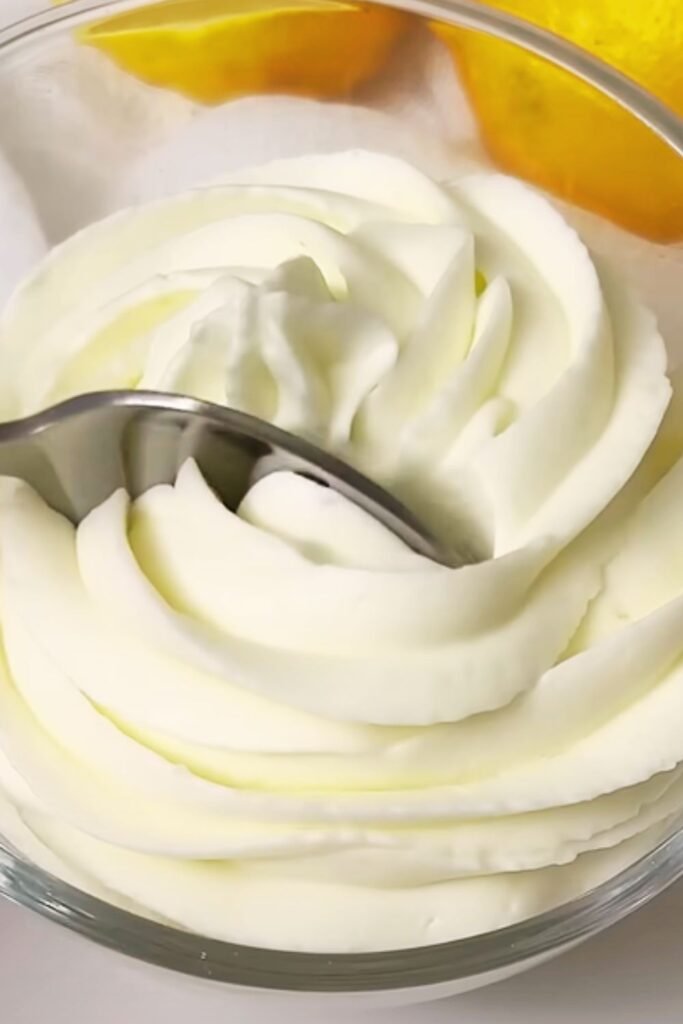
- Whip the cream: In a separate chilled bowl, whip the cold heavy cream with the remaining 1/4 cup of sugar until it forms stiff peaks. Be careful not to over-whip, which can cause the cream to become grainy.
- Fold together: Using a rubber spatula, gently fold one-third of the whipped cream into the cream cheese mixture to lighten it. Then fold in the remaining whipped cream in two additions until no white streaks remain. Use a gentle touch to maintain as much air as possible.
- Chill briefly: Cover the mousse and refrigerate for 15-20 minutes to allow it to begin setting. This makes it easier to pipe if you’re using decorative techniques.
Optional Graham Cracker Base
If you’d like to add a contrasting texture element:
- Make the crust: Crush graham crackers into fine crumbs (using a food processor or placing them in a zip-top bag and rolling with a rolling pin). Mix with melted butter until the texture resembles wet sand.
- Create the base: Press about 2 tablespoons of the graham cracker mixture into the bottom of each serving glass. You can toast it in the oven at 350°F (175°C) for 5 minutes for extra flavor, but allow it to cool completely before adding mousse.
Assembly and Presentation
- Fill serving glasses: Spoon or pipe the mousse into individual serving glasses, filling them about 3/4 full. If using a graham cracker base, add the mousse on top.
- Chill thoroughly: Refrigerate for at least 4 hours, preferably overnight, to allow the mousse to set completely.
- Add finishing touches: Just before serving, garnish with additional lemon zest, a thin lemon slice, fresh berries, a sprig of mint, or a light dusting of graham cracker crumbs.
Troubleshooting Tips
Even experienced cooks encounter challenges. Here are solutions to common mousse problems:
Runny Mousse
- Possible cause: Gelatin wasn’t properly bloomed or was overheated
- Solution: Ensure gelatin fully blooms (becomes spongy) before heating, and never boil it
- Fix: If your mousse isn’t setting, you can whip an additional 1/2 teaspoon of bloomed gelatin and fold it into the mousse, then re-chill
Lumpy Texture
- Possible cause: Cream cheese was too cold or wasn’t beaten long enough
- Solution: Always use room temperature cream cheese and beat until completely smooth before adding other ingredients
- Fix: If you notice lumps, try pressing the mixture through a fine-mesh sieve before folding in the whipped cream
Weeping Mousse
- Possible cause: Over-whipped cream or mixture sat too long before chilling
- Solution: Stop whipping cream as soon as stiff peaks form and chill mousse promptly
- Fix: If slight separation occurs, gently stir the mousse once more before serving
Make-Ahead and Storage
This lemon cheesecake mousse is perfect for planning ahead:
- Make-ahead timing: Prepare up to 24 hours in advance for best results
- Storage: Cover individual portions with plastic wrap and refrigerate for up to 3 days
- Freezing option: These mousses freeze beautifully for up to 1 month; thaw overnight in the refrigerator
- Travel tip: If transporting, keep chilled in an insulated container with ice packs
Variations to Try
Once you’ve mastered the basic recipe, consider these delicious variations:
Citrus Swaps
Replace some or all of the lemon with:
- Lime for a margarita-inspired mousse
- Blood orange for a stunning pink-hued winter version
- Meyer lemon for a sweeter, more floral flavor profile
Layer It Up
Create stunning trifle-style desserts by alternating:
- Lemon mousse
- Fresh berries
- Cubed pound cake
- Lemon curd
Add Some Crunch
Incorporate texture with:
- Crushed meringue cookies
- Toasted coconut flakes
- White chocolate shavings
- Candied lemon peel
Nutritional Information
For those keeping track of dietary information, here’s an approximate breakdown per serving (assuming 8 servings):
| Nutrient | Amount |
|---|---|
| Calories | 385 |
| Total Fat | 31g |
| Saturated Fat | 18g |
| Cholesterol | 105mg |
| Sodium | 275mg |
| Total Carbohydrates | 25g |
| Dietary Fiber | 0.5g |
| Sugars | 22g |
| Protein | 5g |
Note: Values are approximate and may vary based on specific ingredients used.
Dietary Adaptations
This versatile recipe can be modified for various dietary needs:
Gluten-Free
- Replace graham cracker base with crushed gluten-free cookies or a nut-based crust
- Verify that your vanilla extract and gelatin are certified gluten-free
Lower Sugar
- Reduce sugar to 2/3 cup total and supplement with a monk fruit sweetener
- Use reduced-fat cream cheese (though texture will be slightly different)
Dairy-Free
- Substitute plant-based cream cheese (cashew-based works best)
- Use full-fat coconut cream in place of heavy cream (chilled overnight and liquid drained)
- Increase gelatin slightly (additional 1/2 teaspoon) as plant-based ingredients may not set as firmly
Serving Suggestions
Elevate your lemon cheesecake mousse with these sophisticated serving ideas:
- Serve alongside shortbread cookies for dipping
- Create a dessert board with fresh berries, honey, and edible flowers
- Offer as part of a dessert trio with chocolate mousse and raspberry sorbet
- For an elegant brunch, pair with crisp sparkling water with lemon slices
For a refreshing non-alcoholic pairing, try an iced herbal tea like chamomile or mint, or a sparkling elderflower drink that complements the citrus notes beautifully.
Questions & Answers
Can I make this without gelatin? Yes! For a vegetarian version, substitute an equal amount of agar-agar powder, but note that the texture will be slightly different. Another option is to use 2 tablespoons of instant lemon pudding mix, which contains thickeners that help stabilize the mousse.
How far in advance can I make this dessert? For optimal flavor and texture, I recommend making it up to 24 hours ahead of serving. The mousse will keep for up to 3 days in the refrigerator, but the texture is best within the first day.
My mousse didn’t set properly. What went wrong? The most common issue is not allowing the gelatin to bloom fully before heating or overheating it, which can destroy its setting properties. Another possibility is that the mixture wasn’t chilled long enough—it needs at least 4 hours, preferably overnight, to set completely.
Can I use bottled lemon juice instead of fresh? While you can use bottled juice in a pinch, I strongly recommend fresh lemons for this recipe. Not only do you need the zest (which contains essential oils crucial for flavor), but fresh juice has a brighter, more complex taste that makes all the difference in a dessert where lemon is the star.
How do I get the most juice from my lemons? To extract maximum juice, roll your lemons firmly on the countertop before cutting. Also, lemons yield more juice when they’re at room temperature rather than cold from the refrigerator. For this recipe’s 1/2 cup of juice, you’ll need approximately 4-5 medium lemons.
What’s the best way to achieve a perfectly smooth mousse? Three key factors: 1) Make sure your cream cheese is genuinely at room temperature; 2) Beat it thoroughly until completely smooth before adding other ingredients; and 3) Be gentle when folding in the whipped cream to maintain air bubbles while eliminating streaks.
Can I freeze this mousse? Yes! These mousses freeze surprisingly well for up to a month. Thaw overnight in the refrigerator for best results. The texture may be slightly different after freezing, but still delicious.
How can I make this more lemony? If you really love an intense lemon flavor, add an extra tablespoon of zest and/or fold in 2-3 tablespoons of lemon curd after the mousse is mixed. You can also garnish with candied lemon peel for an extra lemon punch.
Final Thoughts
This lemon cheesecake mousse has become my signature dessert for good reason. It combines the familiar comfort of cheesecake with the sophisticated lightness of mousse, all highlighted by bright, sunny lemon. I find it’s the perfect finale to both casual family dinners and elegant dinner parties alike.
What I love most about this recipe is its versatility. The basic technique remains the same, but with a few simple tweaks, you can transform it for any season or occasion. Whether dressed up in champagne flutes for a celebration or served family-style in a trifle dish for a summer gathering, it never fails to impress.
Remember that the key to mousse perfection lies in patience—don’t rush the process of setting, and you’ll be rewarded with that ethereal texture that melts in your mouth while still holding its shape on your spoon.
So go ahead, bring a little brightness to your table with this lemon cheesecake mousse. I guarantee it will become a requested favorite in your recipe repertoire too!