There’s something incredibly satisfying about pulling a tray of fresh, golden rolls from the oven, especially when they’re filled with the mouthwatering combination of herbs, cheese, and caramelized onions. Today, I’m sharing my recipe for herby cheese and onion rolls – a delightful savory bake that will fill your kitchen with the most incredible aroma and have everyone asking for seconds.
Why You’ll Love These Rolls
These cheese and onion rolls hold a special place in my heart. I first learned to make them during a particularly cold winter when I was craving something comforting and warm. After several attempts and refinements, I’ve perfected this recipe, and it’s become one of my most requested bakes when friends come over.
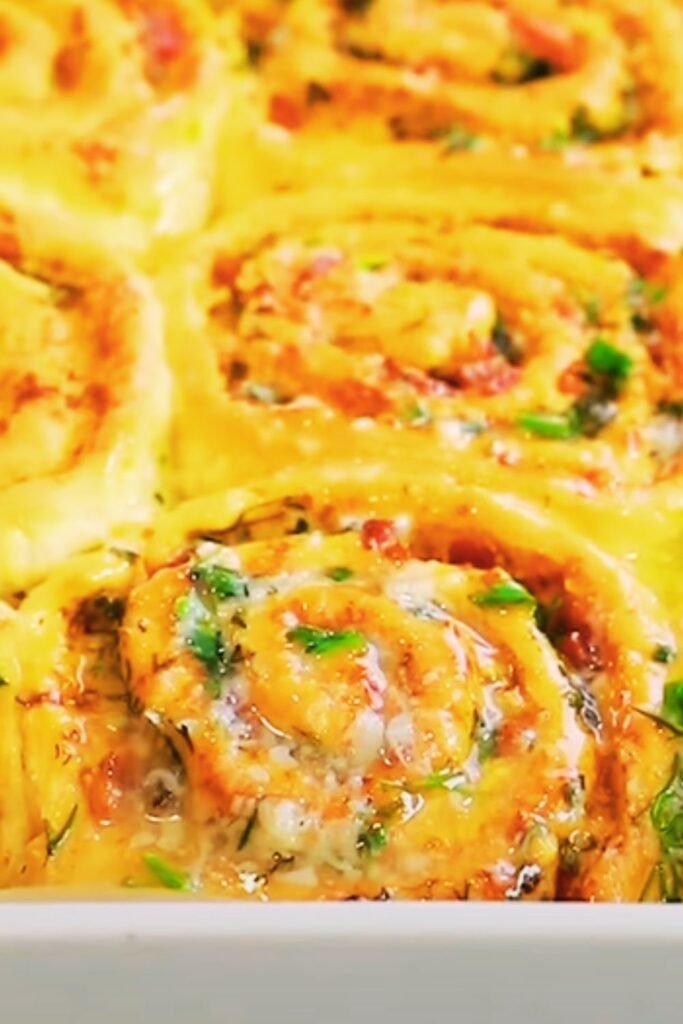
What makes these rolls so special is the perfect balance of flavors – the sweetness of slowly caramelized onions, the savory punch of mature cheddar, and the aromatic blend of fresh herbs. All wrapped up in a soft, fluffy dough that’s golden and slightly crisp on the outside.
These aren’t just dinner rolls – they’re a meal in themselves. Perfect for breakfast with a poached egg, alongside a bowl of soup for lunch, or as part of a picnic spread. I’ve even served them at dinner parties as an impressive alternative to plain bread.
The Secret to Perfect Herby Cheese and Onion Rolls
Before diving into the recipe, let me share what I’ve learned makes these rolls exceptional:
- Take time with the onions – Properly caramelizing onions makes all the difference. Rush this step, and you’ll miss out on their natural sweetness.
- Use fresh herbs – While dried herbs work in a pinch, fresh herbs provide brighter flavor and better aroma.
- Don’t skimp on the cheese – A mature, well-aged cheddar gives the best flavor, but feel free to experiment with other hard cheeses.
- Master the proving time – The dough needs proper time to develop flavor and texture.
Now, let’s get into the details of how to make these irresistible treats!
Ingredients
For the Dough:
- 500g strong bread flour
- 7g fast-action dried yeast
- 10g salt
- 30g unsalted butter, softened
- 320ml lukewarm water
- 1 tablespoon olive oil (for kneading)
For the Filling:
- 3 large onions (about 600g)
- 30g butter
- 1 tablespoon olive oil
- 1 teaspoon brown sugar
- 250g mature cheddar cheese, grated
- 2 tablespoons fresh thyme leaves
- 2 tablespoons fresh rosemary, finely chopped
- 2 tablespoons fresh parsley, finely chopped
- 1 teaspoon freshly ground black pepper
- ½ teaspoon sea salt
For the Topping:
- 1 egg, beaten
- 2 tablespoons mixed seeds (sesame, poppy, pumpkin)
- Extra grated cheese (optional)
Equipment Needed
Here’s what you’ll need to have ready before starting:
- Large mixing bowl
- Wooden spoon
- Kitchen scale
- Measuring spoons
- Large frying pan
- Sharp knife
- Chopping board
- Baking tray
- Pastry brush
- Clean tea towel
- Wire cooling rack
Detailed Method
Step 1: Prepare the Caramelized Onions
This is perhaps the most time-consuming part of the recipe, but trust me, it’s worth every minute.
- Peel and halve the onions, then slice them into thin half-moons.
- Heat the butter and olive oil in a large frying pan over medium-low heat.
- Add the sliced onions to the pan and stir to coat them in the butter and oil.
- Sprinkle with the brown sugar and a pinch of salt.
- Cook the onions very slowly, stirring occasionally, for about 30-40 minutes, until they’re deeply golden and caramelized.
- In the last 5 minutes, add half of the fresh herbs (thyme, rosemary, and parsley).
- Remove from heat and cool completely before using.
I often make the onions the day before and store them in the refrigerator – this actually enhances their flavor and makes the recipe more manageable.
Step 2: Make the Dough
Now for the foundation of our rolls – a simple but perfect bread dough.
- In a large mixing bowl, combine the flour, yeast, and salt. Make sure to keep the salt and yeast on opposite sides of the bowl initially, as direct contact can inhibit the yeast’s action.
- Add the softened butter and gradually incorporate the lukewarm water, mixing until you have a soft, slightly sticky dough.
- Turn the dough out onto a lightly oiled surface (I prefer olive oil over flour for kneading as it keeps the dough moist).
- Knead for about 10 minutes until smooth and elastic. To test if it’s ready, press your finger gently into the dough – it should spring back slowly.
- Place the dough in a clean, lightly oiled bowl, cover with a damp tea towel or plastic wrap, and leave in a warm place to rise for 1-1.5 hours, or until doubled in size.
Step 3: Prepare the Filling Mixture
While the dough is rising, prepare the rest of your filling.
- In a medium bowl, combine the cooled caramelized onions with the grated cheese.
- Add the remaining fresh herbs, black pepper, and sea salt.
- Mix thoroughly and set aside.
Step 4: Shape the Rolls
This is where we bring everything together and create our beautiful rolls.
- Once the dough has doubled in size, gently punch it down to release the air.
- Turn out onto a lightly floured surface and roll into a rectangle approximately 40cm x 30cm.
- Spread the cheese and onion filling evenly across the surface, leaving a 2cm border along one of the long edges.
- Starting from the long edge without the border, roll the dough up tightly like a Swiss roll.
- Using a sharp knife, cut the roll into 12 equal pieces.
- Arrange the pieces, cut side up, on a lined baking tray, leaving space between each for rising.
- Cover with a clean tea towel and leave to prove for another 30-45 minutes until visibly puffed up.
Step 5: Bake to Golden Perfection
The final step that transforms your ingredients into irresistible rolls.
- Preheat your oven to 200°C (180°C fan/gas mark 6) while the rolls are on their second prove.
- Once the rolls have risen, brush them with beaten egg.
- Sprinkle with mixed seeds and extra cheese if using.
- Bake in the preheated oven for 20-25 minutes until golden brown and cooked through. They should sound hollow when tapped on the bottom.
- Transfer to a wire rack to cool slightly before serving.

Nutritional Information
I know many of my readers are conscious about what they eat, so here’s the approximate nutritional breakdown per roll:
| Nutrient | Amount per roll |
|---|---|
| Calories | 320 kcal |
| Carbohydrates | 38g |
| Protein | 12g |
| Fat | 14g |
| Saturated Fat | 8g |
| Fiber | 2g |
| Sugar | 3g |
| Sodium | 650mg |
Variations to Try
One of the joys of this recipe is how adaptable it is. Here are some of my favorite variations:
Cheese Variations
- Blue Cheese Wonder: Replace 100g of the cheddar with crumbled blue cheese for a more pungent flavor.
- Mediterranean Style: Use a mixture of feta and mozzarella with some sun-dried tomatoes and olives added to the filling.
- Smoky Twist: Add 100g of smoked cheese to the mixture for a deeper flavor profile.
Herb Variations
- Spring Garden: Use chives, dill, and parsley for a lighter, fresher taste.
- Italian Inspired: Swap the herbs for basil, oregano, and a touch of sage.
- Warming Spices: Add 1 teaspoon of smoked paprika and ½ teaspoon of cayenne pepper for a spicy kick.
Add-ins for Extra Flavor
- Garlic Lover’s Dream: Add 4 cloves of roasted garlic to the filling.
- Bacon Indulgence: Mix in 150g of crispy bacon bits with the filling.
- Nutty Crunch: Add 80g of toasted walnuts or pine nuts to the filling.
Make-Ahead and Storage Tips
Make-Ahead Options:
- Prepare the caramelized onions up to 3 days ahead and store in the refrigerator.
- Make the dough the night before, let it have its first rise, then refrigerate. Bring to room temperature before shaping.
- The shaped rolls can be refrigerated overnight before their second rise. Bring to room temperature for about an hour before baking.
Storage and Reheating:
- These rolls are best eaten on the day they’re baked but will keep for 2-3 days in an airtight container at room temperature.
- To refresh: sprinkle with a few drops of water and heat in a preheated oven at 160°C for 5-7 minutes.
- Freeze for up to 3 months. Thaw at room temperature and reheat as above.

Serving Suggestions
These versatile rolls pair beautifully with so many dishes. Here are my favorite ways to enjoy them:
- Breakfast: Split and lightly toasted with a poached egg on top.
- Lunch: Alongside a bowl of tomato soup or roasted vegetable soup.
- Dinner: Served warm with a generous knob of butter alongside grilled meats or a hearty stew.
- Snack: Simply on their own, perhaps with a little extra cheese or some chutney.
- Entertaining: As part of a grazing board with cured meats, dips, and olives.
- Picnic Essential: Pack them with some cold cuts and salad for a delicious sandwich alternative.
- Brunch Star: Serve them as part of a weekend brunch spread with scrambled eggs and smoked salmon.
- Soup Companion: Their cheese and herb flavors complement almost any soup, from classic chicken to exotic squash varieties.
Troubleshooting Common Issues
Even experienced bakers encounter challenges sometimes. Here are solutions to common issues you might face:
Dough Not Rising:
- Check that your yeast is fresh and active.
- Ensure your water is lukewarm (too hot will kill the yeast).
- Place your dough in a consistently warm spot – near a preheated oven works well.
Filling Leaking Out:
- Make sure your filling is completely cool before spreading it on the dough.
- Don’t overfill – a thin, even layer works best.
- Seal the edge well when rolling up the dough.
Rolls Stuck to the Tray:
- Always use baking parchment or a silicone baking mat.
- If they do stick, slide a thin spatula underneath while they’re still warm.
Dough Too Sticky to Handle:
- Add flour to your work surface and hands in small increments.
- Chill the dough for 20 minutes to make it more manageable.
Rolls Burning on Top:
- Cover loosely with foil for the last part of baking.
- Check your oven temperature with an oven thermometer – many run hotter than the setting indicates.
Environmental Impact Considerations
I believe in responsible cooking, so here are some tips to make this recipe more environmentally friendly:
- Use locally produced flour and dairy if possible to reduce food miles.
- Choose organic onions – they’re on the “dirty dozen” list of vegetables that typically contain higher pesticide residues.
- Opt for cheese from sustainable dairy farms that prioritize animal welfare.
- Use any leftover herbs in other dishes or dry them for future use to avoid food waste.
- If you have leftover rolls, freeze them rather than risk them going stale and being thrown away.
Why Homemade Rolls Beat Store-Bought Every Time
I’m often asked if making these rolls from scratch is worth the effort when you can buy something similar from a bakery. My answer is always a resounding yes, and here’s why:
- Control Over Ingredients: No preservatives, artificial flavors, or mystery ingredients.
- Freshness: Nothing beats the taste and texture of bread straight from your oven.
- Customization: Adjust the herbs, cheese, and seasonings to your exact preference.
- Cost-Effective: Making a dozen homemade specialty rolls costs significantly less than buying them.
- Satisfaction: There’s an immense pride in creating something so delicious with your own hands.
- Aroma: The smell of these baking will transform your home in a way no store-bought roll ever could.
Frequently Asked Questions
Q: Can I use dried herbs instead of fresh?
Yes, you can use dried herbs, but reduce the quantities by about two-thirds as dried herbs are more concentrated. For this recipe, use about 2 teaspoons each of dried thyme and rosemary instead of the 2 tablespoons of fresh herbs.
Q: Is it possible to make these rolls gluten-free?
While I haven’t personally tested a gluten-free version, you could try using a good quality gluten-free bread flour blend. You may need to add a teaspoon of xanthan gum if your flour blend doesn’t already contain it, and be prepared for a slightly different texture.
Q: Can I make these rolls ahead of time for a dinner party?
Absolutely! You have several options. You can prepare the shaped rolls and refrigerate them overnight before the second rise, then bring to room temperature and bake before your guests arrive. Alternatively, bake them earlier in the day and warm them in the oven for 5 minutes before serving.
Q: My family doesn’t like onions. Can I make these without them?
The onions are a key component, but you could try substituting them with 2-3 leeks, finely sliced and caramelized the same way. Another option would be to use roasted red peppers, drained and chopped, for a different but equally delicious flavor.
Q: How can I tell when the rolls are properly baked?
The rolls should be golden brown on top and sound hollow when tapped on the bottom. If you have a food thermometer, the internal temperature should reach about 90°C (195°F).
Q: Can I freeze the unbaked rolls?
Yes, you can freeze them after shaping but before the second rise. Place them on a baking sheet until frozen solid, then transfer to a freezer bag. When ready to bake, arrange on a lined baking tray, cover, and thaw in the refrigerator overnight. Allow them to come to room temperature and complete their second rise before baking.
Q: What type of cheese works best if I can’t find mature cheddar?
Gruyère is an excellent alternative, as is an aged Gouda. You want a cheese that has good flavor and melts well without becoming oily.
Q: I’m short on time. Can I skip the caramelizing of the onions?
The caramelized onions provide much of the flavor in these rolls, but if you’re really pressed for time, you could sauté them quickly until just translucent (about 10 minutes) and add a teaspoon of onion powder to boost the flavor.
Final Thoughts
These herby cheese and onion rolls are more than just a recipe to me – they represent the joy of creating something special from simple ingredients. The process of making bread is almost meditative, and the reward at the end is something that brings genuine happiness to those who share it.
I hope you enjoy making and eating these rolls as much as I do. There’s something magical about breaking open a warm roll and seeing the melted cheese stretch between the pieces, smelling the fragrant herbs, and tasting the sweet caramelized onions.
If you try this recipe, I’d love to know how you served your rolls and any variations you tried. Baking is an adventure, and these cheese and onion rolls are just waiting to become part of your culinary story.
Happy baking!