There’s something magical about the aroma of freshly baked cinnamon rolls wafting through the house on a lazy weekend morning. I’ve been making traditional cinnamon rolls for years, but when I started experimenting with adding fresh raspberries to the filling and topping them with a tangy lemon glaze instead of the usual cream cheese frosting—something extraordinary happened. These raspberry cinnamon rolls have become my family’s most requested breakfast treat, combining the comforting warmth of cinnamon with bright, fruity notes that dance on your taste buds.
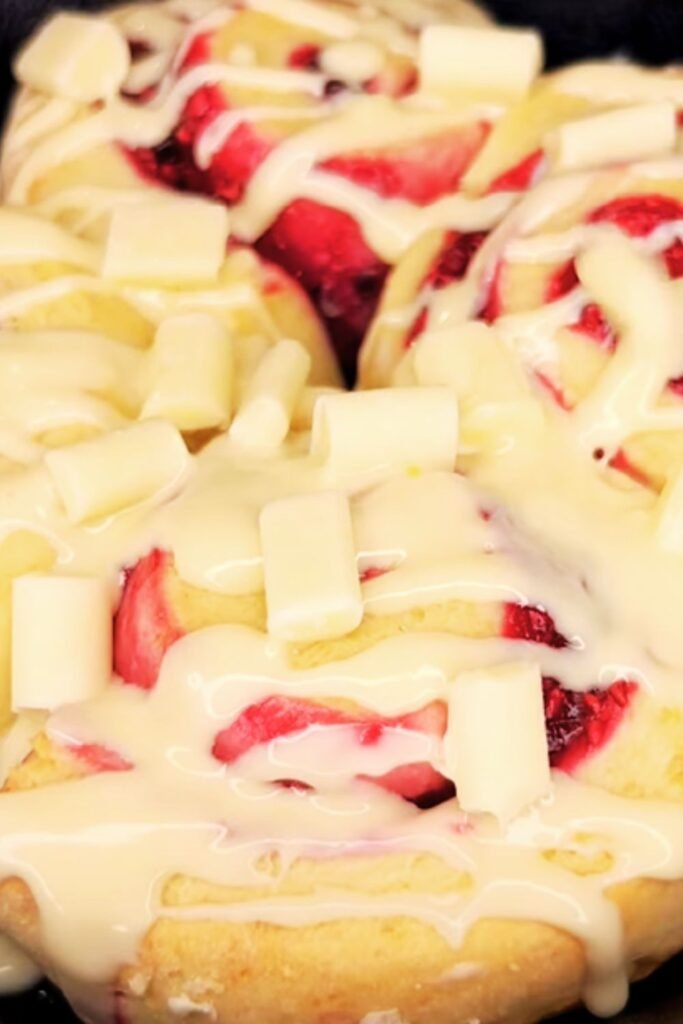
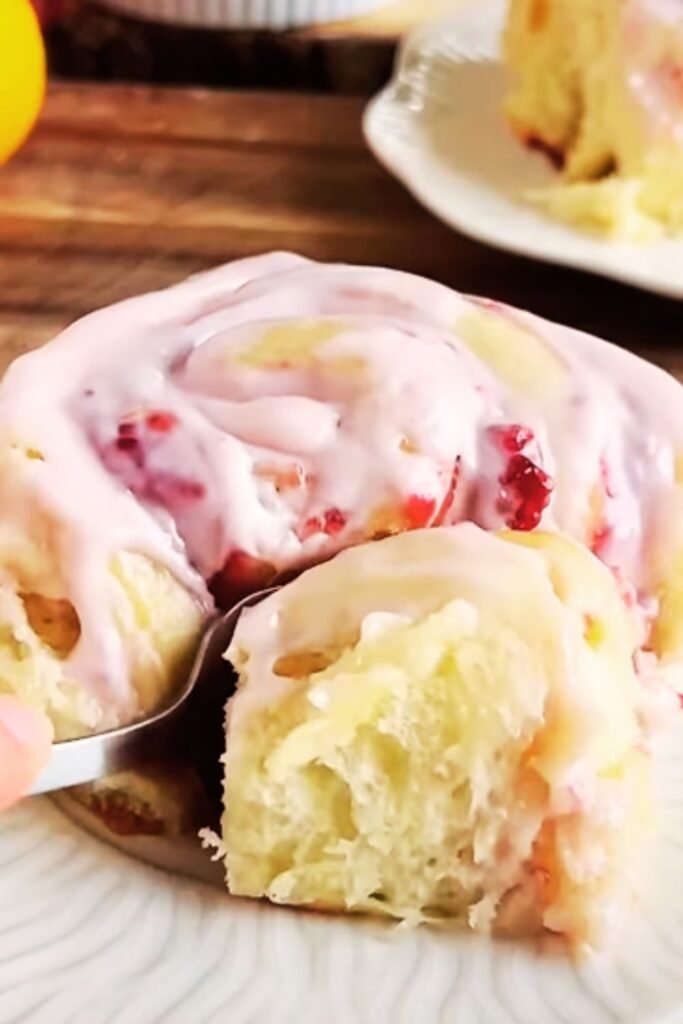
The vibrant red swirls from the raspberries not only create a stunning visual effect but also add pockets of jammy goodness that perfectly complement the buttery, cinnamon-laced dough. When topped with the lemon glaze, each bite becomes a perfect balance of sweet, tangy, and warmly spiced flavors that will have you reaching for seconds (and maybe thirds).
Whether you’re hosting a special brunch, preparing a holiday breakfast, or simply want to elevate your weekend baking game, these raspberry cinnamon rolls are guaranteed to impress. Let me walk you through my detailed, step-by-step recipe that I’ve perfected over dozens of batches.
Why You’ll Love This Recipe
- The raspberry filling creates pockets of jammy goodness throughout each roll
- Lemon glaze adds a refreshing tanginess that balances the sweet filling
- Make-ahead friendly—prepare the night before and bake in the morning
- Impressive enough for special occasions but doable for weekend baking
- Creates unforgettable aromas that will bring everyone to the kitchen
Ingredients
For the Dough:
- 4½ cups (562g) all-purpose flour, plus more for dusting
- ⅓ cup (67g) granulated sugar
- 2¼ teaspoons (1 packet) instant yeast
- ½ teaspoon salt
- 1 cup (240ml) whole milk, warmed to 110°F (43°C)
- ⅓ cup (75g) unsalted butter, melted
- 2 large eggs, room temperature
- 1 teaspoon vanilla extract
For the Filling:
- ½ cup (113g) unsalted butter, softened
- ¾ cup (150g) brown sugar, packed
- 2 tablespoons ground cinnamon
- ¼ teaspoon freshly grated nutmeg
- 2 cups (250g) fresh raspberries
- 2 tablespoons cornstarch
For the Lemon Glaze:
- 2 cups (240g) powdered sugar
- 3 tablespoons fresh lemon juice
- 1 tablespoon lemon zest (from about 1 large lemon)
- 2 tablespoons unsalted butter, melted
- 1 teaspoon vanilla extract
- Pinch of salt
- 1-2 tablespoons milk, as needed for consistency
Equipment Needed
- Stand mixer with dough hook attachment (or large bowl if mixing by hand)
- Rolling pin
- 9×13-inch baking dish
- Pastry brush
- Microplane or zester
- Measuring cups and spoons
- Mixing bowls
- Serrated knife or unflavored dental floss (for cutting rolls)
- Parchment paper
Step-by-Step Instructions
Making the Dough
- Combine dry ingredients: In the bowl of a stand mixer, whisk together 4 cups of flour, sugar, yeast, and salt.
- Mix wet ingredients: In a separate bowl, combine the warm milk, melted butter, eggs, and vanilla extract. The milk should be warm but not hot—about 110°F (43°C) is perfect to activate the yeast without killing it.
- Form the dough: With the mixer on low speed using the dough hook attachment, slowly pour the wet ingredients into the dry ingredients. Mix until everything is just combined, about 2 minutes. The dough will look shaggy at this point.
- Knead the dough: Increase the speed to medium-low and continue to knead for 5-7 minutes until the dough becomes smooth and elastic. If the dough is too sticky, add the remaining ½ cup of flour, 1 tablespoon at a time. The dough should pull away from the sides of the bowl but still be slightly tacky to the touch.
- First rise: Transfer the dough to a lightly oiled bowl, cover with plastic wrap or a clean kitchen towel, and place in a warm spot to rise until doubled in size, about 1 to 1½ hours. I like to turn my oven on to the lowest setting for just 1-2 minutes, then turn it off and place the dough inside with the door slightly ajar.
Preparing the Filling
- Mix cinnamon sugar: While the dough is rising, in a small bowl, mix together the brown sugar, cinnamon, and nutmeg until well combined.
- Prepare raspberries: In another bowl, gently toss the fresh raspberries with cornstarch. This helps absorb some of the moisture released from the berries during baking and prevents the filling from becoming too soggy.
Rolling and Filling
- Roll out the dough: Once the dough has doubled in size, punch it down to release air bubbles. Transfer to a floured surface and roll into a rectangle approximately 18×14 inches, with the long side facing you. The dough should be about ¼-inch thick. Use a light touch with the rolling pin to maintain an even thickness.
- Spread the butter: Using an offset spatula or the back of a spoon, spread the softened butter evenly over the entire surface of the dough, leaving a ½-inch border around the edges.
- Add cinnamon sugar: Sprinkle the cinnamon-sugar mixture evenly over the butter, gently pressing it into the butter with your hands to help it adhere.
- Add raspberries: Distribute the cornstarch-coated raspberries evenly over the cinnamon-sugar layer. Be gentle to avoid crushing them too much, though some breaking is fine and will create beautiful swirls in the rolls.
- Roll into a log: Starting with the long edge closest to you, carefully roll the dough into a tight log. Take your time with this step—a tight roll ensures the filling stays in place and creates those beautiful spiral layers.
- Slice the rolls: Using a sharp serrated knife or unflavored dental floss (my preferred method), cut the log into 12 equal pieces, each about 1½ inches thick. To use dental floss, slide it under the roll, cross the ends over the top, and pull to slice through cleanly without squishing the roll.
Second Rise and Baking
- Arrange in baking dish: Line a 9×13-inch baking dish with parchment paper, allowing some overhang on the sides for easy removal later. Place the sliced rolls in the dish, leaving a little space between each for rising.
- Second rise: Cover the dish with plastic wrap or a clean kitchen towel and let the rolls rise again in a warm place for about 30-45 minutes, until noticeably puffy. Meanwhile, preheat your oven to 350°F (175°C).
- Bake: Remove the covering and bake the rolls in the preheated oven for 22-25 minutes, until golden brown on top and the internal temperature reaches about 190°F (88°C). If the rolls are browning too quickly, tent with aluminum foil.
- Cool slightly: Once baked, remove from the oven and allow to cool in the pan for about 10 minutes before glazing.
Making the Lemon Glaze
- Mix glaze ingredients: While the rolls are cooling, whisk together the powdered sugar, lemon juice, lemon zest, melted butter, vanilla extract, and salt in a medium bowl until smooth. Add milk, 1 tablespoon at a time, until the glaze reaches your desired consistency. For a thicker glaze that sets on top of the rolls, use less milk; for a thinner glaze that seeps into the crevices, add a bit more.
- Glaze the rolls: When the rolls have cooled for about 10 minutes (they should still be warm but not hot), pour or spread the lemon glaze evenly over the top. The residual heat will help the glaze to set slightly while still remaining gloriously gooey.
Make-Ahead Options
Overnight Method:
I often prepare these rolls the night before for a special breakfast without the early wake-up call:
- Follow all steps through arranging the sliced rolls in the baking dish.
- Cover tightly with plastic wrap and refrigerate overnight (up to 12 hours).
- The next morning, remove from refrigerator and let stand at room temperature for 30-45 minutes before baking.
- Bake as directed, though you may need to add 2-3 minutes to the baking time since they’ll be starting from a colder temperature.
Freezing Instructions:
Unbaked rolls:
- Follow the recipe through slicing the rolls.
- Place rolls on a parchment-lined baking sheet, not touching, and freeze until solid.
- Transfer to a freezer-safe container or bag and freeze for up to 1 month.
- To bake: thaw in the refrigerator overnight, arrange in baking dish, let rise until puffy (1-2 hours), then bake as directed.
Baked rolls:
- Cool completely without glaze.
- Wrap tightly in plastic wrap and aluminum foil or place in a freezer-safe container.
- Freeze for up to 2 months.
- Thaw overnight in the refrigerator or at room temperature for a few hours.
- Warm in a 300°F (150°C) oven for 10-15 minutes, then add fresh glaze.
Recipe Variations
While these raspberry cinnamon rolls are perfect as written, here are some delicious variations I’ve tried:
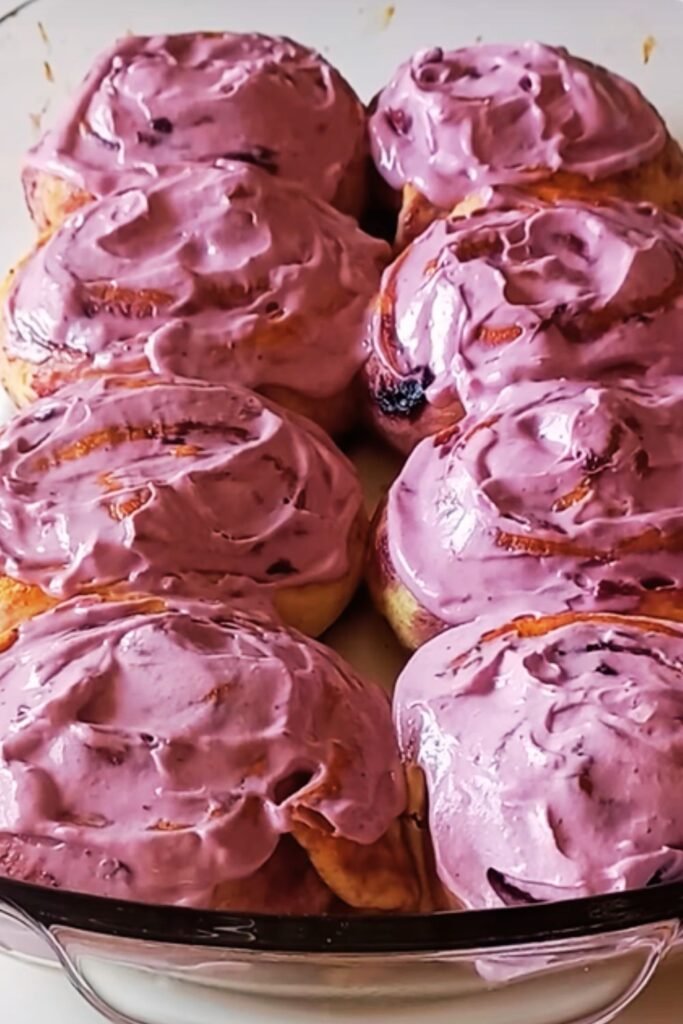
- Mixed Berry: Replace half the raspberries with blueberries or blackberries for a mixed berry delight.
- Orange Twist: Substitute orange zest and juice for the lemon in the glaze for a different citrus pairing.
- Chocolate Raspberry: Add ½ cup mini chocolate chips to the filling for decadent chocolate-raspberry rolls.
- Almond Touch: Add ½ teaspoon almond extract to the dough and sprinkle toasted sliced almonds over the glaze.
- Cream Cheese Swirl: Blend 4 oz softened cream cheese with 2 tbsp sugar and spread a thin layer over the butter before adding other filling ingredients.
Troubleshooting Tips
| Problem | Possible Cause | Solution |
|---|---|---|
| Dough not rising | Inactive yeast or too cold environment | Make sure milk is at 110°F; create a warm environment for rising; check yeast expiration date |
| Filling leaking out | Butter too melted or rolls not tight enough | Use softened (not melted) butter; roll dough tightly; ensure proper sealing of edge |
| Soggy bottom rolls | Too much moisture from raspberries | Thoroughly coat berries with cornstarch; don’t crush berries when spreading; avoid overfilling |
| Dough too sticky to work with | Not enough flour or high humidity | Add more flour gradually while kneading; chill dough for 20 minutes before rolling |
| Uneven baking | Oven hot spots or uneven roll sizes | Rotate pan halfway through baking; ensure rolls are cut to equal size |
| Glaze too runny | Too much liquid added | Add more powdered sugar, 1 tablespoon at a time, until desired consistency |
Serving Suggestions
These raspberry cinnamon rolls make a stunning centerpiece for any breakfast or brunch spread. Here are my favorite pairings:
- Fresh fruit salad with mint
- Crispy bacon or breakfast sausage for a sweet-savory contrast
- Cold brew coffee or hot coffee with frothed milk
- Sparkling water with lemon slices
- Hot chocolate for the kids
- Freshly squeezed orange juice
- Yogurt parfaits with granola and berries
Storage Instructions
If by some miracle you have leftovers, here’s how to store them:
- Counter: Store in an airtight container at room temperature for up to 2 days.
- Refrigerator: Keep in an airtight container for up to 5 days. Warm slightly before serving.
- Reheating: For best results, microwave individual rolls for 15-20 seconds or warm in a 300°F oven for 5-7 minutes.
Nutritional Information
| Nutrient | Amount per Roll |
|---|---|
| Calories | 385 |
| Total Fat | 17g |
| Saturated Fat | 10g |
| Cholesterol | 65mg |
| Sodium | 135mg |
| Total Carbohydrates | 55g |
| Dietary Fiber | 3g |
| Sugars | 28g |
| Protein | 6g |
| Vitamin C | 8mg |
| Calcium | 55mg |
| Iron | 2mg |
Note: Nutritional values are approximate and may vary based on specific ingredients used.
Recipe FAQs
Q: Can I use frozen raspberries instead of fresh? A: Yes, you can use frozen raspberries, but don’t thaw them first. Toss them frozen with the cornstarch and use immediately. You might need to increase the cornstarch to 3 tablespoons to account for extra moisture.
Q: My kitchen is cold. How can I help my dough rise properly? A: Create a warm environment by turning your oven on to the lowest setting for 2 minutes, then turning it off. Place the covered dough in the slightly warm oven with the door cracked open. Alternatively, place the dough near a sunny window or on top of a running dryer.
Q: Can I make these without a stand mixer? A: Absolutely! Mix the dough ingredients with a wooden spoon until combined, then turn out onto a floured surface and knead by hand for 8-10 minutes until smooth and elastic.
Q: How do I know when the rolls are properly baked? A: The tops should be golden brown, and if you have a kitchen thermometer, the internal temperature should reach 190°F (88°C). Another test is to gently pull at the center roll—if it still looks doughy and raw, continue baking.
Q: My glaze set too quickly and is too thick. What should I do? A: Warm it slightly in the microwave (5-10 seconds) or add another teaspoon of lemon juice or milk to thin it out.
Q: Can I double this recipe? A: Yes! Double all ingredients and either make two 9×13-inch pans or use one large 15×10-inch baking pan.
Q: The center rolls seem underbaked while the outer ones are perfect. Help! A: This is common with cinnamon rolls. Try using a metal pan instead of glass for more even heat distribution, and make sure your oven is properly calibrated. You can also try baking at 25°F lower and for longer.
Personal Notes
I first created these raspberry cinnamon rolls for my sister’s birthday brunch, and they’ve become our family’s signature special occasion breakfast. What I love most about this recipe is how the tart raspberries cut through the sweetness that can sometimes make traditional cinnamon rolls overwhelming after the first few bites.
The dough recipe itself has been in my baking repertoire for years, adapted from my grandmother’s handwritten recipe card that’s now splattered with butter stains and dusted with permanent flour residue—the mark of a truly beloved recipe. She always made her cinnamon rolls with raisins, which I’ve swapped for raspberries, but the base dough remains the same trustworthy foundation.
Don’t be intimidated if you’re new to working with yeast doughs. This recipe is surprisingly forgiving, and even “imperfect” homemade cinnamon rolls are delicious. The key is patience—let the dough rise fully, handle it gently when rolling, and don’t rush the process.

Once you master this recipe, you’ll never want to return to store-bought rolls again. The smell alone as they bake is worth the effort, not to mention the pride that comes from presenting a pan of these beautiful swirled creations to your appreciative family or guests.
I hope these raspberry cinnamon rolls bring as much joy to your kitchen as they have to mine. There’s something deeply satisfying about continuing baking traditions while adding your own creative twist—creating new food memories one delicious roll at a time.