There’s something magical about the aroma of freshly baked dinner rolls wafting through your kitchen. I’ve been perfecting my dinner roll recipe for over a decade, and I can tell you that nothing beats the satisfaction of pulling a tray of golden, pillowy rolls from your own oven. Whether you’re preparing for a holiday feast, Sunday dinner, or just want to elevate an ordinary weeknight meal, homemade dinner rolls are the perfect complement to any table.
My journey with dinner rolls began when I was a young cook, frustrated by store-bought rolls that were either too dense, too sweet, or simply lacking that homemade warmth. After countless experiments, failed batches, and plenty of learning moments, I’ve developed what I consider the perfect dinner roll recipe. These rolls are soft, buttery, and have just the right amount of sweetness to complement both savory and sweet dishes.
Understanding the Science Behind Perfect Dinner Rolls
Before diving into the recipe, I want to share some essential knowledge about what makes dinner rolls truly exceptional. The secret lies in understanding how each ingredient contributes to the final product.
Yeast: The living organism that creates the magic : Active dry yeast or instant yeast both work wonderfully for this recipe. Yeast feeds on sugars and produces carbon dioxide, which creates those beautiful air pockets that make rolls light and fluffy.
Flour: The foundation of structure : All-purpose flour provides the perfect balance of protein content for tender yet structured rolls. I prefer unbleached flour for its superior flavor and performance.
Sugar: More than just sweetness : Sugar feeds the yeast and contributes to browning. It also helps retain moisture, keeping your rolls soft for days.
Butter: The key to richness : Real butter adds flavor and creates a tender crumb. I always use unsalted butter so I can control the salt content precisely.
Eggs: The binding agents : Eggs provide structure, richness, and contribute to the beautiful golden color of the finished rolls.
Salt: The flavor enhancer : Salt doesn’t just add flavor; it strengthens the gluten network and controls yeast activity for optimal rise.
My Foolproof Dinner Roll Recipe
After years of refinement, this recipe consistently produces 18 perfectly sized dinner rolls that are soft, flavorful, and have an irresistible golden crust.
Ingredients
| Ingredient | Amount | Notes |
|---|---|---|
| Warm water | 1 cup (240ml) | Temperature should be 105-115°F |
| Active dry yeast | 2¼ teaspoons | One standard packet |
| Sugar | ¼ cup (50g) | Granulated white sugar |
| All-purpose flour | 4 cups (480g) | Unbleached preferred |
| Salt | 1 teaspoon | Fine sea salt or table salt |
| Unsalted butter | 6 tablespoons | Softened to room temperature |
| Large eggs | 2 | Room temperature |
| Milk | ½ cup (120ml) | Whole milk for richness |
| Butter for brushing | 2 tablespoons | Melted |
Step-by-Step Instructions
Step 1: Activate the Yeast I start by combining the warm water, yeast, and a pinch of the sugar in a large mixing bowl. The water temperature is crucial here – too hot and you’ll kill the yeast, too cool and it won’t activate properly. I let this mixture sit for 5-10 minutes until it becomes foamy and bubbly. This tells me the yeast is alive and ready to work.
Step 2: Create the Dough Base To the activated yeast mixture, I add the remaining sugar, milk, melted butter, and eggs. I whisk these ingredients together until well combined. The mixture should be smooth and slightly warm to the touch.
Step 3: Incorporate the Flour I add the flour and salt to the wet ingredients, starting with 3 cups of flour. Using a wooden spoon or my stand mixer with a dough hook, I mix until a shaggy dough forms. Then I gradually add the remaining flour, mixing until the dough pulls away from the sides of the bowl.
Step 4: Knead to Perfection This is where the magic happens. I knead the dough for 8-10 minutes by hand or 5-6 minutes with a stand mixer. The dough should become smooth, elastic, and slightly tacky but not sticky. I perform the “windowpane test” – stretching a small piece of dough thin enough to see light through it without tearing.
Step 5: First Rise I place the dough in a greased bowl, cover it with a damp towel, and let it rise in a warm, draft-free place for 1-1.5 hours, or until doubled in size. I often use my oven with just the light on to create the perfect environment.
Step 6: Shape the Rolls Once the dough has doubled, I punch it down gently to release the air bubbles. I divide the dough into 18 equal pieces, each weighing about 2.5 ounces. I shape each piece into a smooth ball by tucking the edges under and rolling against the counter with my palm.
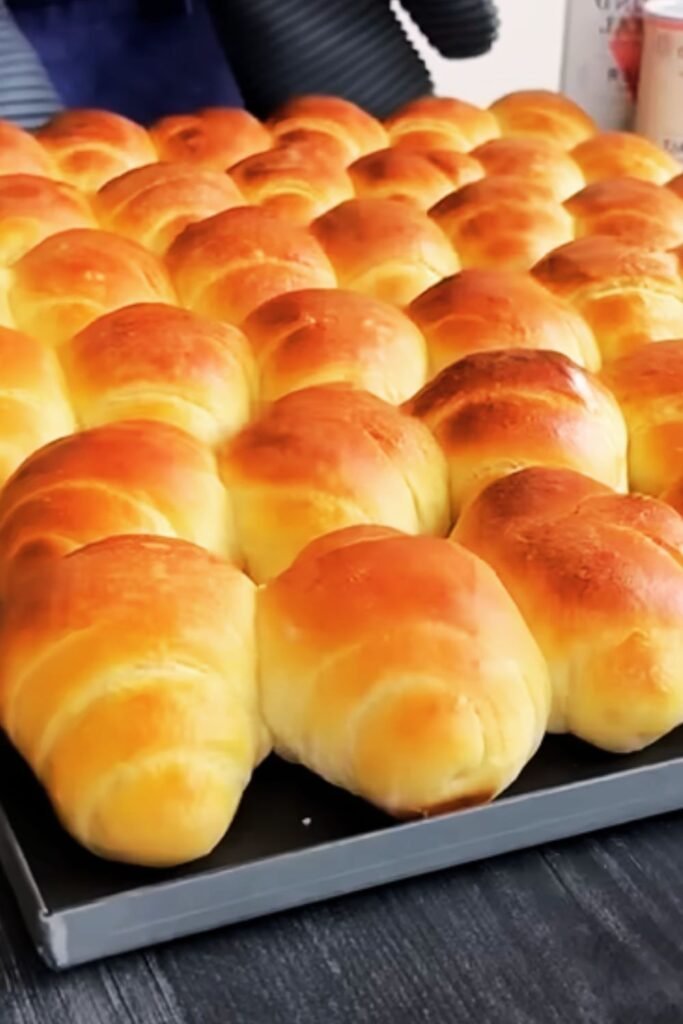
Step 7: Second Rise I arrange the shaped rolls on two greased 9×13 inch baking pans, spacing them about 2 inches apart. I cover them with a clean kitchen towel and let them rise for another 45-60 minutes until they’ve nearly doubled in size and are touching each other.
Step 8: Bake to Golden Perfection I preheat my oven to 375°F (190°C). Before baking, I brush the tops of the rolls with melted butter for that gorgeous golden color. I bake for 15-18 minutes, rotating the pans halfway through for even browning.

Troubleshooting Common Issues
Over the years, I’ve encountered and solved numerous dinner roll challenges. Here are the most common problems and my solutions:
Dense, Heavy Rolls This usually results from too much flour or insufficient kneading. I always measure flour by spooning it into the measuring cup and leveling it off, never scooping directly from the bag. Proper kneading develops the gluten network essential for light, airy rolls.
Rolls That Don’t Rise Check your yeast’s expiration date and water temperature. Yeast is sensitive to temperature – too hot kills it, too cool prevents activation. I always test my yeast in a small amount of warm water with sugar before adding it to the full recipe.
Tough, Chewy Texture This typically happens when the dough is over-kneaded or contains too much flour. I knead just until the dough is smooth and elastic, and I add flour gradually to avoid overdoing it.
Uneven Browning Oven hot spots can cause uneven browning. I rotate my pans halfway through baking and position them in the center of the oven for the most even heat distribution.
Nutritional Information and Storage
Understanding the nutritional content helps me plan balanced meals around these delicious rolls.
Nutritional Breakdown (Per Roll)
| Nutrient | Amount | % Daily Value |
|---|---|---|
| Calories | 165 | 8% |
| Total Fat | 4.5g | 6% |
| Saturated Fat | 2.8g | 14% |
| Cholesterol | 35mg | 12% |
| Sodium | 180mg | 8% |
| Total Carbohydrates | 27g | 10% |
| Dietary Fiber | 1g | 4% |
| Sugars | 4g | – |
| Protein | 5g | 10% |
Storage Guidelines
| Storage Method | Duration | Quality Notes |
|---|---|---|
| Room Temperature | 2-3 days | Store in airtight container |
| Refrigerator | 1 week | May become slightly firm |
| Freezer | 3 months | Wrap individually in plastic |
| Reheating | 5-10 minutes | 300°F oven for best results |
Variations and Flavor Enhancements
One of the things I love most about this recipe is its versatility. Here are some of my favorite variations:
Herb Dinner Rolls I add 2 tablespoons of fresh chopped herbs like rosemary, thyme, or sage to the dough during the mixing stage. These are perfect for holiday meals.
Garlic Butter Rolls I brush the rolls with garlic butter before baking – mixing 3 cloves of minced garlic with the melted butter creates an irresistible aroma and flavor.
Honey Wheat Rolls I substitute 1 cup of all-purpose flour with whole wheat flour and replace the sugar with honey. These have a nuttier flavor and slightly denser texture.
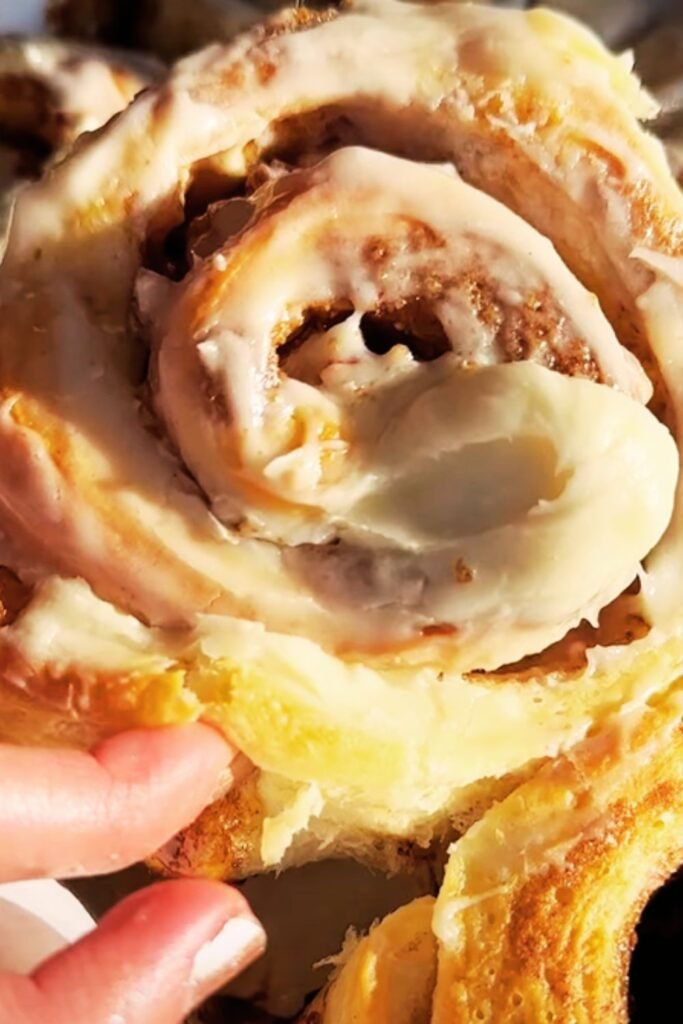
Sweet Cinnamon Rolls I roll the dough into a rectangle, brush with butter, sprinkle with cinnamon sugar, roll up, and slice. Perfect for special occasions.
Perfect Pairings and Serving Suggestions
These versatile rolls complement countless dishes. Here are some of my favorite pairings:
Holiday Dinners My dinner rolls are essential for Thanksgiving, Christmas, and Easter meals. They’re perfect for soaking up gravy and complement both turkey and ham beautifully.
Soup and Salad Combos I serve these rolls with hearty soups like chicken noodle, tomato basil, or minestrone. They’re also wonderful with fresh garden salads.
Barbecue and Grilled Meals These rolls make excellent sliders with pulled pork or grilled chicken. Their soft texture holds up well to saucy barbecue dishes.
Breakfast Applications Leftover rolls make fantastic breakfast sandwiches or French toast. I slice them in half and toast them lightly for the perfect breakfast base.
Advanced Tips for Professional Results
After years of making these rolls, I’ve learned some professional techniques that take them from good to exceptional:
Temperature Control I use a kitchen thermometer to ensure my water is the perfect temperature for yeast activation. This small investment has dramatically improved my success rate.
Timing Flexibility I can slow down the rising process by placing the dough in the refrigerator for the first rise. This develops more complex flavors and fits better into busy schedules.
Steam for Crustiness For a slightly crustier exterior, I place a small pan of hot water on the bottom rack of my oven during the first 10 minutes of baking.
Egg Wash Alternative Instead of just butter, I sometimes brush the rolls with beaten egg mixed with a tablespoon of milk for an extra glossy, golden finish.
Frequently Asked Questions
Q: Can I make the dough ahead of time? Absolutely! I often prepare the dough through the first rise, then refrigerate it overnight. The next day, I let it come to room temperature, shape the rolls, and proceed with the second rise.
Q: What’s the best way to reheat leftover rolls? I wrap them in damp paper towels and microwave for 10-15 seconds, or place them in a 300°F oven for 5-10 minutes. The oven method gives better texture.
Q: Can I freeze the shaped rolls before baking? Yes! I freeze the shaped rolls on a baking sheet, then transfer them to freezer bags. When ready to bake, I thaw them at room temperature, let them rise, and bake as usual.
Q: Why do my rolls sometimes come out too sweet? The sugar content in this recipe is balanced for most tastes, but if you prefer less sweetness, you can reduce the sugar to 2 tablespoons without affecting the yeast activity significantly.
Q: Can I use bread flour instead of all-purpose flour? You can, but the texture will be slightly different. Bread flour has higher protein content, which creates chewier rolls. I prefer all-purpose flour for the tender texture these rolls are known for.
Q: How do I know when the rolls are fully baked? The rolls should be golden brown on top and sound hollow when tapped on the bottom. An instant-read thermometer inserted into the center should read 190°F.
Q: What’s the secret to getting rolls that are touching but still pull apart easily? I space the rolls about 2 inches apart initially, and during the second rise, they naturally grow together. The key is not to press them together forcefully.
Q: Can I make mini dinner rolls with this recipe? Certainly! I divide the dough into 24-30 smaller pieces instead of 18. The baking time reduces to about 12-15 minutes, so watch them carefully.
Q: Is there a way to make these rolls dairy-free? You can substitute the milk with non-dairy alternatives like almond or oat milk, and use vegan butter. The texture will be slightly different but still delicious.
Q: What should I do if my dough isn’t rising? Check that your yeast is fresh and that your rising environment is warm enough (75-80°F is ideal). If it’s too cold, try placing the bowl on top of your refrigerator or in an oven with just the light on.
Seasonal Adaptations
Throughout the year, I modify this recipe to match seasonal ingredients and occasions:
Spring: I add fresh chives and a touch of lemon zest for bright, fresh flavors.
Summer: Fresh herbs from my garden like basil or oregano make wonderful additions.
Fall: I incorporate pumpkin puree (reducing the milk slightly) and warm spices like cinnamon and nutmeg.
Winter: During the holidays, I add a touch of vanilla extract and sometimes dried cranberries for festive color.
The Perfect Dinner Roll Experience
Making homemade dinner rolls is about more than just following a recipe – it’s about creating an experience. The process of kneading dough is meditative, the aroma while baking is intoxicating, and the satisfaction of serving something made entirely from scratch is unmatched.
I encourage you to make this recipe your own. Maybe you’ll discover that your family prefers a touch more salt, or perhaps you’ll find that adding a tablespoon of honey creates the perfect sweetness level for your taste. The beauty of homemade bread is that it can be customized to your exact preferences.
Remember, bread-making is as much an art as it is a science. Don’t be discouraged if your first batch isn’t perfect – each attempt teaches you something new about the process. Pay attention to how the dough feels, how it looks at different stages, and how environmental factors like humidity and temperature affect your results.
These dinner rolls have become a signature item in my kitchen, requested for every family gathering and special occasion. They represent comfort, hospitality, and the joy of sharing homemade food with people you love. I hope this recipe brings the same satisfaction to your kitchen that it has brought to mine.
The next time you’re planning a special meal or simply want to surprise your family with something extraordinary, remember that perfect dinner rolls are just a few hours away. The time invested in making them from scratch is always worth it when you see the smiles around your table and hear the satisfied sighs as people bite into these pillowy, buttery creations.
Happy baking, and may your kitchen always be filled with the wonderful aroma of freshly baked bread!