Have you ever gazed in wonder at those perfectly decorated cakes and cookies in bakery windows? The beautiful swirls, flowers, and intricate designs that seem almost too perfect to eat? I’ve been there too, and I’m here to tell you that with the right tools, techniques, and a bit of practice, you can create these stunning decorations in your own kitchen.
As someone who has spent countless hours with a piping bag in hand (and occasionally with frosting on my face), I’ve learned that piping isn’t just a culinary skill—it’s an art form that transforms ordinary desserts into extraordinary creations. Whether you’re a beginner who’s never held a piping bag or an experienced baker looking to refine your techniques, this comprehensive guide will help you elevate your decorating game.
The Essential Piping Tools
Before diving into techniques, let’s make sure you have the right equipment. Having proper tools makes all the difference between frustration and success.
Piping Bags
Piping bags are the foundation of any decoration work. There are several options available:
- Disposable Plastic Bags: Perfect for beginners or occasional use
- Reusable Cloth Bags: More environmentally friendly and durable
- Parchment Paper Bags: Can be custom-made for specific projects
- Silicone Bags: Easy to clean and have good grip
I personally prefer reusable cloth bags for everyday use, but keep disposable ones on hand for quick color changes or when working with multiple colors. No matter which type you choose, remember that the size matters—16-inch bags are versatile for most projects, while smaller 12-inch bags work well for detailed work.
Piping Tips
Piping tips are where the magic happens. These metal (or sometimes plastic) attachments create specific patterns and shapes:
| Tip Category | Common Numbers | Best Used For | Typical Designs |
|---|---|---|---|
| Round Tips | #1, #2, #3, #5, #8, #12 | Writing, dots, outlines, beadwork | Simple lines, dots, pearls, stringwork |
| Star Tips | #4B, #16, #18, #21, #32, #199, #2D | Rosettes, shells, stars, borders | Stars, shells, rosettes, fluted borders |
| Leaf Tips | #67, #68, #69, #70, #113 | Foliage, leaves | Various leaf shapes |
| Petal Tips | #101, #102, #103, #104, #125 | Flower petals, ruffles | Rose petals, chrysanthemums, carnations |
| Specialty Tips | #233 (grass), #44 (basket weave) | Textured designs | Grass, fur, hair, basket weave patterns |
| French Tips | #6B, #8B, #30, #32 | Borders, rosettes with more texture | Open stars, french shell borders |
| Basketweave Tips | #47, #48 | Creating woven texture | Basket patterns on cakes |
| Ruffle Tips | #86, #87, #340, #352 | Ruffles, frills | Dress edges, curtain effects, ribbon effects |
My advice? Start with these essential tips: Round #3, Round #12, Star #16, Star #21, Petal #104, and Leaf #67. This combination will allow you to create a wide variety of designs while you build your skills.
Couplers and Other Accessories
Don’t overlook these helpful additions:
- Couplers: Allow you to change tips without changing bags
- Tip Cleaning Brushes: Essential for maintaining your tips
- Flower Nails: For creating flowers that can be transferred to your desserts
- Flower Scissors: Help in transferring delicate decorations
- Piping Bag Ties: Keep your bags closed and prevent frosting from escaping
Grab the Saving up to 50% from Target Deal Days (Mar 25 to 27, 2026)
Preparing Your Piping Medium
The consistency of your frosting or icing is crucial for successful piping. Here’s what you need to know:
Types of Piping Mediums
| Medium | Best For | Consistency Tips | Storage |
|---|---|---|---|
| Buttercream | General decorating, borders, flowers | Medium-stiff for flowers, softer for borders | Room temp for use, refrigerate up to 1 week |
| Royal Icing | Fine details, stringwork, flood work | Stiff for details, thinned for flooding | Airtight at room temp for 24 hours, refrigerate up to 2 weeks |
| Cream Cheese Frosting | Carrot cakes, red velvet | Chill before piping for better control | Refrigerate up to 1 week |
| Ganache | Drips, simple piping | Use when slightly cooled but still flowing | Refrigerate up to 2 weeks |
| Stabilized Whipped Cream | Light decorations, rosettes | Pipe immediately after preparing | Use immediately, doesn’t store well |
| Meringue | Cookies, pie decorations | Stiff peaks for best control | Use immediately |
I’ve found that buttercream is the most versatile medium for beginners. It’s stable, forgiving, and can be adjusted easily. The perfect piping buttercream should hold its shape when piped but still feel smooth and manageable in the bag.
Achieving the Right Consistency
The ideal consistency depends on your technique:
- Stiff Consistency: Holds sharp edges and detailed shapes (flowers, figures)
- Medium Consistency: Most versatile, holds some shape but pipes smoothly (borders, rosettes)
- Thin Consistency: Flowing but not runny (coating, simple borders)
To test your buttercream consistency, take a spatula, scoop some frosting, and flip it upside down. If it stays on the spatula without falling off, it’s good for most piping needs. If it’s too stiff, add a few drops of milk or water. If it’s too soft, add more powdered sugar or chill it for a while.
Basic Piping Techniques
Let’s start with the fundamentals that form the building blocks of more complex designs.
How to Fill a Piping Bag
- Place your piping bag in a tall glass, folding the edges over the rim
- Insert your chosen tip and coupler if using
- Fill the bag no more than 2/3 full with your medium
- Twist the top of the bag to close and push frosting down toward the tip
- Remove air bubbles by gently squeezing some frosting back into your bowl
Holding the Bag Correctly
Proper grip is essential:
- Hold the twisted end of the bag between your thumb and fingers of your dominant hand
- Guide the tip with your non-dominant hand
- Apply pressure with your dominant hand while your non-dominant hand controls direction
- Keep your wrist straight and use your whole arm for movement, not just your wrist
Basic Techniques
| Technique | How To | Common Uses |
|---|---|---|
| Lines | Hold bag at 45° angle, apply even pressure, move steadily | Outlines, writing, stems |
| Dots | Hold bag at 90° angle, apply pressure, stop, pull away | Borders, centers, decorative elements |
| Stars | Hold bag at 90° angle, apply pressure, stop, pull away | Borders, background fills, simple flowers |
| Rosettes | Hold bag at 90° angle, start in center, pipe in circular motion outward | Cake tops, cupcakes, borders |
| Shells | Hold at 45° angle, apply pressure, move forward, decrease pressure, stop | Borders, edges |
| Zigzags | Hold at 45° angle, move side to side while applying consistent pressure | Borders, textured backgrounds |
Grab the Saving up to 50% from Target Deal Days (Mar 25 to 27, 2026)
Intermediate Piping Techniques
Once you’ve mastered the basics, these techniques will help you create more elaborate designs.
Flower Techniques
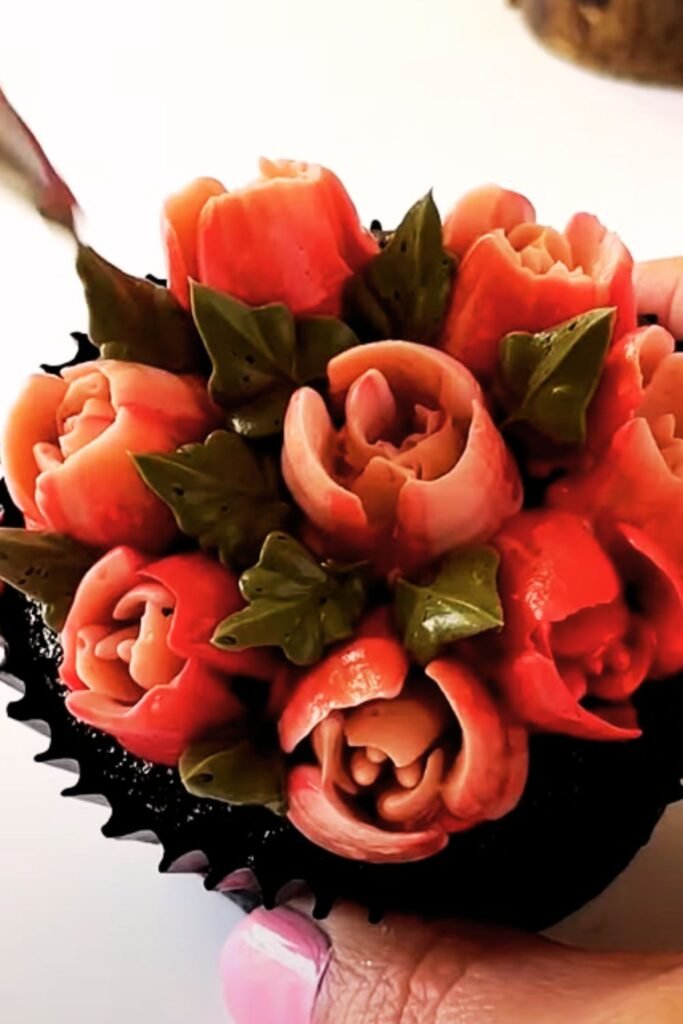
Roses
I remember my first attempt at piping roses—they looked more like cabbages! But with practice, they’ve become one of my favorite decorations to create:
- Start with a small cone of stiff buttercream on your flower nail
- Using a petal tip (#104), pipe three overlapping petals around the center
- Continue adding rows of overlapping petals, working outward
- Each new row should be offset from the previous row
- As you move outward, gradually angle the tip more horizontally
Drop Flowers
These are much simpler than roses but still impressive:
- Use a star tip (#2D or #131)
- Hold the bag perpendicular to the surface
- Apply pressure and then quickly release, pulling away
- The result is a quick flower that requires no additional petals
Petal Flowers
For daisies, chrysanthemums, and other flat flowers:
- Pipe a round center using a round tip
- Switch to a petal tip (#104)
- Hold the bag at a 45° angle with the narrow end of the tip pointing outward from the center
- Apply pressure while pulling outward to create each petal
- Continue around the center until complete
Leaf Techniques
Leaves add natural elements and color contrast to your floral designs:
- Use a leaf tip (#67 or #352)
- Hold the bag at a 45° angle with the pointed end up
- Apply pressure and pull away, reducing pressure as you finish
- For realistic leaves, add a slight wiggle as you pipe
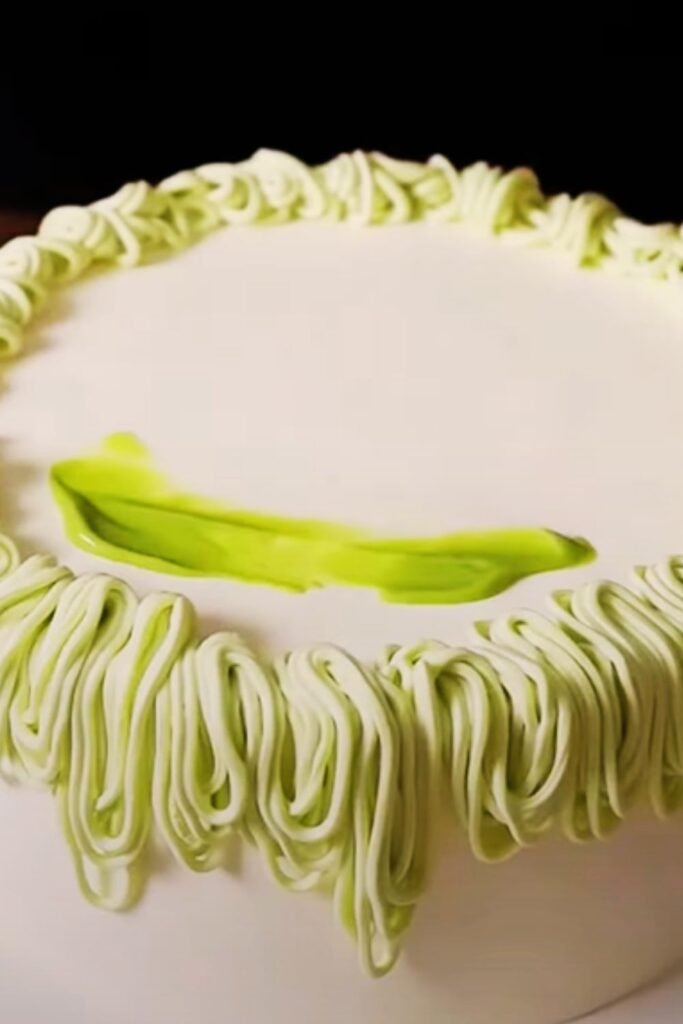
Border Techniques
Borders frame your creation and add a finished look:
- Shell Border: Pipe a series of connected shells along the edge
- Rope Border: Pipe diagonal lines that connect to form a twisted rope appearance
- Ruffle Border: Use a petal tip to create flowing ruffles along the edge
- Bead Border: Pipe a series of even dots along the edge
- Scalloped Border: Create connected half-circles for an elegant effect
Grab the Saving up to 50% from Target Deal Days (Mar 25 to 27, 2026)
Advanced Piping Techniques
Ready to take your skills to the next level? These techniques will truly impress.
Brush Embroidery
This technique creates a painted look with depth:
- Pipe an outline of your design using a small round tip
- While the icing is still wet, use a small paintbrush to gently pull the icing inward
- The result resembles delicate embroidery work
Stringwork and Lace
These delicate techniques require practice but create stunning results:
- Use royal icing with a small round tip (#0 or #1)
- For suspended strings, pipe a dot, let it set slightly, then extend a string to another point
- For lace patterns, pipe interconnected strings in lacework patterns
- Work in small sections and allow partial drying between elements
Lambeth Method
This classical English technique creates dimensional designs:
- Start with a base border
- Add progressively smaller borders on top
- Each new layer should be set before adding the next
- The result is an ornate, three-dimensional decoration

Piping for Different Desserts
Different desserts require different approaches. Here’s how to adapt your techniques:
Cakes
- Layer Cakes: Focus on borders, top decorations, and side designs
- Sheet Cakes: Large designs work well, consider spacing
- Cupcakes: Single large decorations or multiple smaller elements
Cookies
- Use smaller tips (#1, #2) for fine details
- Royal icing works best for defined edges
- Allow base layers to dry before adding details
Pastries
- Use star tips for cream puffs and éclairs
- Consider the texture of your filling—chunky fillings need larger tips
- French pastry often uses specific tips for classical designs
Macarons
- Small round tips (#1, #2) for filling
- Keep designs within the boundary of the cookie
- Pipe filling in a ring around the edge, then fill the center
Grab the Saving up to 50% from Target Deal Days (Mar 25 to 27, 2026)
Common Piping Problems and Solutions
Even experienced decorators encounter issues. Here’s how to fix them:
| Problem | Cause | Solution |
|---|---|---|
| Frosting too soft | Temperature too high, too much liquid | Add more powdered sugar, chill bag for 5-10 minutes |
| Frosting too stiff | Not enough liquid, too cold | Add a few drops of milk or water, let warm slightly |
| Air bubbles | Improper bag filling | Knead bag before piping, pipe some frosting into a bowl first |
| Tips clogging | Solid particles, dried frosting | Use a tip cleaner or thin wire to clear, strain thick frostings |
| Uneven lines | Inconsistent pressure, bag held wrong | Practice pressure control, check your grip |
| Designs losing shape | Frosting too soft, room too warm | Use stiffer frosting, work in cooler environment |
| Hand fatigue | Squeezing too hard, poor technique | Take breaks, use proper technique, don’t overfill bags |
Color Mixing Tips
The right colors can transform your creations:
- Start with a small amount of gel or paste colors (not liquid)
- Mix colors in advance so they can deepen
- Create custom shades by mixing primary colors
- For metallic effects, use special dust mixed with clear alcohol
Pro tip: I like to create a color chart on parchment paper when working on complex projects. Once the colors dry, you can see exactly how they’ll look on your finished piece.
Themed Decorating Ideas
Need inspiration? Here are some themes to explore:
Seasonal Themes
- Spring: Pastel colors, flowers (roses, daisies), leaves
- Summer: Bright colors, tropical flowers, beach themes
- Fall: Orange, brown, red tones, leaves, pumpkins
- Winter: Blue, white, snowflakes, holly leaves
Celebration Themes
- Birthday: Stars, balloons, confetti designs
- Wedding: Elegant scrollwork, delicate flowers, lace patterns
- Baby Shower: Soft colors, small flowers, simple animals
- Graduation: School colors, diploma designs, caps
Holiday Themes
- Valentine’s Day: Hearts, roses, swirls in red and pink
- Easter: Eggs, bunnies, spring flowers
- Halloween: Spiderwebs, pumpkins, ghosts
- Christmas: Snowflakes, holly, Christmas trees
Practice Exercises
Improve your skills with these targeted exercises:
- Line Control: Practice piping straight lines, curved lines, and zigzags on parchment paper
- Pressure Control: Create dots that gradually increase then decrease in size
- Star Consistency: Pipe rows of stars, aiming for identical size and shape
- Rosette Challenge: Create rosettes of various sizes with the same tip
- Border Practice: Create a continuous border around a circle without stopping
Remember to save your practice sheets—it’s incredibly satisfying to look back and see your progress!
Taking Your Skills Further
As you grow more confident, consider these next steps:
Learning Resources
- Attend workshops at local cake supply stores
- Follow tutorial videos online
- Join piping forums and social media groups
- Study books on specialized techniques
Building a Piping Kit
Create a dedicated kit with:
- A variety of tips organized by category
- Different types and sizes of bags
- Color mixing tools
- Template guides
- Small offset spatula for corrections
Photography Tips
Want to showcase your work?
- Use natural lighting when possible
- Take photos from multiple angles
- Create simple, non-distracting backgrounds
- Consider investing in a macro lens for detail shots
Serving Suggestions
Beautiful piping deserves a beautiful presentation:
- Match your serving plates to the color scheme of your desserts
- Consider height and levels when displaying multiple desserts
- Use cake stands to elevate special pieces
- Add fresh elements (mint leaves, edible flowers) as accents
- For formal events, coordinate with table linens and decor
Storage and Transportation
Protect your hard work with proper storage:
- Allow royal icing decorations to dry completely before storing
- Refrigerate buttercream decorations to set before transport
- Use cake boxes tall enough to avoid touching the decorations
- For longer trips, consider using a cooler with ice packs
- Insert dowels in tiered cakes for stability during transport
Grab the Saving up to 50% from Target Deal Days (Mar 25 to 27, 2026)
Q&A Section
Q: How long does it take to become proficient at piping?
Like any skill, piping takes practice. Most beginners can master basic techniques like stars and shells within a few weeks of regular practice. More complex techniques like roses and stringwork might take several months to perfect. The key is consistent practice—even 15 minutes a day will build your skill faster than occasional marathon sessions.
Q: My hands get tired very quickly when piping. What am I doing wrong?
You might be gripping the bag too tightly or using frosting that’s too stiff. Try loosening your grip and ensuring your frosting is the right consistency. Also, don’t overfill your bags—they should be no more than 2/3 full. Taking short breaks and stretching your hands can help prevent fatigue.
Q: How do I prevent air bubbles in my piping bag?
Air bubbles can ruin a smooth design. To prevent them, after filling your bag, lift it tip-up and squeeze the frosting down toward the tip, forcing air bubbles upward. Then twist the bag tightly and press out a small amount of frosting into a separate bowl before starting your decorating.
Q: My buttercream keeps breaking and looking grainy. How can I fix this?
Broken buttercream usually means the fats and liquids have separated. To fix it, try warming the outside of the bowl slightly (using a hairdryer on low or placing the bowl over warm water) while continuing to mix. For American buttercream, adding a tablespoon of heavy cream or milk and mixing thoroughly can also help restore smoothness.
Q: Can I pipe designs in advance and freeze them?
Yes! Many decorations can be piped ahead of time. Royal icing decorations can be made weeks in advance—pipe them onto parchment paper, let them dry completely, then store in an airtight container. Buttercream flowers can be piped onto small squares of parchment, frozen on a baking sheet, then transferred to a container and kept frozen until needed.
Q: What’s the best way to practice without wasting ingredients?
I love using mashed potatoes (plain, no butter) as a practice medium! They have a similar consistency to buttercream but cost much less. You can also reuse the same batch for an entire practice session. Another option is shortening mixed with powdered sugar, which can be scooped back into a container and reused multiple times.
Q: How do I keep my hands from warming the buttercream in the bag?
If your hands run warm, try using a cloth barrier between your hands and the piping bag. A small kitchen towel works well. You can also keep a bowl of ice water nearby to occasionally cool your hands, and work with smaller amounts of frosting at a time, keeping the rest refrigerated until needed.
Q: My piped flowers keep falling over or losing shape. What am I doing wrong?
Your buttercream is likely too soft. Try these fixes: use a stiffer buttercream recipe with a higher ratio of powdered sugar; chill your buttercream for 10-15 minutes before piping; work in a cooler room; or add a small amount of tylose powder or CMC (about 1/4 teaspoon per cup of buttercream) to help it set more firmly.
Final Thoughts
Piping is truly an art form that combines creativity with technical skill. What I love most about it is how it transforms simple ingredients into stunning designs that bring joy to others. The learning process never really ends—even after years of practice, I still discover new techniques and find ways to improve.
Remember that even professional decorators had to start somewhere. Be patient with yourself, celebrate your progress, and don’t be afraid to experiment. Some of my most popular designs came from happy accidents!
Whether you’re decorating for special occasions or simply enjoying a creative outlet, I hope this guide helps you discover the joy of piping. Start with simple techniques, build your confidence, and before long, you’ll be creating designs that make people ask, “How did you do that?”
Happy piping!