Have you ever had that moment? You’re all set for a backyard barbecue or casual family dinner, the grill is heating up, the hot dogs are ready to go, and then… panic strikes. You’re out of hot dog buns! I’ve been there more times than I’d like to admit, which is exactly why I developed this quick and easy hot dog bun recipe that’s become my secret weapon.
What if I told you that you could make delicious, soft, perfectly-sized hot dog buns at home in just about 90 minutes? No more emergency trips to the store, no more settling for hamburger buns sliced down the middle (we’ve all been there!), and definitely no more serving naked hot dogs on a plate (the horror!).
I’m going to walk you through my foolproof method for creating hot dog buns that not only taste better than store-bought but will have your family and friends wondering when you became such a talented baker. Trust me, this recipe is so straightforward that even if you’ve never baked bread before, you’ll be successful.
Why Make Your Own Hot Dog Buns?
Before diving into the recipe, let me share why making your own hot dog buns is worth the (minimal) effort:
- Freshness: Nothing beats the smell and taste of freshly baked bread
- Control over ingredients: No preservatives or ingredients you can’t pronounce
- Customization: Make them the size and shape you want
- Cost-effective: Pennies per bun compared to store prices
- Impressive factor: Serving homemade buns earns serious host/hostess points
- Emergency solution: Perfect for when you’re caught without buns
The Ingredients Rundown
One of the things I love most about this recipe is that it uses simple pantry staples. Here’s what you’ll need:
| Ingredient | Amount | Notes |
|---|---|---|
| All-purpose flour | 3½ cups (440g) | You can substitute up to 1 cup with whole wheat flour |
| Instant yeast | 2¼ teaspoons (1 packet) | Active dry yeast works too, just proof it first |
| Granulated sugar | 2 tablespoons | Feeds the yeast and adds a touch of sweetness |
| Salt | 1¼ teaspoons | Enhances flavor and controls yeast activity |
| Warm water | 1 cup (240ml) | Around 110°F (43°C) – should feel warm, not hot |
| Milk | ½ cup (120ml) | Whole milk creates the softest buns |
| Butter | 3 tablespoons (42g) | Unsalted, melted and cooled slightly |
| Egg | 1 large | Brings richness and structure |
| For topping (optional): | ||
| Egg wash | 1 egg beaten with 1 tablespoon water | For a glossy top |
| Sesame seeds | 2 tablespoons | Adds texture and visual appeal |
| Poppy seeds | 2 tablespoons | Alternative topping option |
Essential Equipment
You don’t need fancy equipment, but these basic tools will help:
- Large mixing bowl
- Measuring cups and spoons
- Kitchen scale (optional but helpful for consistency)
- Baking sheet
- Parchment paper
- Kitchen towel
- Sharp knife or kitchen scissors
- Pastry brush (for egg wash)
Grab the Saving up to 50% from Target Deal Days (Mar 25 to 27, 2026)
Step-by-Step Instructions
Let me walk you through the process with detailed steps to ensure perfect results every time:
1. Prepare the Dough
- In a large bowl, whisk together 3 cups of flour, yeast, sugar, and salt.
- In a separate microwave-safe bowl or measuring cup, combine water and milk. Heat to approximately 110°F (43°C) – it should feel warm but not hot on your wrist.
- Add the warm liquid mixture, melted butter, and egg to the dry ingredients.
- Mix until a shaggy dough forms.
- Gradually add the remaining ½ cup of flour as needed until the dough comes together but is still slightly tacky.
2. Knead to Perfection
- Turn the dough out onto a lightly floured surface.
- Knead for 5-7 minutes until smooth and elastic. (When you press a finger into the dough, it should slowly spring back.)
- If using a stand mixer, knead with the dough hook on medium-low speed for about 5 minutes.
I find that hand-kneading gives me a better feel for when the dough is ready, but either method works beautifully.
3. First Rise
- Place the dough in a lightly oiled bowl, turning once to coat both sides.
- Cover with a clean kitchen towel or plastic wrap.
- Let rise in a warm place until doubled in size, about 30-40 minutes.
Pro tip: I turn my oven on to its lowest setting for just 1-2 minutes, then turn it off and use it as a draft-free rising spot.
4. Shape the Buns
- Once doubled, gently punch down the dough to release air bubbles.
- Turn out onto a lightly floured surface.
- Divide the dough into 8 equal portions (about 100g each for standard-sized buns).
- For each portion:
- Roll into a ball
- Then roll into a cylinder shape about 4½-5 inches long
- Place on a parchment-lined baking sheet, leaving about 2 inches between each bun
You can make them bigger or smaller depending on your hot dogs. I sometimes make 10-12 smaller ones for kid-sized portions.
5. Second Rise
- Loosely cover the shaped buns with a kitchen towel.
- Let rise until puffy, about 20-30 minutes.
- Meanwhile, preheat your oven to 375°F (190°C).
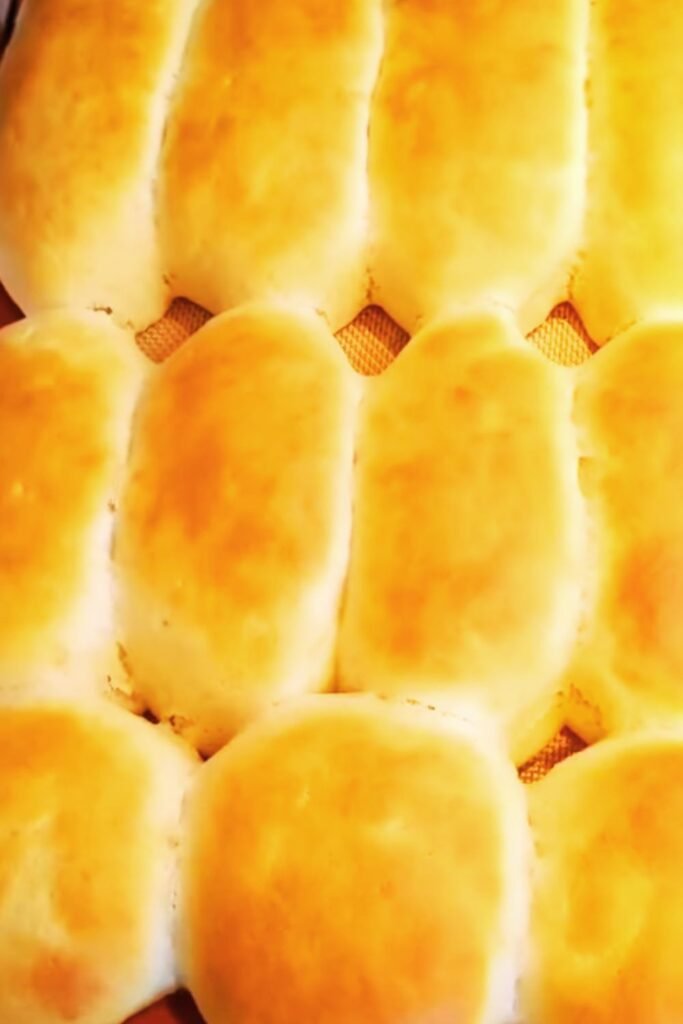
6. Bake to Golden Perfection
- If using egg wash, gently brush the tops of the buns just before baking.
- Sprinkle with sesame seeds or poppy seeds if desired.
- Bake for 12-15 minutes until golden brown.
- Remove from the oven and transfer to a wire rack to cool completely.
Grab the Saving up to 50% from Target Deal Days (Mar 25 to 27, 2026)

Troubleshooting Common Issues
Even with a straightforward recipe, things can sometimes go sideways. Here’s how to solve common problems:
| Problem | Possible Cause | Solution |
|---|---|---|
| Buns didn’t rise | Old yeast or too cool environment | Test yeast freshness before using; find a warmer spot for rising |
| Too dense/heavy | Not enough rising time or overworking the dough | Allow more time for rising; handle dough gently |
| Buns spread too wide | Dough too wet | Add a bit more flour; shape more firmly |
| Too crusty | Overbaking | Reduce baking time; cover with foil for the last few minutes |
| Uneven baking | Hot spots in the oven | Rotate the pan halfway through baking |
| Too pale | No egg wash used | Use egg wash for golden color; check oven temperature |
Variations to Try
Once you’ve mastered the basic recipe, why not try these delicious variations?
Whole Wheat Hot Dog Buns
Replace up to half of the all-purpose flour with whole wheat flour for a nuttier taste and added fiber. You might need to add an extra tablespoon of liquid as whole wheat flour absorbs more moisture.
Garlic Herb Buns
Add 2 teaspoons of garlic powder and 1 tablespoon of mixed dried herbs (like oregano, basil, and thyme) to the dry ingredients. Brush with melted butter mixed with minced fresh garlic after baking.
Cheesy Hot Dog Buns
Knead in ½ cup of shredded cheddar or Parmesan cheese to the dough. Sprinkle additional cheese on top before baking.
Brioche-Style Buns
Increase the butter to 6 tablespoons and use 2 eggs instead of 1 for a richer, more tender result.
Pretzel Hot Dog Buns
After shaping, dip buns in a bath of 8 cups water with ½ cup baking soda for 30 seconds. Drain, place on baking sheet, and sprinkle with coarse salt before baking.
Storage and Make-Ahead Tips
Like most homemade bread products, these buns are best enjoyed fresh. However, here’s how to handle extras:
- Same-day storage: Keep in a paper bag or loosely covered at room temperature.
- Short-term storage: Place in an airtight container for up to 2 days at room temperature.
- Freezing: Freeze in a zip-top bag for up to 3 months. Thaw at room temperature.
- Refreshing: To revive slightly stale buns, sprinkle with water and heat in a 350°F oven for 5 minutes.
- Make-ahead option: You can refrigerate the dough after the first rise for up to 24 hours. Let come to room temperature before shaping.
Grab the Saving up to 50% from Target Deal Days (Mar 25 to 27, 2026)
Serving Suggestions
These homemade buns elevate any hot dog experience. Here are some serving ideas to try:
- Classic American: Top with mustard, ketchup, relish, and diced onions
- Chicago Style: Yellow mustard, bright green relish, chopped onion, tomato slices, pickle spear, sport peppers, and a dash of celery salt
- Southwestern: Topped with pico de gallo, avocado slices, and a drizzle of lime crema
- Korean Inspired: Kimchi, sriracha mayo, and green onions
- Breakfast Dog: Serve a breakfast sausage in the bun with scrambled eggs and maple syrup
- Kid-Friendly: Cut into bite-sized pieces with ketchup for dipping
- Veggie Option: Use veggie dogs with sauerkraut and stone-ground mustard

The Perfect Slice Technique
One detail that makes a big difference is how you slice your buns. Here’s my preferred method:
- Let the buns cool completely for the cleanest cut.
- Use a serrated knife and cut from the top, leaving about ¼-inch connected at the bottom.
- For New England-style buns (top-sliced), cut down from the top, keeping sides intact.
This method keeps your hot dog and toppings secure and prevents the dreaded “flip-through” where everything falls out the bottom!
Nutritional Information
For those watching their intake, here’s an approximate nutritional breakdown per bun (without toppings):
| Nutrient | Amount per Bun |
|---|---|
| Calories | 210 |
| Total Fat | 5g |
| Saturated Fat | 2.5g |
| Cholesterol | 30mg |
| Sodium | 380mg |
| Total Carbohydrates | 35g |
| Dietary Fiber | 1g |
| Sugars | 3g |
| Protein | 6g |
Values are approximate and based on 8 buns per recipe.
Budget-Friendly Analysis
Making your own hot dog buns isn’t just delicious—it’s economical too:
| Item | Store-Bought Cost | Homemade Cost |
|---|---|---|
| 8-pack premium buns | $3.99-$4.99 | $1.50-$2.00 |
| Cost per bun | $0.50-$0.62 | $0.19-$0.25 |
| Annual savings* | — | $40-$60 |
*Based on consuming 24 packs per year
When you factor in the quality difference and the convenience of making them whenever you need them, the value is even greater.
How These Compare to Store-Bought
I’ve done extensive “research” (a.k.a. eaten a lot of hot dogs) and here’s how homemade stacks up against store-bought:
| Feature | Store-Bought | Homemade |
|---|---|---|
| Freshness | 3-7 days old | Same day fresh |
| Ingredient quality | Contains preservatives | Clean, simple ingredients |
| Texture | Often dry, crumbly | Soft, tender crumb |
| Flavor | Bland | Rich, buttery flavor |
| Size control | Standard sizes only | Customizable to your needs |
| Cost effectiveness | Higher cost | Lower cost per bun |
| Wow factor | Minimal | Impressive to guests |
Grab the Saving up to 50% from Target Deal Days (Mar 25 to 27, 2026)
Q&A Section
Q: Can I make these buns if I’ve never baked bread before? Absolutely! This recipe is perfect for beginners. The dough is forgiving, and the shaping doesn’t require special skills. Just follow the instructions carefully, and you’ll be surprised at how professional your results will be.
Q: How do I know if my yeast is still good? Before using yeast, especially if it’s been in your pantry for a while, test its viability by dissolving a teaspoon in warm water with a pinch of sugar. If it doesn’t foam within 5-10 minutes, it’s time for new yeast.
Q: Can I use a bread machine for this recipe? Yes! Simply add the ingredients in the order recommended by your bread machine manufacturer. Use the dough cycle, then proceed with shaping, second rise, and baking as directed.
Q: Can I make these gluten-free? While I haven’t personally tested a gluten-free version, readers have reported success using a 1:1 gluten-free flour blend plus ½ teaspoon of xanthan gum if not included in the blend. The texture will be slightly different, but still delicious.
Q: My kitchen is cold. How can I help the dough rise? Create a warm environment by preheating your oven to its lowest setting for just 1-2 minutes, then turn it off. Place the covered dough in the warm (but turned off) oven with the light on. Alternatively, place the dough on top of a running clothes dryer or near (not on) a heating vent.
Q: Can I make mini buns for sliders? Definitely! Divide the dough into 16 equal portions instead of 8. Reduce the baking time to 10-12 minutes, watching carefully to avoid over-browning.
Q: How can I make my buns extra soft? Replace the water with milk for ultra-soft buns, and brush them with melted butter immediately after removing from the oven.
Q: Can I make these ahead for a party? Yes! You can either freeze the baked buns up to 3 months ahead or refrigerate the dough after the first rise for up to 24 hours. If refrigerating the dough, let it come to room temperature before shaping.
Final Thoughts
There’s something deeply satisfying about serving completely homemade hot dogs, from the buns to the toppings. These quick and easy hot dog buns have become my go-to recipe whether I’m preparing for a planned cookout or dealing with a bun emergency.
The process is straightforward, the ingredients are simple, and the results are far superior to anything you’ll find in a plastic bag at the supermarket. Plus, there’s that wonderful sense of accomplishment that comes from placing a hot-from-the-oven creation on the table.
I hope this recipe becomes a staple in your home as it has in mine. Once you’ve mastered it, you’ll never want to go back to store-bought hot dog buns again!
Remember, baking is part science and part art—don’t be afraid to adjust and experiment once you’ve got the basic technique down. Happy baking and happy hot dog eating!