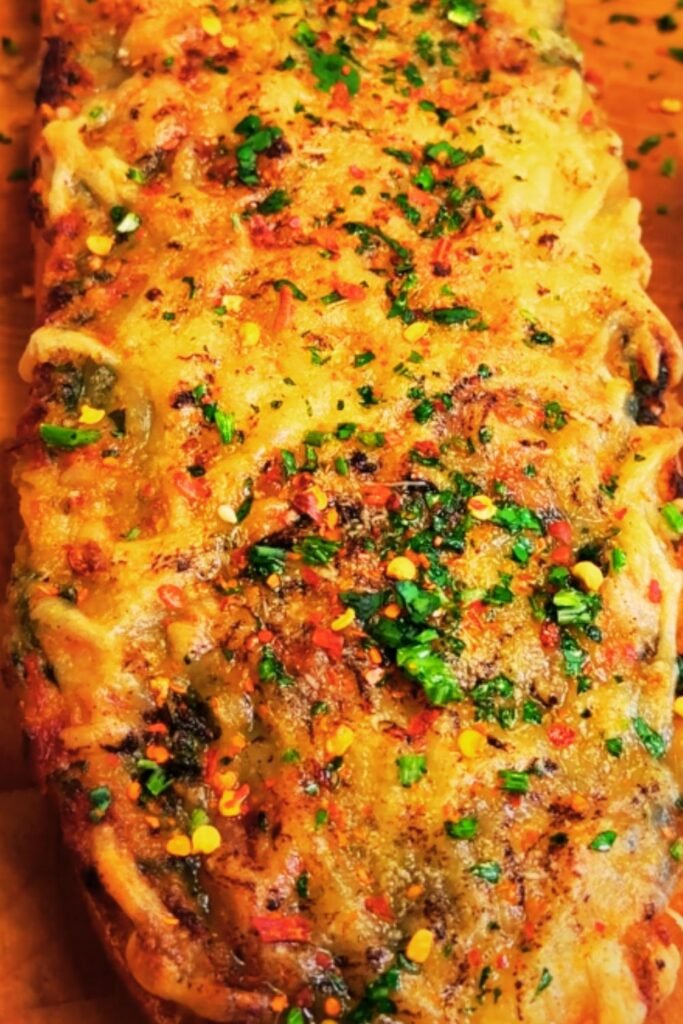
There’s something magical about the aroma of garlic bread wafting through the kitchen. The moment that buttery, herbaceous scent hits your nose, it’s nearly impossible not to start salivating. I’ve been perfecting my garlic bread recipe for years, and today I’m excited to share my absolute favorite version: a decadent herbed cheesy garlic bread that elevates this classic side dish to centerpiece status.
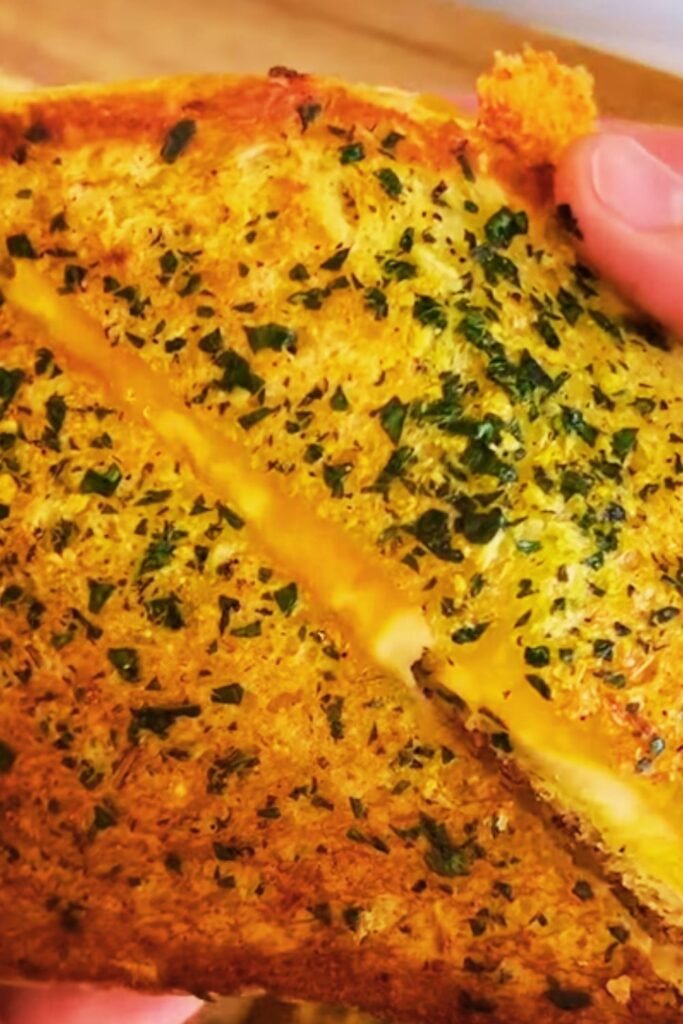
This isn’t just any garlic bread. It’s a carefully crafted combination of aromatic herbs, melty cheese, and perfectly toasted bread that creates an irresistible texture contrast—crispy on the outside, soft and gooey on the inside. Whether you’re serving it alongside pasta, as an appetizer for guests, or (let’s be honest) as a comfort food meal all on its own, this recipe will become your new go-to.
Why This Recipe Works
Before diving into the ingredients and method, let me explain why this particular recipe stands out from the countless garlic bread variations out there:
- The herb butter mixture can be prepared ahead of time, allowing the flavors to meld beautifully
- A combination of cheeses creates the perfect balance of flavor and that Instagram-worthy cheese pull
- Strategic baking technique ensures a crispy exterior while maintaining a soft interior
- Customizable herb combinations let you tailor the flavor profile to your preference
- Simple ingredients that you likely already have in your pantry
I’ve made this garlic bread for countless dinner parties, family gatherings, and cozy nights in. The reaction is always the same—eyes widening with that first bite, followed by requests for the recipe. Now, I’m finally documenting my approach so you can recreate this crowd-pleaser in your own kitchen.
Essential Ingredients
The beauty of this recipe lies in its simplicity. You don’t need fancy ingredients—just quality basics that work harmoniously together:
The Bread
The foundation of any good garlic bread is, of course, the bread itself. I recommend:
- 1 loaf of French bread or Italian bread (approximately 16-18 inches long)
French bread typically has a crispier crust with a lighter interior, while Italian bread often has a slightly softer crust. Both work beautifully, so choose based on your texture preference. Whatever you select, make sure it’s fresh—ideally baked the same day you’re making the garlic bread.
The Herb Butter
This flavor-packed spread is what transforms ordinary bread into something extraordinary:
- 1/2 cup (1 stick) unsalted butter, softened at room temperature
- 6 cloves garlic, minced finely (about 2 tablespoons)
- 1/4 cup fresh parsley, finely chopped
- 2 tablespoons fresh basil, finely chopped
- 1 tablespoon fresh oregano, finely chopped (or 1 teaspoon dried)
- 1 tablespoon fresh thyme leaves (or 1 teaspoon dried)
- 1/2 teaspoon kosher salt
- 1/4 teaspoon freshly ground black pepper
- 1/4 teaspoon red pepper flakes (optional, for heat lovers)
- 1 tablespoon extra virgin olive oil
The Cheese Blend
The perfect cheese combination delivers both flavor and that irresistible melty texture:
- 1 cup mozzarella cheese, freshly shredded
- 1/2 cup Parmesan cheese, freshly grated
- 1/4 cup provolone cheese, shredded (optional, but adds wonderful depth)
Equipment You’ll Need
Nothing fancy required here:
- Sharp knife for cutting the bread
- Mixing bowl for preparing the herb butter
- Baking sheet
- Aluminum foil
- Cheese grater (if using block cheese)
- Cutting board
- Measuring cups and spoons
- Garlic press (optional but recommended)
Preparation Method
Step 1: Prepare the Herb Butter Mixture
- In a medium bowl, combine the softened butter, minced garlic, chopped herbs (parsley, basil, oregano, and thyme), salt, pepper, and red pepper flakes if using.
- Add the olive oil and mix until thoroughly combined. The olive oil helps make the spread more… well, spreadable, and adds a wonderful richness.
- Let this mixture rest for at least 30 minutes at room temperature to allow the flavors to meld. If preparing ahead, you can refrigerate it for up to 24 hours—just bring it back to room temperature before using.
Chef’s tip: For even more flavor infusion, prepare the herb butter the day before and refrigerate overnight.
Step 2: Prepare the Bread
- Preheat your oven to 375°F (190°C).
- Using a sharp bread knife, cut the loaf in half lengthwise, creating two long halves with exposed interior.
- Place both halves, cut side up, on a large baking sheet.
Step 3: Apply the Herb Butter
- Using a spatula or butter knife, generously spread the herb butter mixture evenly across both cut surfaces of the bread.
- Make sure to spread it all the way to the edges—those crispy, buttery edges are often the best part!
Step 4: Add the Cheese
- In a separate bowl, combine the shredded mozzarella, grated Parmesan, and provolone (if using).
- Sprinkle this cheese mixture evenly over both buttered bread halves.
- For extra flavor, you can add a light dusting of additional dried herbs on top of the cheese.
Step 5: Baking – The Two-Stage Method
This two-stage baking method is my secret to perfect garlic bread every time:
First stage (covered):
- Bring the two halves together like a sandwich, with the buttered, cheese-covered sides facing each other.
- Wrap the entire loaf loosely in aluminum foil.
- Bake for 10 minutes at 375°F (190°C).
Second stage (open-faced):
- Remove from the oven and carefully open the foil.
- Separate the halves and place them back on the baking sheet, cheese side up.
- Return to the oven, uncovered, and bake for an additional 5-7 minutes, or until the cheese is melted and beginning to brown in spots.
- For an extra crispy top, switch to the broiler for the final 1-2 minutes, but watch carefully to prevent burning!
Step 6: Serve
- Remove from the oven and let cool for 1-2 minutes (this helps the cheese set slightly and makes cutting easier).
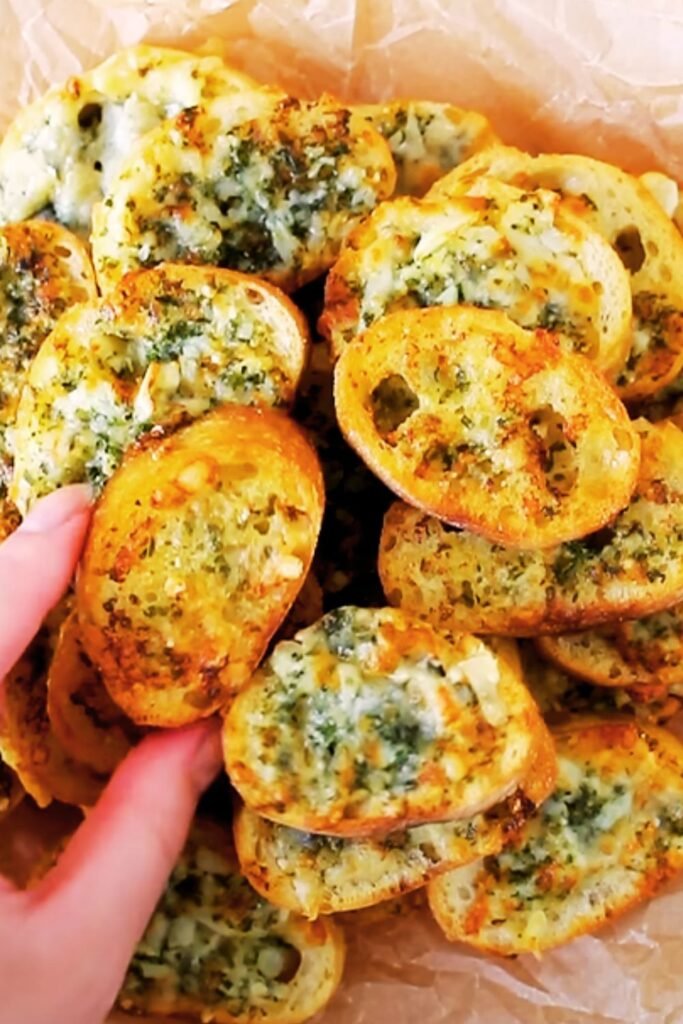
- Slice into approximately 2-inch portions.
- Serve immediately while hot and gooey.
Flavor Variations
One of the joys of making garlic bread at home is how easily you can customize it. Here are some of my favorite variations:
Herb Substitutions
The herb combination I’ve suggested gives a classic Italian-inspired flavor profile, but don’t be afraid to experiment:
| Herb Combination | Flavor Profile | Best Paired With |
|---|---|---|
| Rosemary & Thyme | Rustic, earthy | Roasted meats, stews |
| Sage & Oregano | Robust, aromatic | Hearty pasta dishes |
| Dill & Chives | Bright, fresh | Fish dishes, light soups |
| Cilantro & Lime Zest | Zesty, vibrant | Mexican-inspired meals |
| Tarragon & Parsley | Subtle, elegant | French cuisine |
Cheese Variations
The cheese blend can also be customized to your taste:
| Cheese Combination | Characteristics | Special Notes |
|---|---|---|
| Gruyère & Parmesan | Rich, nutty | Excellent for a more sophisticated flavor |
| Cheddar & Monterey Jack | Bold, creamy | Great for those who love a sharper taste |
| Fontina & Mozzarella | Ultra melty, mild | Creates the most impressive cheese pull |
| Blue cheese & Mozzarella | Pungent, complex | Use blue cheese sparingly as an accent |
| Goat cheese & Parmesan | Tangy, distinctive | Spread goat cheese under the Parmesan |
Add-Ins for Extra Flavor
For even more flavor dimensions, consider these additions:
- Sun-dried tomatoes, finely chopped
- Caramelized onions
- Crispy bacon bits
- Roasted garlic (instead of raw)
- Pesto (mixed into the butter or dolloped under the cheese)
- Thinly sliced jalapeños (for heat lovers)
Common Mistakes to Avoid
Through years of garlic bread making, I’ve learned what not to do:
1. Using cold butter
This leads to uneven spreading and tearing of the bread. Always bring butter to room temperature first.
2. Skimping on the garlic
Don’t be shy with the garlic! It’s called garlic bread for a reason.
3. Over-baking
This results in dried-out bread that’s too crunchy. Follow the two-stage baking method for the perfect texture.
4. Using pre-shredded cheese
Pre-packaged shredded cheese contains anti-caking agents that prevent proper melting. Take the extra minute to shred your own—it’s worth it!
5. Cutting the bread too thin
For the optimal bread-to-topping ratio, keep your loaf halves substantial.
Serving Suggestions
This herbed cheesy garlic bread pairs beautifully with so many dishes:
Perfect Pairings:
- Pasta dishes: Especially tomato-based sauces like marinara or bolognese
- Soups: From minestrone to tomato to creamy mushroom
- Salads: Turn a side salad into a complete meal with garlic bread
- Grilled meats: The bread soaks up the juices beautifully
- On its own: Served with a side of marinara sauce for dipping
Make-Ahead and Storage Options
Make-Ahead Options:
- Prepare the herb butter up to 3 days in advance and store in the refrigerator. Bring to room temperature before spreading.
- Assemble the entire garlic bread up to 8 hours ahead, wrap tightly in plastic wrap, and refrigerate until ready to bake.
- Pre-bake the covered stage up to 2 hours ahead, then finish with the uncovered baking right before serving.
Storage and Reheating:
- Refrigerate leftovers for up to 3 days in an airtight container.
- Reheat in a 350°F (175°C) oven for 5-7 minutes until warmed through and crispy again.
- For freezing: Wrap individual portions in plastic wrap, then aluminum foil. Freeze for up to 1 month. Reheat directly from frozen, adding about 5 minutes to the reheating time.
Nutritional Information
While this isn’t exactly health food, it’s good to know what you’re consuming. Here’s an approximate breakdown per serving (assuming 12 servings per loaf):
| Nutrient | Amount per Serving |
|---|---|
| Calories | Approximately 220 |
| Total Fat | 12g |
| Saturated Fat | 7g |
| Cholesterol | 30mg |
| Sodium | 350mg |
| Total Carbohydrates | 22g |
| Dietary Fiber | 1g |
| Protein | 6g |
Special Dietary Adaptations
Gluten-Free Version:
- Substitute a gluten-free baguette or ciabatta
- Double-check that your seasonings are certified gluten-free
Dairy-Free Version:
- Use plant-based butter (look for one designed for cooking)
- Substitute dairy-free cheese alternatives (cashew-based cheeses melt particularly well)
- Add a sprinkle of nutritional yeast for that cheesy flavor
Lower-Calorie Version:
- Use half the amount of butter and cheese
- Opt for part-skim mozzarella
- Increase the herbs and garlic for flavor without the extra calories
Troubleshooting Common Issues
| Problem | Likely Cause | Solution |
|---|---|---|
| Soggy middle | Not enough uncovered baking time | Increase the uncovered baking time by 2-3 minutes |
| Too crispy/hard | Overbaking | Reduce overall baking time or lower oven temperature |
| Burnt edges | Oven too hot or bread too close to heating element | Use the middle rack and watch carefully during broiling |
| Cheese not melty | Cheese too cold or wrong type | Bring cheese to room temperature and ensure you’re using good melting cheeses |
| Bland flavor | Not enough seasoning or resting time | Increase herbs/garlic and allow herb butter to rest longer |
FAQ Section
Q: Can I use dried herbs instead of fresh?
Yes, absolutely! The general rule is to use one-third the amount of dried herbs compared to fresh. So if the recipe calls for 1 tablespoon of fresh herbs, use 1 teaspoon of dried. Dried herbs tend to have a more concentrated flavor, so you need less.
Q: My garlic always burns and tastes bitter. How can I prevent this?
Garlic can indeed burn easily, resulting in a bitter taste. There are several approaches to prevent this: 1) Ensure the garlic is thoroughly mixed into the butter, which protects it, 2) Use the two-stage baking method described in this recipe, which helps prevent burning, or 3) For extremely sensitive palates, you can use roasted garlic instead of raw, which has a sweeter, less pungent flavor and is less prone to burning.
Q: Can I prepare this in advance for a party?
Absolutely! You have several options: 1) Make the herb butter up to three days ahead and store it in the refrigerator, 2) Assemble the entire bread with butter and cheese up to 8 hours ahead and refrigerate until baking time, or 3) Complete the first covered baking stage up to 2 hours ahead, then do the final uncovered baking just before serving.
Q: What’s the best way to cut the bread for garlic bread?
For the best results, use a sharp serrated bread knife and cut the loaf horizontally (lengthwise), creating two long halves. This gives you the maximum surface area for your delicious toppings! When cutting the finished garlic bread into portions, diagonal cuts of about 2 inches work beautifully and create an attractive presentation.
Q: My cheese doesn’t get that golden, bubbly appearance. What am I doing wrong?
For that perfect golden, bubbly cheese top, make sure you’re: 1) Using freshly shredded cheese (pre-shredded has anti-caking agents that affect melting), 2) Including some Parmesan or another cheese that browns well, 3) Finishing with a brief broil—just 1-2 minutes under the broiler works wonders, but watch it carefully!
Q: How can I make sure my garlic bread isn’t greasy?
If you find garlic bread too greasy, try these adjustments: 1) Use slightly less butter in your spread, 2) Substitute part of the butter with olive oil, which gives a lighter mouthfeel, or 3) After spreading the herb butter, let the bread sit for 5 minutes before adding cheese, allowing some of the butter to absorb into the bread.
Q: Can I freeze garlic bread?
Yes! Garlic bread freezes beautifully, either before or after baking. To freeze unbaked garlic bread, prepare it up through adding the cheese, then wrap tightly in plastic wrap followed by foil. Freeze for up to 3 months. When ready to bake, unwrap and bake directly from frozen, adding about 5-7 minutes to the total baking time. For leftover baked garlic bread, wrap individual portions and freeze for up to 1 month. Reheat in a 350°F oven until warmed through.
Final Tips for Garlic Bread Perfection
After years of refining this recipe, I’ve gathered some insider tips that make all the difference:
- Quality matters: Use fresh bread and good quality butter for the best results.
- Don’t rush the herb butter: The longer the herbs and garlic infuse in the butter, the more flavorful your garlic bread will be.
- Temperature transitions: The two-stage baking method may seem like extra work, but it creates the perfect texture contrast between the crispy exterior and soft interior.
- Cheese placement: For extra gooeyness, push some cheese deeper into crevices in the bread.
- Rest before cutting: Let the garlic bread cool for 1-2 minutes after baking. This helps the cheese set slightly so it doesn’t all slide off when you cut it.
- Fresh garnish: For an extra pop of color and freshness, sprinkle freshly chopped parsley over the bread right before serving.
- Experiment: Once you’ve mastered the basic recipe, don’t be afraid to experiment with different herb and cheese combinations to find your perfect match!

This herbed cheesy garlic bread has been my go-to recipe for years. The combination of aromatic herbs, golden melted cheese, and crispy-yet-soft bread makes it impossible to resist. Whether you’re serving it as an accompaniment to a larger meal or enjoying it as the star of the show (we’ve all had “just garlic bread” for dinner at least once!), this recipe delivers restaurant-quality results with minimal effort.
I hope you enjoy making this recipe as much as I’ve enjoyed perfecting it over the years. The joy of seeing family and friends dive in, eyes closing in appreciation with that first bite, is truly one of the simple pleasures of cooking. Happy baking!