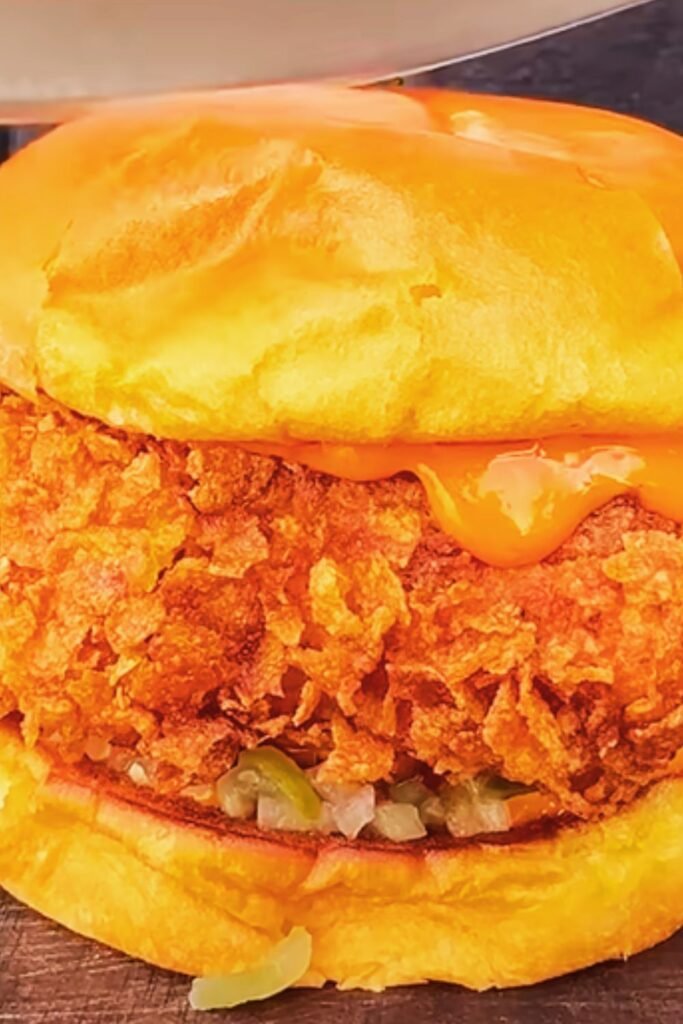
Have you ever craved a chicken sandwich that transcends the ordinary? One that balances crispy, juicy chicken with fresh ingredients and bold flavors? Today, I’m sharing my absolute favorite gourmet chicken sandwich recipe inspired by world-class culinary techniques. This isn’t just any chicken sandwich—it’s a masterpiece of texture and flavor that will make you feel like you’re dining at a high-end restaurant.
The Secret to Perfect Chicken Sandwiches
What makes a truly exceptional chicken sandwich? It’s all about technique, quality ingredients, and understanding flavor balance. After perfecting this recipe through countless trials, I’ve discovered that the magic lies in the preparation of the chicken itself—getting that perfect crispy exterior while maintaining juicy tenderness inside.
The foundation of any great chicken sandwich begins with quality ingredients. For this recipe, I recommend using free-range chicken breasts for the best flavor and texture. Let’s explore what makes this sandwich stand out from the crowd.
Ingredients You’ll Need
For the Chicken Marinade:
- 4 chicken breasts (boneless, skinless)
- 2 cups buttermilk
- 2 tablespoons hot sauce
- 1 tablespoon Dijon mustard
- 4 garlic cloves, minced
- 1 tablespoon kosher salt
- 1 teaspoon black pepper
- 1 teaspoon paprika
For the Coating:
- 3 cups all-purpose flour
- 2 tablespoons garlic powder
- 2 tablespoons onion powder
- 2 tablespoons paprika
- 1 tablespoon cayenne pepper (adjust to taste)
- 2 tablespoons dried herbs (thyme, oregano, basil mix)
- 2 teaspoons salt
- 2 teaspoons black pepper
For the Special Sauce:
- 1/2 cup mayonnaise
- 2 tablespoons Dijon mustard
- 1 tablespoon honey
- 1 tablespoon sriracha sauce
- 1 teaspoon lemon juice
- 1 clove garlic, finely minced
- Salt and pepper to taste
For Assembly:
- 4 brioche buns, toasted with butter
- 1 cup shredded iceberg lettuce
- 2 large tomatoes, sliced
- 1 red onion, thinly sliced
- 8 pickle slices
- 4 slices of mature cheddar cheese (optional)
Equipment Needed
Before we dive into the preparation, make sure you have these essentials on hand:
| Equipment | Purpose | Notes |
|---|---|---|
| Large mixing bowl | For marinating chicken | Glass or stainless steel preferred |
| Cast iron skillet | For frying chicken | Provides even heat distribution |
| Meat tenderizer | For pounding chicken | Creates uniform thickness |
| Kitchen thermometer | For oil temperature | Critical for perfect frying |
| Wire rack | For draining chicken | Keeps chicken crisp, not soggy |
| Paper towels | For oil blotting | Removes excess grease |
| Tongs | For handling hot chicken | Safer than forks |
| Shallow dishes | For dredging stations | Wide, flat containers work best |
Step-by-Step Preparation

Step 1: Prepare the Chicken
- Place each chicken breast between two sheets of plastic wrap.
- Using a meat tenderizer, gently pound the chicken to an even thickness of about 1/2 inch.
- Cut each breast in half if they’re particularly large to better fit your buns.
Step 2: Marinate the Chicken
- In a large bowl, combine buttermilk, hot sauce, Dijon mustard, minced garlic, salt, pepper, and paprika.
- Whisk ingredients until well blended.
- Add chicken pieces to the marinade, ensuring they’re fully submerged.
- Cover with plastic wrap and refrigerate for at least 4 hours (overnight is ideal).
Step 3: Prepare the Coating
- In a shallow dish, combine flour, garlic powder, onion powder, paprika, cayenne pepper, dried herbs, salt, and black pepper.
- Whisk to combine all ingredients thoroughly.
- Set aside 2 tablespoons of this mixture to add to the marinade later (this creates extra texture).
Step 4: Set Up Your Dredging Station
- Remove marinated chicken from the refrigerator 30 minutes before cooking to take the chill off.
- Take 3 tablespoons of the buttermilk marinade and mix it into your dry flour mixture, creating small clumps that will add extra crispiness.
- Set up your station: marinated chicken, seasoned flour mixture, and a clean plate for the coated chicken.
Step 5: Coat the Chicken
- Remove each piece of chicken from the marinade, allowing excess to drip off.
- Thoroughly coat in the seasoned flour mixture, pressing firmly to ensure coating adheres.
- Shake off excess flour and set aside on a plate. Let rest for 10 minutes (this helps the coating bond to the chicken).
Step 6: Fry the Chicken

- Heat 2 inches of vegetable oil in a cast iron skillet to 350°F (175°C).
- Carefully place chicken pieces in hot oil, ensuring not to overcrowd the pan.
- Fry for 5-6 minutes per side until golden brown and internal temperature reaches 165°F (74°C).
- Transfer to a wire rack set over a baking sheet to drain excess oil.
- If adding cheese, place a slice on each piece while hot.
Step 7: Make the Special Sauce
- In a small bowl, combine mayonnaise, Dijon mustard, honey, sriracha, lemon juice, and minced garlic.
- Whisk until smooth and season with salt and pepper to taste.
- Refrigerate until ready to use.
Step 8: Toast the Buns
- Halve the brioche buns.
- Lightly butter the cut sides.
- Toast in a clean skillet over medium heat until golden brown (about 1-2 minutes).
Step 9: Assemble the Sandwich

- Spread special sauce on both sides of toasted buns.
- On the bottom half, layer shredded lettuce, tomato slices, and red onion.
- Place the fried chicken (with cheese if using) on top of the vegetables.
- Add pickle slices.
- Top with the other half of the bun.
- Press down gently to compress the sandwich slightly.
Pro Tips for Next-Level Results
Having made this sandwich countless times, I’ve discovered some secrets that elevate it from great to extraordinary:
- Double-dredge for extra crispiness: After the first coating, dip the chicken back into the marinade and then into the flour mixture again.
- Rest before serving: Let the fried chicken rest for 5 minutes before assembly. This allows the juices to redistribute for maximum tenderness.
- Temperature control is key: Maintain oil temperature between 340-350°F throughout frying. Too hot, and the exterior burns before the interior cooks; too cool, and the chicken absorbs excess oil.
- Season immediately after frying: Sprinkle a pinch of flaky sea salt on the chicken right after it comes out of the oil when it’s still hot.
- Pickle juice secret: Add a tablespoon of pickle juice to your marinade for extra tanginess and tenderness.
Nutritional Information
Understanding the nutritional profile of your meals is important. Here’s a breakdown of this chicken sandwich:
| Nutrient | Amount per Serving | % Daily Value* |
|---|---|---|
| Calories | 720 kcal | 36% |
| Protein | 42g | 84% |
| Total Fat | 38g | 49% |
| Saturated Fat | 9g | 45% |
| Carbohydrates | 54g | 20% |
| Dietary Fiber | 3g | 11% |
| Sugars | 8g | 16% |
| Sodium | 1250mg | 54% |
| Potassium | 720mg | 15% |
| Iron | 4mg | 22% |
| Calcium | 180mg | 14% |
*Based on a 2,000 calorie diet
Variations to Try
Spicy Nashville-Style
Transform this sandwich into a Nashville hot chicken creation:
- Add 3 tablespoons cayenne pepper to 1/2 cup hot oil
- Mix in 1 tablespoon brown sugar and brush onto the fried chicken
- Serve with extra pickles and no cheese
Herb-Crusted Mediterranean
For a lighter, herb-forward version:
- Add fresh chopped herbs (dill, parsley, basil) to the flour mixture
- Replace the special sauce with tzatziki
- Add cucumber slices and feta cheese
- Use ciabatta instead of brioche
Asian-Fusion Twist
Create an East-meets-West variation:
- Add Chinese five-spice to your flour mixture
- Replace the special sauce with sriracha mayo
- Top with Asian slaw (shredded cabbage, carrots, and rice vinegar dressing)
- Add a few cilantro leaves and a squeeze of lime
Make-Ahead and Storage Tips
Preparing Components Ahead:
| Component | Storage Method | Maximum Time |
|---|---|---|
| Marinated chicken (uncooked) | Refrigerated in airtight container | Up to 24 hours |
| Special sauce | Refrigerated in airtight container | Up to 5 days |
| Seasoned flour mixture | Room temperature in sealed container | Up to 1 month |
| Prepped vegetables | Refrigerated in sealed containers | Up to 2 days |
Storing Leftovers:
- Fried chicken pieces: Allow to cool completely, then store in an airtight container in the refrigerator for up to 3 days.
- Reheat method: For best results, reheat in a 350°F oven for 10-15 minutes. Avoid microwave as it makes the coating soggy.
- Assembled sandwiches: Not recommended for storage as they quickly become soggy. Store components separately.
Serving Suggestions
Complete your meal with these perfect side dish pairings:
- Homemade Triple-Cooked Chips: Parboiled, frozen, then fried twice for the ultimate crunch.
- Fresh Coleslaw: A tangy, crunchy slaw with cabbage, carrots, and apple cider vinegar dressing provides a refreshing contrast.
- Sweet Potato Fries: Tossed with paprika and served with chipotle mayo.
- Grilled Corn on the Cob: Brushed with herb butter and a squeeze of lime.
- Garden Salad: Mixed greens with cherry tomatoes and a light vinaigrette to balance the richness of the sandwich.
For beverages, consider these non-alcoholic options:
- Fresh lemonade with mint sprigs
- Iced tea with lemon slices
- Sparkling water with cucumber and lime
- Homemade ginger ale
Cost Breakdown
Knowing the approximate cost can help with meal planning. Here’s a breakdown for four sandwiches:
| Ingredient | Approximate Cost | Notes |
|---|---|---|
| Chicken breasts | $8-12 | Prices vary by quality |
| Brioche buns | $4-5 | Artisanal buns cost more |
| Buttermilk | $2 | Can substitute with milk + lemon juice |
| Flour and spices | $3 | Assuming you have most spices on hand |
| Vegetables | $5 | Lettuce, tomato, onion, pickles |
| Cheese | $3 | Optional ingredient |
| Condiments | $2 | For special sauce ingredients |
| Oil for frying | $3 | Can be strained and reused |
| Total | $30-35 | $7.50-8.75 per sandwich |
Troubleshooting Common Issues
| Problem | Possible Cause | Solution |
|---|---|---|
| Soggy coating | Oil not hot enough | Ensure oil is at 350°F before adding chicken |
| Burnt exterior, raw interior | Oil too hot/chicken too thick | Lower heat and pound chicken to even thickness |
| Coating falls off | Not enough rest time after dredging | Let coated chicken sit 10 minutes before frying |
| Greasy sandwich | Improper draining | Use wire rack, not paper towels, for draining |
| Bland flavor | Insufficient seasoning | Season chicken and flour mixture generously |
| Dry chicken | Overcooked | Use thermometer to cook to exactly 165°F |
The Science Behind Perfect Fried Chicken
Understanding the science helps you master the technique:
- Buttermilk marinade: The lactic acid in buttermilk helps tenderize the chicken by breaking down proteins, while the fat content helps keep the meat moist during cooking.
- Double dredging: Creates layers of starch that, when hydrated and heated, form a complex structure that becomes crispy when fried.
- Resting coated chicken: Allows the flour to hydrate slightly, helping it adhere better during frying.
- Temperature equilibrium: The 350°F oil creates steam inside the chicken that pushes outward, preventing oil from seeping in while creating a moisture barrier.
Q&A Section
Q: Can I bake this chicken instead of frying?
While frying gives the best texture and flavor, you can bake it. Preheat your oven to 425°F, place the coated chicken on a wire rack over a baking sheet, spray with cooking oil, and bake for 20-25 minutes until golden and 165°F internally. The coating won’t be quite as crispy, but it’s still delicious.
Q: How do I make sure my chicken stays juicy?
The key is not overcooking. Use a meat thermometer and remove the chicken from the oil as soon as it reaches 165°F internally. Also, the buttermilk marinade helps retain moisture during cooking.
Q: Can I prepare any components ahead of time?
Absolutely! The special sauce can be made up to 5 days ahead. You can also marinate the chicken overnight. The flour mixture can be prepared weeks in advance if stored in an airtight container.
Q: What’s the best oil for frying chicken?
Vegetable oil, canola oil, or peanut oil all work well due to their high smoke points. Peanut oil imparts a slightly nuttier flavor that many prefer, but vegetable or canola oil have more neutral flavors.
Q: My coating always falls off during frying. What am I doing wrong?
Make sure to: 1) Let excess marinade drip off before dredging, 2) Press the flour mixture firmly onto the chicken, and 3) Allow the coated chicken to rest for 10 minutes before frying. Also, don’t move the chicken too much during the first few minutes of frying.
Q: How can I make this gluten-free?
Substitute all-purpose flour with a gluten-free flour blend and ensure your spices are certified gluten-free. Use gluten-free buns or lettuce wraps for serving.
Q: What’s the best cheese to use on this sandwich?
Sharp cheddar provides a nice flavor contrast, but American cheese melts beautifully, and pepper jack adds a nice kick. It really comes down to personal preference!
Final Thoughts
The perfect chicken sandwich balances texture, flavor, and technique. While it might seem like a lot of work for “just a sandwich,” the results are truly restaurant-quality. The crispy exterior giving way to juicy, tender chicken, complemented by fresh vegetables and that special sauce—it’s a culinary experience worth every minute of preparation.
Remember that practice makes perfect. Your first attempt might not be flawless, but each time you make this recipe, you’ll refine your technique and develop an intuition for the perfect fry, the ideal seasoning balance, and the optimal assembly order.
So heat up that oil, get your dredging station ready, and prepare to create a chicken sandwich that will have family and friends convinced you’ve been secretly training in a professional kitchen!