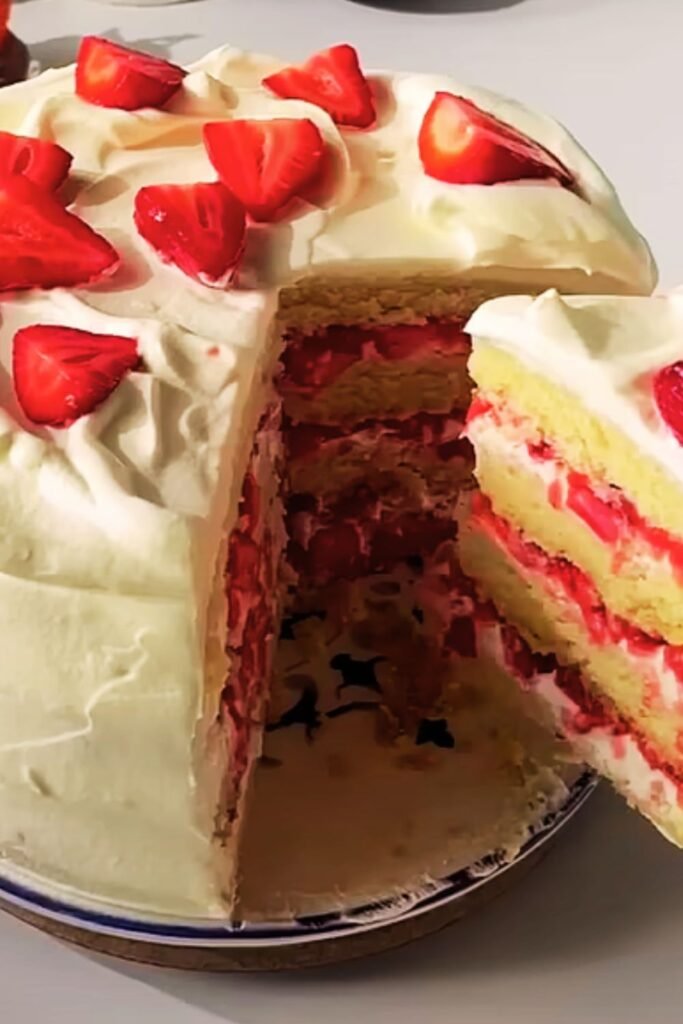
There’s something magical about the combination of vanilla and strawberries that never fails to captivate my taste buds. When I first attempted to create the perfect vanilla cake with strawberry filling, I had no idea it would become my signature dessert. The delicate sweetness of vanilla paired with the bright, tangy burst of fresh strawberries creates a harmony that speaks to both comfort and elegance.
This isn’t just another cake recipe – it’s a journey into creating something truly special that will have your family and friends asking for seconds (and thirds). I’ve spent countless hours perfecting this recipe, testing different techniques and ingredient combinations to bring you what I consider the ultimate version of this classic dessert.
Understanding Your Ingredients: The Foundation of Excellence
Before we dive into the actual baking process, I want to share my insights about each ingredient and why it matters. Understanding your ingredients transforms you from someone following a recipe to someone who truly understands the art of baking.
Vanilla Extract vs. Vanilla Paste : Pure vanilla extract provides that classic vanilla flavor we all love, but vanilla paste adds those beautiful black specks and intensifies the flavor profile. I prefer using vanilla paste when I want visual appeal and deeper flavor.
Cake Flour vs. All-Purpose Flour : Cake flour contains less protein, resulting in a more tender crumb. If you only have all-purpose flour, you can substitute by removing 2 tablespoons per cup and replacing with cornstarch.
Room Temperature Ingredients : This isn’t just a suggestion – it’s crucial for proper mixing and texture. Cold ingredients don’t combine well and can result in a dense, uneven cake.
Fresh vs. Frozen Strawberries : While frozen strawberries work in a pinch, fresh strawberries provide better texture and flavor control in your filling. The natural juices blend more harmoniously with other filling components.
Essential Equipment and Preparation
Having the right tools makes the difference between frustration and success in baking. I’ve learned this through years of trial and error, and I want to save you from the same mistakes I made early on.
| Equipment | Purpose | Alternative Options |
|---|---|---|
| Stand Mixer | Creaming butter and sugar efficiently | Hand mixer (requires more time) |
| Kitchen Scale | Precise measurements | Measuring cups (less accurate) |
| 9-inch Round Pans (2) | Standard cake layers | 8-inch pans (adjust baking time) |
| Offset Spatula | Smooth frosting application | Large knife or bench scraper |
| Wire Cooling Racks | Proper air circulation | Clean kitchen towels on counters |
| Piping Bags | Professional filling application | Zip-lock bags with corners cut |
The Perfect Vanilla Cake Base
My vanilla cake recipe has evolved over years of experimentation. The secret lies in the creaming method and the careful balance of wet and dry ingredients.
Ingredients for Vanilla Cake
| Ingredient | Quantity | Purpose in Recipe |
|---|---|---|
| Unsalted Butter | 1 cup (226g), room temperature | Structure and richness |
| Granulated Sugar | 1½ cups (300g) | Sweetness and moisture retention |
| Large Eggs | 4, room temperature | Binding and structure |
| Vanilla Paste | 2 tablespoons | Primary flavor profile |
| Cake Flour | 2¾ cups (330g) | Tender crumb texture |
| Baking Powder | 2½ teaspoons | Leavening agent |
| Salt | 1 teaspoon | Flavor enhancement |
| Whole Milk | 1¼ cups, room temperature | Moisture and richness |
Step-by-Step Cake Preparation
The order of operations in cake baking isn’t arbitrary – each step builds upon the previous one to create the perfect texture and rise.
- Preparation Phase: Preheat your oven to 350°F (175°C). Grease two 9-inch round pans with butter, then dust with flour, tapping out excess. This dual approach prevents sticking better than just one method alone.
- Creaming Process: In your stand mixer bowl, cream butter and sugar for 5-7 minutes until the mixture becomes pale yellow and noticeably fluffy. This incorporates air, which contributes to cake lightness.
- Egg Integration: Add eggs one at a time, beating well after each addition. This prevents the mixture from breaking and ensures smooth incorporation.
- Vanilla Addition: Mix in vanilla paste until evenly distributed throughout the batter.
- Dry Ingredient Combination: In a separate bowl, whisk together cake flour, baking powder, and salt. This ensures even distribution of leavening agents.
- Alternating Method: Add dry ingredients in three additions, alternating with milk in two additions. Begin and end with flour mixture. Mix just until combined – overmixing develops gluten, resulting in tough cake.
- Final Assembly: Divide batter evenly between prepared pans. I use a kitchen scale for accuracy, but eyeballing works if you’re experienced.
Baking Guidelines and Temperature Control
Proper baking requires attention to both time and visual cues. I’ve found that oven temperatures can vary significantly, so I rely on multiple indicators for doneness.
| Baking Stage | Time | Visual/Physical Cues |
|---|---|---|
| Initial Rise | 10-15 minutes | Batter begins to set around edges |
| Midpoint Check | 20-25 minutes | Top starts to golden lightly |
| Final Assessment | 28-32 minutes | Toothpick inserted in center comes out with few moist crumbs |
| Cooling Phase | 10 minutes in pan | Cake pulls slightly from pan sides |
The key to perfect cake layers lies in understanding your oven’s personality. I recommend investing in an oven thermometer because temperature accuracy directly impacts your results.
Crafting the Strawberry Filling
The strawberry filling is where this cake truly shines. I’ve experimented with various approaches, from simple macerated berries to complex custard-based fillings. My preferred method balances fresh strawberry flavor with structural stability.
Fresh Strawberry Preparation
Starting with quality strawberries makes an enormous difference. I look for berries that are bright red, fragrant, and give slightly to gentle pressure. Avoid berries with white shoulders or those that feel mushy.
Selection Criteria:
- Bright, uniform color
- Fresh green tops
- Sweet fragrance at room temperature
- Firm but not hard texture
- No dark spots or mold
Strawberry Filling Components
| Ingredient | Quantity | Function |
|---|---|---|
| Fresh Strawberries | 2 pounds, hulled and sliced | Primary flavor and texture |
| Granulated Sugar | ⅓ cup | Draws out juices, sweetens |
| Cornstarch | 3 tablespoons | Thickening agent |
| Lemon Juice | 2 tablespoons | Brightens flavor, prevents browning |
| Vanilla Extract | 1 teaspoon | Complements strawberry flavor |
| Salt | Pinch | Enhances overall taste |
Filling Preparation Method
Creating the perfect strawberry filling requires patience and attention to detail. I’ve learned that rushing this process results in either runny filling that soaks into the cake or overly thick filling that doesn’t spread well.
- Maceration Process: Combine sliced strawberries with sugar in a large bowl. Let stand for 30 minutes, stirring occasionally. This draws out natural juices and creates the base for your filling.
- Cooking Phase: Transfer the strawberry mixture to a heavy-bottomed saucepan. Cook over medium heat for 8-10 minutes, stirring frequently, until strawberries break down slightly and release more juice.
- Thickening Step: Whisk cornstarch with lemon juice until smooth, then stir into the strawberry mixture. Continue cooking for 2-3 minutes until filling thickens to a spreadable consistency.
- Final Seasoning: Remove from heat and stir in vanilla extract and salt. Taste and adjust sweetness if needed.
- Cooling Process: Transfer to a bowl and press plastic wrap directly onto surface to prevent skin formation. Cool completely before using.
Assembly Techniques for Professional Results
The assembly phase determines whether your cake looks homemade or professionally crafted. I’ve developed specific techniques that ensure even layers and clean presentation.
Layer Preparation and Leveling
Even the most carefully baked cakes typically dome slightly during baking. I use a long serrated knife to level each layer, creating flat surfaces that stack evenly.
Leveling Process:
- Place cake layer on a rotating cake stand
- Hold serrated knife parallel to work surface
- Rotate stand while gently sawing through the dome
- Remove excess cake (baker’s treat!)
Strategic Filling Distribution
The secret to perfect filling distribution lies in creating a dam of frosting around the cake’s perimeter. This prevents filling from oozing out and creates clean, professional-looking slices.
Assembly Steps:
- Place first layer cut-side down on serving plate
- Pipe a ring of buttercream around the outer edge
- Spread strawberry filling within the buttercream dam
- Place second layer cut-side up
- Press gently to ensure even contact
Buttercream Frosting: The Perfect Complement
While the cake and filling are the stars, the buttercream frosting plays a crucial supporting role. I prefer American buttercream for its stability and sweet flavor that doesn’t compete with the strawberries.
Buttercream Ingredients and Ratios
| Ingredient | Quantity | Temperature | Purpose |
|---|---|---|---|
| Unsalted Butter | 1 cup, room temperature | 65-68°F | Base and richness |
| Powdered Sugar | 4 cups, sifted | Room temperature | Sweetness and structure |
| Heavy Cream | 3-4 tablespoons | Room temperature | Consistency adjustment |
| Vanilla Extract | 2 teaspoons | Room temperature | Flavor enhancement |
| Salt | ¼ teaspoon | Room temperature | Flavor balance |
Buttercream Preparation Method
Perfect buttercream requires patience and attention to temperature. I’ve made countless batches that were too stiff, too loose, or poorly mixed because I rushed the process.
- Initial Creaming: Beat room temperature butter for 3-4 minutes until light and fluffy. Proper temperature is crucial – too cold and it won’t cream properly, too warm and it becomes greasy.
- Sugar Integration: Add powdered sugar gradually, one cup at a time, beating well after each addition. This prevents sugar clouds and ensures smooth incorporation.
- Liquid Balance: Add cream one tablespoon at a time until desired consistency is reached. The buttercream should hold its shape but spread easily.
- Flavor Development: Beat in vanilla extract and salt. Taste and adjust as needed.
- Final Texture: Beat on medium-high speed for 2-3 minutes until buttercream is light, fluffy, and completely smooth.
Decorating Techniques and Presentation
The visual presentation of your vanilla cake with strawberry filling can elevate it from delicious to stunning. I’ve developed several techniques that create impressive results without requiring professional decorator skills.
Basic Frosting Application
Smooth frosting application requires the right tools and technique. I use an offset spatula and a bench scraper for professional-looking results.
Frosting Steps:
- Apply a thin crumb coat of buttercream
- Refrigerate for 30 minutes to set
- Apply final frosting layer with offset spatula
- Use bench scraper for smooth sides
- Create decorative swirls on top with spatula
Fresh Strawberry Garnish Options
Fresh strawberries make beautiful natural decorations. I use several preparation methods depending on the desired aesthetic.
Garnish Techniques:
- Whole berries with stems for rustic appeal
- Fanned slices for elegant presentation
- Chopped berries mixed into frosting for color
- Chocolate-dipped berries for luxury feel
Storage and Make-Ahead Strategies
Understanding proper storage extends your cake’s life and maintains quality. I’ve learned specific techniques that keep each component at peak freshness.
Component Storage Guidelines
| Component | Storage Method | Duration | Quality Notes |
|---|---|---|---|
| Cake Layers (unfrosted) | Wrapped tightly, room temperature | 2 days | Best texture when fresh |
| Cake Layers (unfrosted) | Wrapped, frozen | 3 months | Thaw before assembly |
| Strawberry Filling | Refrigerated, covered | 3 days | Stir before using |
| Buttercream | Room temperature, covered | 2 days | Re-whip before using |
| Assembled Cake | Refrigerated, covered | 3 days | Bring to room temp before serving |
Make-Ahead Timeline
Planning ahead makes entertaining stress-free. I follow this timeline for optimal results:
Three Days Before: Bake cake layers, wrap tightly, and store at room temperature or freeze.
Two Days Before: Prepare strawberry filling and buttercream. Store properly as outlined above.
Day Before: Assemble cake completely. This allows flavors to meld and actually improves taste.
Day Of: Remove from refrigerator 30-60 minutes before serving for best texture and flavor.
Troubleshooting Common Issues
Even experienced bakers encounter problems occasionally. I’ve compiled solutions to the most common issues I’ve faced and helped others resolve.
Dense, Heavy Cake:
- Cause: Overmixing or incorrect ingredient temperatures
- Solution: Mix just until combined; ensure ingredients are room temperature
Runny Filling:
- Cause: Insufficient thickening or not cooking long enough
- Solution: Cook longer or add more cornstarch slurry
Separated Buttercream:
- Cause: Temperature issues with butter or liquid
- Solution: Adjust temperature and re-whip vigorously
Cake Layers Sticking to Pan:
- Cause: Inadequate pan preparation
- Solution: Butter AND flour pans thoroughly; consider parchment paper
Nutritional Information and Serving Suggestions
Understanding the nutritional profile helps with meal planning and dietary considerations. I’ve calculated approximate values based on standard ingredient nutritional data.
Nutritional Breakdown (Per Slice, 12 servings)
| Nutrient | Amount | % Daily Value |
|---|---|---|
| Calories | 485 | 24% |
| Total Fat | 18g | 28% |
| Saturated Fat | 11g | 55% |
| Cholesterol | 95mg | 32% |
| Sodium | 285mg | 12% |
| Total Carbohydrates | 78g | 26% |
| Dietary Fiber | 2g | 8% |
| Sugars | 65g | – |
| Protein | 6g | 12% |
| Vitamin C | 45mg | 75% |
Serving Suggestions and Pairings
This cake shines in various settings, from casual family dinners to elegant celebrations. I’ve found certain accompaniments enhance the overall experience.
Beverage Pairings:
- Fresh-brewed coffee or espresso
- Earl Grey or chamomile tea
- Cold milk or plant-based alternatives
- Sparkling water with lemon
- Fresh strawberry lemonade
Complementary Desserts:
- Vanilla ice cream or gelato
- Fresh whipped cream
- Lemon curd drizzle
- Toasted coconut flakes
- Chopped toasted almonds
Seasonal Variations and Adaptations
The beauty of this recipe lies in its adaptability. I’ve created numerous variations that maintain the core appeal while offering seasonal interest.
Summer Variations
Mixed Berry Version: Replace strawberries with combination of blueberries, raspberries, and blackberries.
Peach Adaptation: Substitute fresh peaches for strawberries, adding a pinch of cinnamon to the filling.
Holiday Modifications
Winter Berry: Use frozen berry medley when fresh strawberries are expensive or unavailable.
Chocolate Drizzle: Add melted dark chocolate drizzle for special occasions.
Professional Tips for Success
After years of perfecting this recipe, I’ve identified key factors that separate good results from exceptional ones.
Temperature Control: Room temperature ingredients mix more easily and create better texture. Plan ahead to remove ingredients from refrigerator 2-3 hours before baking.
Measuring Accuracy: Weight measurements provide more consistent results than volume measurements. Invest in a kitchen scale for best outcomes.
Patience with Cooling: Allowing components to cool completely prevents melting and sliding. Rushing this step compromises final presentation.
Quality Ingredients: Using high-quality vanilla, fresh strawberries, and real butter makes a noticeable difference in final flavor.
Tasting and Adjusting: Taste components as you go and adjust sweetness, acidity, or seasoning to your preference.
Questions and Answers
Q: Can I make this cake gluten-free?
I’ve successfully adapted this recipe using a cup-for-cup gluten-free flour blend. The texture is slightly different but still delicious. Make sure your blend contains xanthan gum for best structure.
Q: How do I prevent the strawberry filling from making the cake soggy?
The key is proper thickening and creating a buttercream dam around the cake’s perimeter. Also, don’t add filling until you’re ready to serve, or store assembled cake in refrigerator.
Q: Can I use frozen strawberries for the filling?
Yes, but thaw them completely and drain excess liquid first. You may need less added liquid in the recipe since frozen berries release more juice than fresh ones.
Q: Why did my buttercream turn out grainy?
Grainy buttercream usually results from powdered sugar that wasn’t sifted or wasn’t beaten long enough. Sift your powdered sugar and beat the buttercream for several minutes until completely smooth.
Q: How far in advance can I assemble this cake?
I recommend assembling no more than 24 hours in advance for best texture and appearance. The cake actually improves slightly as flavors meld, but longer storage can affect texture.
Q: Can I freeze the assembled cake?
While possible, I don’t recommend freezing the assembled cake because the strawberry filling and buttercream don’t freeze well together. Freeze components separately for better results.
Q: What’s the best way to transport this cake?
Use a sturdy cake carrier and keep the cake chilled until ready to serve. If traveling long distances, consider transporting components separately and assembling at destination.
Q: How do I know when my cake layers are perfectly baked?
Look for multiple indicators: cake pulls slightly from pan sides, top springs back when lightly touched, and a toothpick inserted in center comes out with just a few moist crumbs attached.
Q: Can I make individual cupcakes instead of a layer cake?
Absolutely! This recipe makes approximately 24 cupcakes. Bake at 350°F for 18-22 minutes. Fill cupcakes using a piping bag or by cutting small wells in the tops.
Q: What should I do if my cake layers are uneven?
Use a long serrated knife to level the layers, or embrace the rustic look if the unevenness isn’t too dramatic. Proper oven temperature and pan preparation help prevent uneven baking.
This vanilla cake with strawberry filling represents more than just a dessert – it’s a celebration of classic flavors executed with modern technique and understanding. Every element, from the tender vanilla crumb to the bright strawberry filling and silky buttercream, works in harmony to create something truly special. The time invested in understanding each component and perfecting the techniques pays dividends in the final result.