When I first tasted authentic karaage at a tiny izakaya in Tokyo’s Shibuya district, I knew my life had changed forever. The golden, impossibly crispy exterior gave way to the most tender, juicy chicken I’d ever experienced. The flavor was complex yet comforting—a perfect balance of soy, ginger, and garlic that seemed to dance on my tongue. That moment sparked my obsession with perfecting this iconic Japanese dish.
Karaage isn’t just fried chicken; it’s a culinary art form that represents the Japanese philosophy of taking simple ingredients and elevating them to extraordinary heights. Unlike its Western counterparts, karaage achieves its signature texture through a unique marinating process and a special coating technique that creates an incredibly light yet shatteringly crisp exterior.
Understanding Karaage: More Than Just Fried Chicken
Karaage (唐揚げ) literally translates to “Chinese-style deep frying,” though the dish has evolved into something distinctly Japanese. The technique involves marinating bite-sized pieces of chicken in a flavorful mixture before coating them lightly in potato starch or cornstarch and frying until golden perfection.
Key Characteristics of Authentic Karaage:
- Texture: Exceptionally crispy exterior with incredibly tender, juicy interior
- Flavor Profile: Savory-sweet with prominent notes of soy sauce, ginger, and garlic
- Coating: Light, almost translucent coating that shatters when bitten
- Size: Bite-sized pieces, typically 1-2 inches
- Color: Golden amber to deep golden brown
The magic of karaage lies in its simplicity. While the ingredient list is short, each component plays a crucial role in creating the final masterpiece. The marinade doesn’t just add flavor—it tenderizes the meat and creates the foundation for that incredible taste that keeps you reaching for piece after piece.
Essential Ingredients for Perfect Karaage
Main Ingredients
| Ingredient | Quantity | Purpose | Substitutions |
|---|---|---|---|
| Chicken thighs (boneless, skinless) | 2 lbs (900g) | Main protein – provides juiciness | Chicken breast (less ideal) |
| Soy sauce | 3 tablespoons | Primary umami flavor | Tamari for gluten-free |
| Sake | 2 tablespoons | Tenderizes meat, adds depth | Dry sherry or omit |
| Fresh ginger (grated) | 1 tablespoon | Aromatic base, tenderizer | Ground ginger (1 teaspoon) |
| Garlic (minced) | 2 cloves | Flavor foundation | Garlic powder (1/2 teaspoon) |
| Potato starch | 1/2 cup | Creates crispy coating | Cornstarch |
| Vegetable oil | 4-6 cups | For deep frying | Canola or peanut oil |
Optional Flavor Enhancers
| Ingredient | Quantity | Effect | When to Use |
|---|---|---|---|
| Sesame oil | 1 teaspoon | Nutty aroma | For richer flavor |
| White pepper | 1/4 teaspoon | Subtle heat | Traditional touch |
| Sugar | 1/2 teaspoon | Balances saltiness | If soy sauce is very salty |
| Egg white | 1 | Helps coating adhere | For extra crispiness |
I’ve experimented with countless variations over the years, and I can confidently say that chicken thighs are non-negotiable. The higher fat content ensures the meat stays incredibly juicy even after the double-frying process. I’ve tried using chicken breast, but it simply doesn’t compare—the meat becomes dry and lacks that succulent quality that makes karaage so addictive.
The Science Behind Perfect Karaage
Understanding the science behind karaage transforms you from someone who follows a recipe to someone who truly masters the technique. The marinade serves multiple purposes beyond flavor. The enzymes in ginger and the acidity in sake work together to break down tough muscle fibers, creating that incredibly tender texture.
Marinade Components and Their Functions:
- Soy Sauce: Provides glutamates for umami flavor and salt for seasoning
- Sake: Contains enzymes that tenderize proteins and adds complexity
- Ginger: Contains proteolytic enzymes that break down proteins
- Garlic: Adds aromatic compounds and antimicrobial properties
The coating is where karaage truly differentiates itself from other fried chicken styles. Potato starch creates a lighter, more delicate coating than wheat flour. When heated, it forms a network that’s both incredibly crispy and less dense than traditional flour coatings.

Mastering the Karaage Technique
Step 1: Preparing the Chicken
I always start by examining my chicken thighs carefully. I remove any excess fat and cut the meat into uniform pieces, roughly 1.5 inches in size. Consistency is key—uniform pieces ensure even cooking and prevent some pieces from being overcooked while others remain underdone.
When cutting, I follow the natural seams in the meat. This technique, which I learned from a master chef in Kyoto, ensures each piece has the optimal texture. I never pound or flatten the chicken; the natural thickness creates those perfect juicy centers we’re after.
Step 2: The Marinade Process
Marinade Preparation Steps:
- Combine soy sauce, sake, grated ginger, and minced garlic in a large bowl
- Whisk until well combined and the ginger is evenly distributed
- Add chicken pieces and mix thoroughly with clean hands
- Ensure every piece is completely coated
- Cover and refrigerate for minimum 30 minutes, optimal 2-4 hours
The marinating time is crucial. I’ve tested everything from 15 minutes to overnight, and I’ve found that 2-4 hours provides the perfect balance. Less time doesn’t allow the flavors to penetrate deeply enough, while more than 6 hours can make the texture too soft.
During marination, I flip the chicken every hour to ensure even flavor distribution. This extra step makes a noticeable difference in the final product.
Step 3: The Coating Process
Proper Coating Technique:
- Remove chicken from marinade, reserving excess liquid
- Place potato starch in a large bowl
- Add chicken pieces to starch, tossing to coat evenly
- Shake off excess starch—the coating should be light and even
- Let coated chicken rest for 5 minutes before frying
I never discard the leftover marinade. Instead, I add a tablespoon to the potato starch, creating small clumps that add incredible texture to the final coating. This technique creates those beautiful, irregular surfaces that provide extra crispiness.

Step 4: The Double-Frying Method
The double-frying method is what elevates karaage from good to extraordinary. This technique, traditional to Japanese cooking, ensures perfect texture every time.
First Frying (170°F/175°C):
- Heat oil to exactly 340°F (170°C)
- Fry chicken pieces for 3-4 minutes
- Remove and drain on wire rack
- Rest for 3-5 minutes
Second Frying (185°C/365°F):
- Increase oil temperature to 365°F (185°C)
- Fry for additional 1-2 minutes until deep golden
- Remove immediately when color is achieved
- Drain on fresh wire rack
The first frying cooks the chicken through while creating the initial crust. The rest period allows the residual heat to finish cooking the interior gently. The second frying creates that signature shatteringly crisp exterior that makes karaage so special.
Temperature control is absolutely critical. I use a digital thermometer and adjust my heat constantly. Too low, and the coating becomes greasy; too high, and the exterior burns before the interior cooks properly.
Regional Variations and Personal Touches
During my travels throughout Japan, I’ve discovered fascinating regional variations that showcase the versatility of karaage. In Oita Prefecture, they add a touch of local citrus to the marinade. In Hokkaido, some chefs incorporate local dairy elements. These variations taught me that karaage is a canvas for creativity while maintaining its essential character.
Popular Regional Variations:
| Region | Unique Element | Flavor Profile | Best For |
|---|---|---|---|
| Oita | Kabosu citrus zest | Bright, tangy | Summer serving |
| Kyushu | Slightly sweeter marinade | Balanced sweet-savory | Family gatherings |
| Tokyo | Additional garlic | More pronounced savory | Izakaya-style |
| Osaka | Lighter coating | Extra crispy texture | Casual snacking |
My personal favorite variation involves adding a tiny amount of sesame oil to the marinade and finishing the cooked karaage with a light sprinkle of toasted sesame seeds. This addition doesn’t overpower the traditional flavors but adds a subtle nutty complexity that pairs beautifully with the ginger and garlic.
Troubleshooting Common Karaage Problems
Problem: Greasy, Heavy Coating
Causes and Solutions:
- Oil temperature too low: Maintain proper temperature with thermometer
- Overcrowding the pot: Fry in smaller batches
- Too much coating: Shake off excess starch before frying
- Inadequate draining: Use wire racks, not paper towels
Problem: Dry, Overcooked Interior
Causes and Solutions:
- Pieces cut too small: Maintain 1.5-inch minimum size
- Oil temperature too high: Monitor temperature constantly
- Single frying method: Always use double-frying technique
- Insufficient marination: Allow minimum 30 minutes, optimal 2-4 hours
Problem: Bland Flavor
Causes and Solutions:
- Inadequate seasoning: Increase soy sauce gradually
- Poor quality ingredients: Use authentic Japanese soy sauce
- Insufficient marination time: Allow proper time for flavor penetration
- Wrong salt balance: Taste marinade and adjust
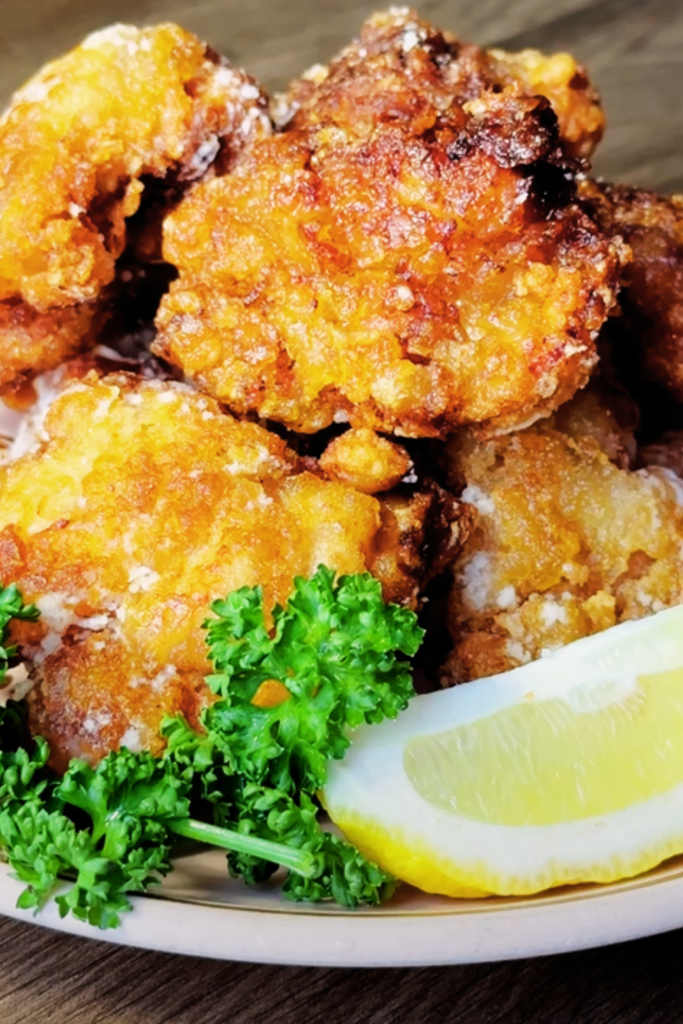
Serving Suggestions and Accompaniments
Karaage shines brightest when served immediately after frying, while the coating is at its crispiest. In Japan, it’s commonly accompanied by fresh lemon wedges and a small portion of mayonnaise for dipping.
Traditional Accompaniments:
- Lemon wedges: Essential for cutting through richness
- Japanese mayonnaise: Kewpie brand preferred for authentic taste
- Shredded cabbage: Provides fresh contrast and aids digestion
- Pickled vegetables: Adds acidic balance to the meal
Modern Serving Ideas:
- Over steamed rice: Creates a satisfying karaage bowl
- In bento boxes: Perfect for packed lunches
- With ramen: Adds protein to soup-based meals
- As bar snacks: Ideal with cold soft drinks or tea
I particularly enjoy serving karaage family-style with an assortment of small dishes. The contrast of temperatures and textures creates a memorable dining experience that encourages conversation and sharing.
Storage and Reheating Tips
While karaage is undoubtedly best fresh, proper storage and reheating techniques can help maintain quality for later enjoyment.
Storage Guidelines:
| Storage Method | Duration | Quality Level | Best Use |
|---|---|---|---|
| Room temperature | 2 hours maximum | Excellent | Immediate consumption |
| Refrigerator | 3-4 days | Good when reheated | Meal prep |
| Freezer | 1-2 months | Fair when reheated | Long-term storage |
Reheating Methods:
- Oven Method (Preferred): 350°F for 8-10 minutes
- Air Fryer: 375°F for 3-4 minutes
- Skillet: Medium heat with minimal oil, 2-3 minutes per side
Never use the microwave for reheating karaage—it destroys the crispy coating that makes this dish so special. The oven method, while taking longer, restores much of the original texture and prevents the coating from becoming soggy.
Nutritional Considerations and Modifications
Nutritional Profile (per 100g serving):
| Nutrient | Amount | % Daily Value |
|---|---|---|
| Calories | 285 | 14% |
| Protein | 22g | 44% |
| Fat | 18g | 28% |
| Carbohydrates | 8g | 3% |
| Sodium | 485mg | 21% |
For those seeking healthier alternatives, I’ve successfully adapted karaage for various dietary needs. Using an air fryer reduces oil content significantly while maintaining much of the signature texture. For gluten-free versions, ensure your soy sauce is tamari-based and use certified gluten-free potato starch.
Dietary Modifications:
- Lower sodium: Reduce soy sauce, increase other seasonings
- Gluten-free: Use tamari and certified starch
- Lower fat: Air fry at 380°F for 12-15 minutes
- Keto-friendly: Already naturally low in carbohydrates
Questions and Answers
Q: Can I use chicken breast instead of thighs for karaage?
While technically possible, I strongly recommend against using chicken breast. Thighs contain more fat and connective tissue, which keep the meat incredibly juicy during the double-frying process. Breast meat tends to become dry and lacks the rich flavor that makes karaage so addictive. If you must use breast meat, consider brining it first or reducing the cooking time significantly.
Q: What’s the difference between potato starch and cornstarch for coating?
Potato starch creates a lighter, more delicate coating that becomes incredibly crispy when fried. It has a more neutral flavor and creates those beautiful, almost translucent golden coatings you see in authentic karaage. Cornstarch works as a substitute but creates a slightly denser coating with a more pronounced flavor. For the most authentic results, always choose potato starch when available.
Q: How can I tell when the oil is at the right temperature without a thermometer?
While I always recommend using a thermometer for consistency, you can test oil temperature by dropping a small piece of coated chicken into the oil. At the correct temperature (340°F for first frying), it should sink briefly then immediately float to the surface while bubbling vigorously. If it sinks and stays down, the oil is too cool. If it bubbles frantically and browns immediately, it’s too hot.
Q: Why does my karaage coating fall off during frying?
Coating adhesion problems usually stem from excess moisture on the chicken surface or insufficient resting time after coating. Always pat the marinated chicken pieces dry before coating, and let the coated pieces rest for 5 minutes before frying. This allows the starch to hydrate slightly and adhere better. Also, ensure you’re not overcrowding the oil, which can cause temperature fluctuations.
Q: Can I prepare karaage in advance for a party?
Absolutely! You can complete the first frying up to 2 hours in advance, then do the second frying just before serving. This actually works beautifully for entertaining because the time-consuming first frying is done, and the final crisping takes only 1-2 minutes per batch. Keep the first-fried pieces at room temperature on wire racks—don’t cover them, as this will create moisture and soften the coating.
Q: What’s the best oil for frying karaage?
I prefer neutral oils with high smoke points like vegetable oil, canola oil, or peanut oil. These oils don’t compete with the delicate flavors in the marinade and can handle the high temperatures needed for proper frying. Avoid olive oil or other strongly flavored oils, as they can overpower the subtle complexity of authentic karaage. The oil should be fresh—reused oil can impart off-flavors and doesn’t achieve the same crispy results.
Q: How do I prevent my karaage from becoming too salty?
Saltiness in karaage typically comes from the soy sauce in the marinade. Different brands have varying sodium levels, so always taste your marinade before using it. If it seems too salty, dilute it with a small amount of water or sake. Remember that the chicken will absorb some of this flavor, and the coating will dilute it further. Start with less soy sauce and adjust upward rather than starting with too much and trying to fix it.
Mastering karaage isn’t just about following a recipe—it’s about understanding the harmony between ingredients, technique, and timing. Each time I make this dish, I’m reminded of that first transformative bite in Tokyo and how food can transport us across cultures and create lasting memories. The crispy, golden perfection of properly made karaage represents everything I love about Japanese cuisine: simplicity elevated to an art form, attention to detail, and respect for ingredients.
Whether you’re preparing karaage for a casual family dinner or an elaborate gathering, remember that the joy lies not just in the final product but in the process itself. Take time to appreciate the aromatics of ginger and garlic, the satisfying sizzle as the chicken hits the oil, and the anticipation as that perfect golden color develops. These moments of mindful cooking transform a simple recipe into a meaningful culinary experience.